
A crispy chicken dinner for picky eaters has to solve a small kitchen puzzle: the crust needs to crackle, the meat needs to stay juicy, and nothing on the plate can look suspicious. No onion chunks hiding in the sauce. No aggressive herbs. No green confetti someone will flick to the edge of the plate and refuse to discuss.
That is why thin cutlets matter so much here. A thick breast gives you that annoying race between a browned crust and dry chicken, and nobody wants to eat their way through a chalky center just because the outside looked promising. Slice the breasts into cutlets, keep the seasoning clean, and use a hot skillet plus the oven so the breading turns golden without turning into a greasy shell.
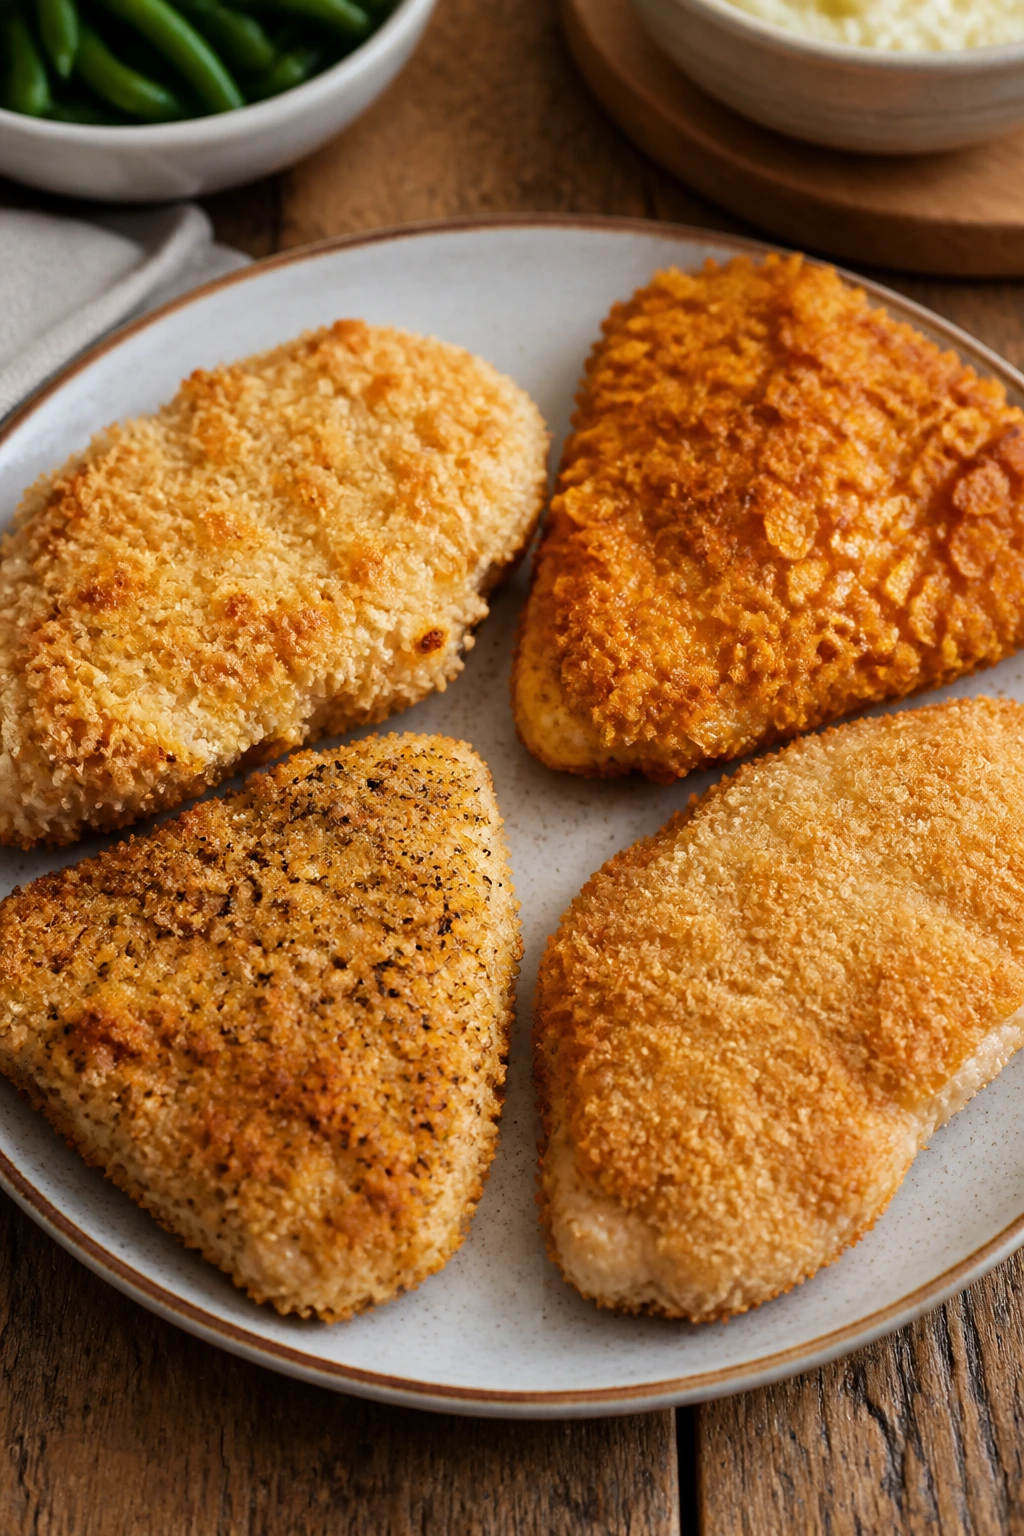
I keep this version intentionally plain in the right places. Garlic powder, sweet paprika, a little parmesan if your crowd is open to it, and panko for the crunch that sounds louder than it looks. The first bite should give you that neat little crackle, then the chicken should stay tender enough that nobody reaches for a glass of water halfway through. That’s the whole trick, really. Get the coating right, and the rest behaves.
Why This Crispy Chicken Dinner Works for Picky Eaters
Some dinners ask for a negotiation. This one doesn’t.
-
Short, familiar ingredients: You’re working with chicken, flour, eggs, panko, and a few pantry seasonings, so there’s nothing odd hiding in the breading.
-
Crunch without a fryer: A hot skillet and a brief oven finish build a crisp crust without making your kitchen smell like deep-fry oil for the next six hours.
-
Mild on purpose: Garlic powder and sweet paprika add depth without turning the chicken into something that tastes “too seasoned” for a cautious eater.
-
Fast enough for a weeknight window: Thin cutlets cook quickly, so you can move from raw chicken to plated dinner in about 40 minutes.
-
Sauce stays optional: Ketchup, ranch, honey mustard, or plain gravy can sit off to the side instead of soaking into the crust.
-
Leftovers still have a fighting chance: A hot oven or air fryer brings the crunch back better than a microwave ever will.
Fast Facts Before You Start
The stopwatch matters here. Thin chicken cutlets forgive very little, which is exactly why they’re useful on a busy evening: once the pan is hot, the chicken moves fast.
Yield: Serves 4
Prep Time: 25 minutes
Cook Time: 15 minutes
Total Time: 40 minutes
Difficulty: Beginner — the steps are simple, but you do need to bread the chicken carefully and watch the heat so the crumbs don’t burn before the meat cooks through.
Chill/Rest Time: 5 minutes after breading, plus 3 minutes after cooking
Best Served: Immediately, while the crust is still crisp and the chicken is juicy inside
The Short Ingredient List and Why Each Piece Matters
Clean Ingredient List
For the Chicken
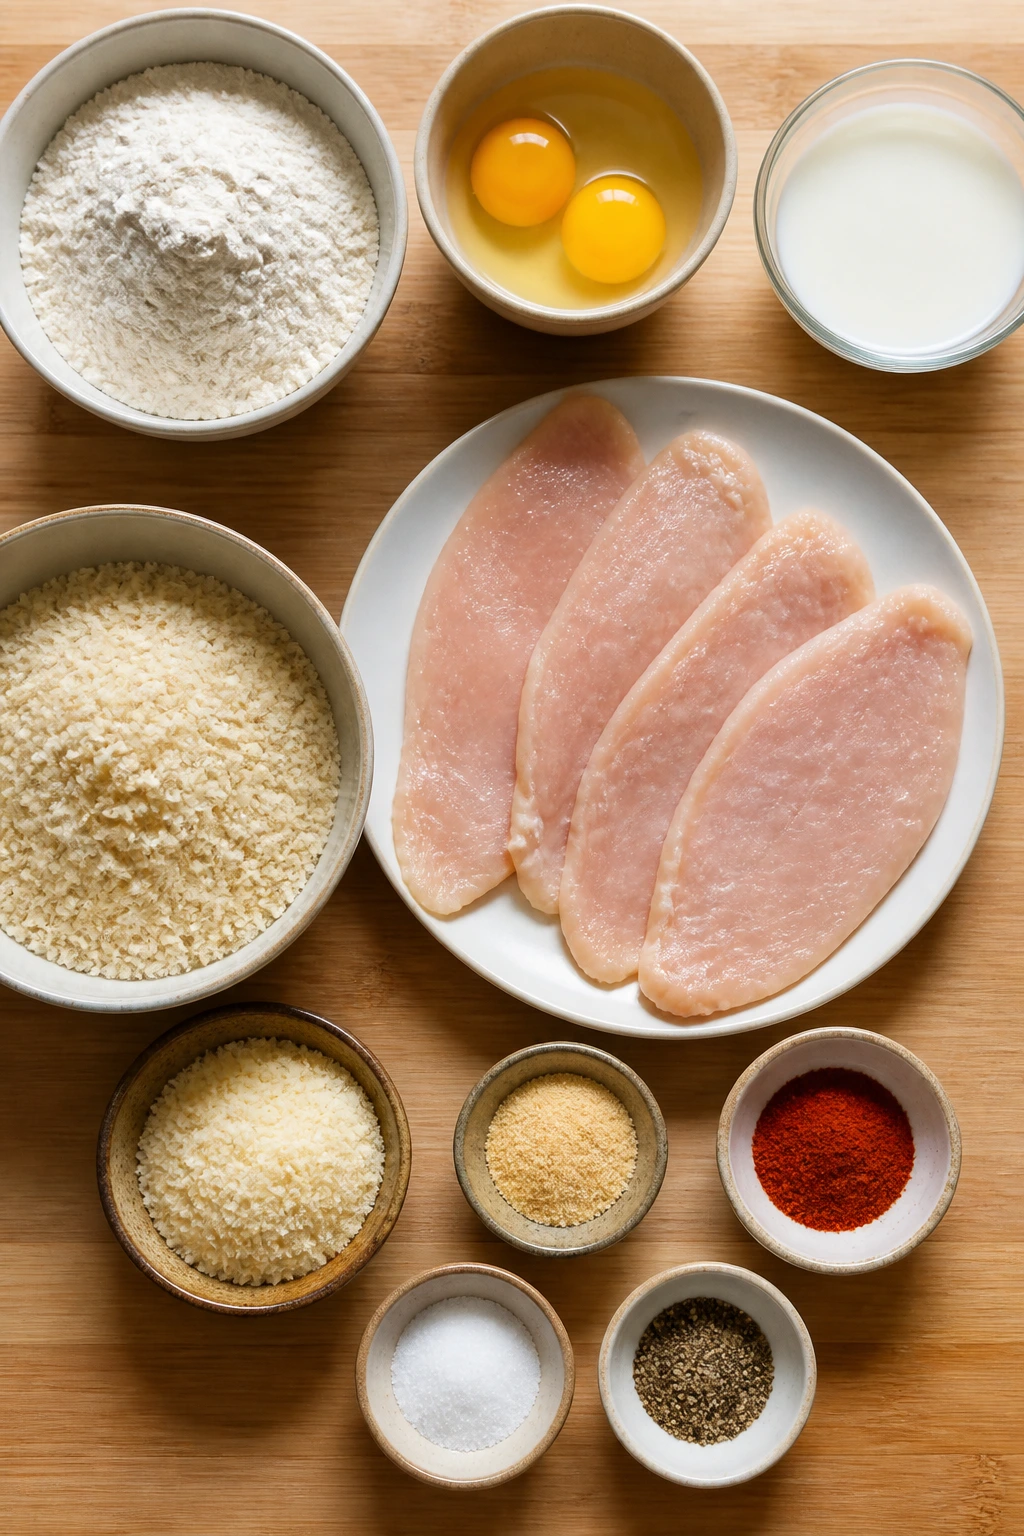
- 1 1/2 pounds boneless, skinless chicken breasts, about 3 medium breasts, sliced horizontally into 4 thin cutlets and pounded to 1/2 inch thick
- 1 teaspoon kosher salt
- 1/2 teaspoon black pepper
For the Breading Station
- 1/2 cup all-purpose flour
- 1 teaspoon garlic powder
- 1/2 teaspoon sweet paprika
- 2 large eggs
- 2 tablespoons milk
- 1 1/2 cups panko breadcrumbs
- 1/3 cup finely grated Parmesan cheese
For Cooking and Serving
- 3 tablespoons neutral oil, such as canola, avocado, or light olive oil
- Lemon wedges, for serving
Chicken Cutlets
What to use: 1 1/2 pounds boneless, skinless chicken breasts, split into 4 cutlets and pounded to about 1/2 inch thick.
Preparation: Slice each breast horizontally first, then cover the pieces with parchment or plastic wrap and pound them gently so the thick end and thin end are close to the same size.
Substitutions: Boneless chicken thighs work if that’s what you have, though they’ll need a little more time and won’t look quite as tidy on the plate. Chicken tenderloins also work if you want finger-food shape.
Tips: Pat the chicken dry before seasoning. Moisture is the enemy of a coating that sticks; if the surface feels damp, the flour turns pasty and the crumbs slide around later.
The Breading Trio
What to use: 1/2 cup all-purpose flour, 2 large eggs beaten with 2 tablespoons milk, and 1 1/2 cups panko breadcrumbs mixed with 1/3 cup finely grated Parmesan.
Preparation: Set the bowls in the order the chicken will move through them: flour first, egg second, crumbs third. Season the flour, not just the chicken, so the crust tastes seasoned all the way through.
Substitutions: Gluten-free flour and gluten-free panko both work. If you’re out of panko, crushed cornflakes make a louder, slightly sweeter crunch that many picky eaters accept without complaint.
Tips: Finely grated parmesan disappears into the crumbs better than shreds. Big shreds clump; fine shreds melt into the coating and help it brown without breaking apart.
Seasoning and Heat
What to use: 1 teaspoon kosher salt, 1/2 teaspoon black pepper, 1 teaspoon garlic powder, and 1/2 teaspoon sweet paprika.
Preparation: Mix the garlic powder and paprika into the flour so the seasoning starts at the bottom of the breading. Salt the chicken lightly before dredging, then let the rest come from the flour and parmesan.
Substitutions: If paprika puts people off, leave it out and add another 1/2 teaspoon of garlic powder. If your household prefers extra plain food, skip the paprika and keep the seasoning to salt, pepper, and garlic.
Tips: Use sweet paprika, not hot. This is not the place for surprise heat. The crust should taste warm and savory, not like it’s trying to prove something.
Cooking Oil and Finish
What to use: 3 tablespoons neutral oil and lemon wedges for the table.
Preparation: Heat the oil until it shimmers in the skillet. That’s the cue; you want the crust to start browning right away, not soak up oil like a sponge.
Substitutions: Avocado oil, canola oil, or a light olive oil all handle the heat well. Skip extra-virgin olive oil for this one if you’re cooking on the stove — it’s too precious for a hot breading job and not the best fit for the heat.
Tips: Don’t starve the pan. Too little oil gives you dry, patchy crumbs; too much makes the crust greasy. A thin, even layer across the bottom is the sweet spot.
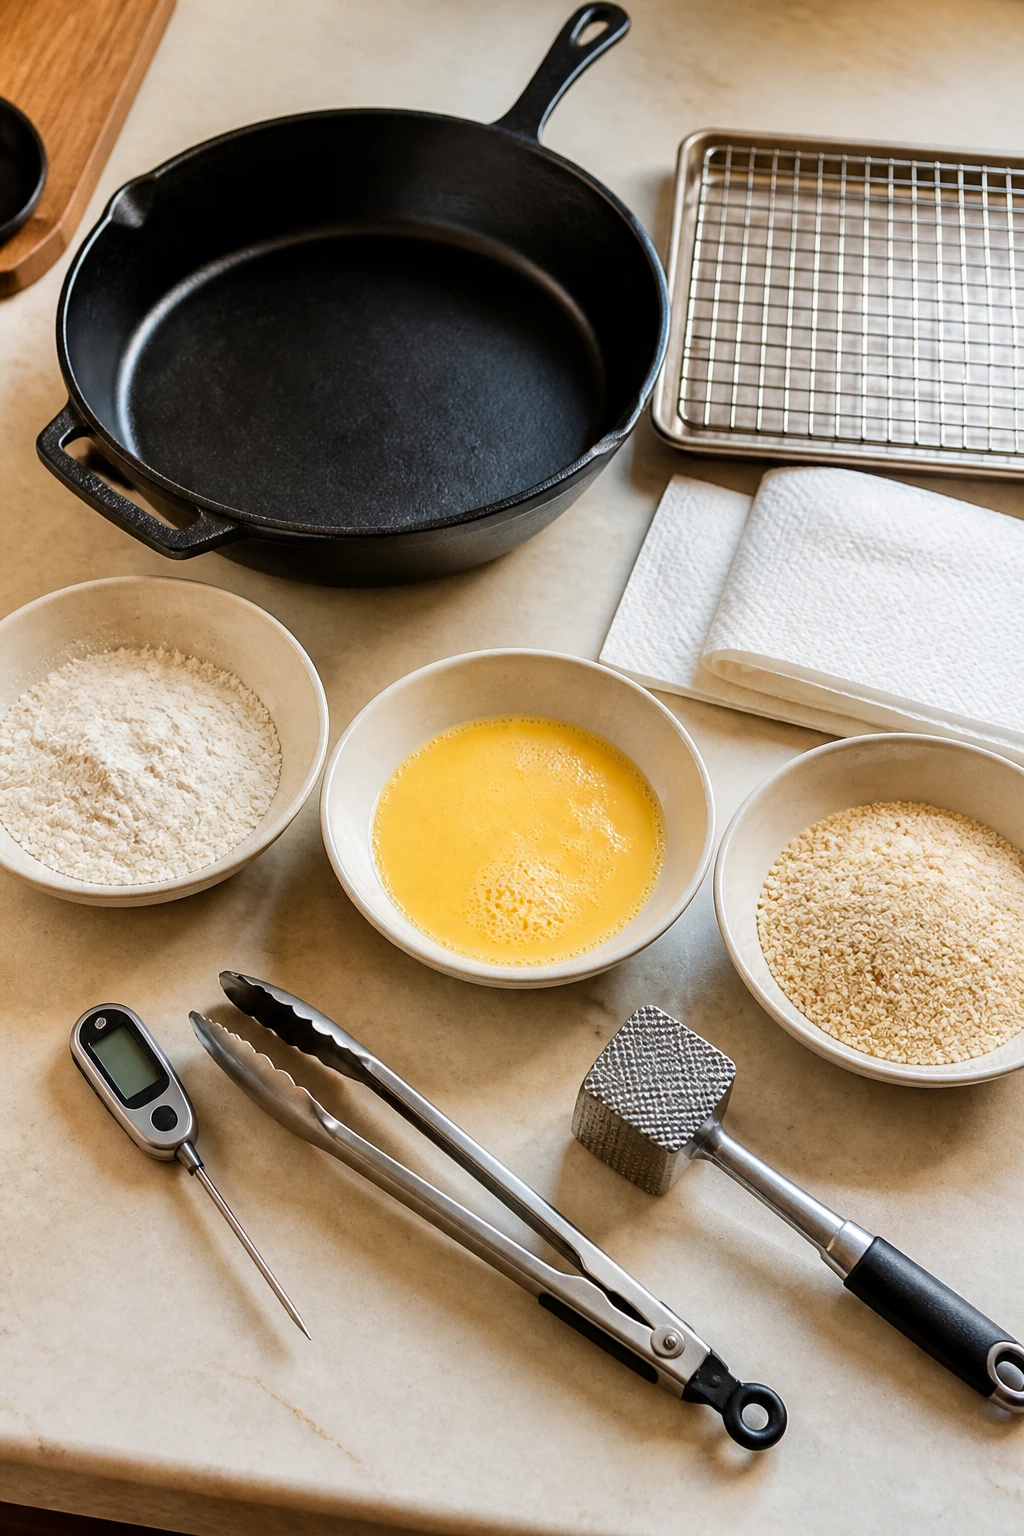
The Gear That Makes the Crust Behave
A breaded chicken dinner gets easier when the setup is clean. Messy stations lead to flour clumps on the counter, crumbs in the egg bowl, and chicken that looks like it went through a storm before it hit the pan.
-
12-inch oven-safe skillet, preferably cast iron or heavy stainless steel — This gives you a strong sear on the stove and a safe transfer into the oven without changing pans.
-
3 shallow bowls or pie plates — One each for flour, egg, and crumbs keeps the coating process orderly and fast.
-
Instant-read thermometer — Chicken is done at 165°F in the thickest part. Guessing is how you get dry cutlets or a nervous second round in the oven.
-
Tongs — Easier than forks and less likely to tear the breading off when you flip.
-
Meat mallet or rolling pin — Either one works for pounding the cutlets to even thickness.
-
Paper towels — Dry chicken bread better. No clever workaround beats this boring little step.
-
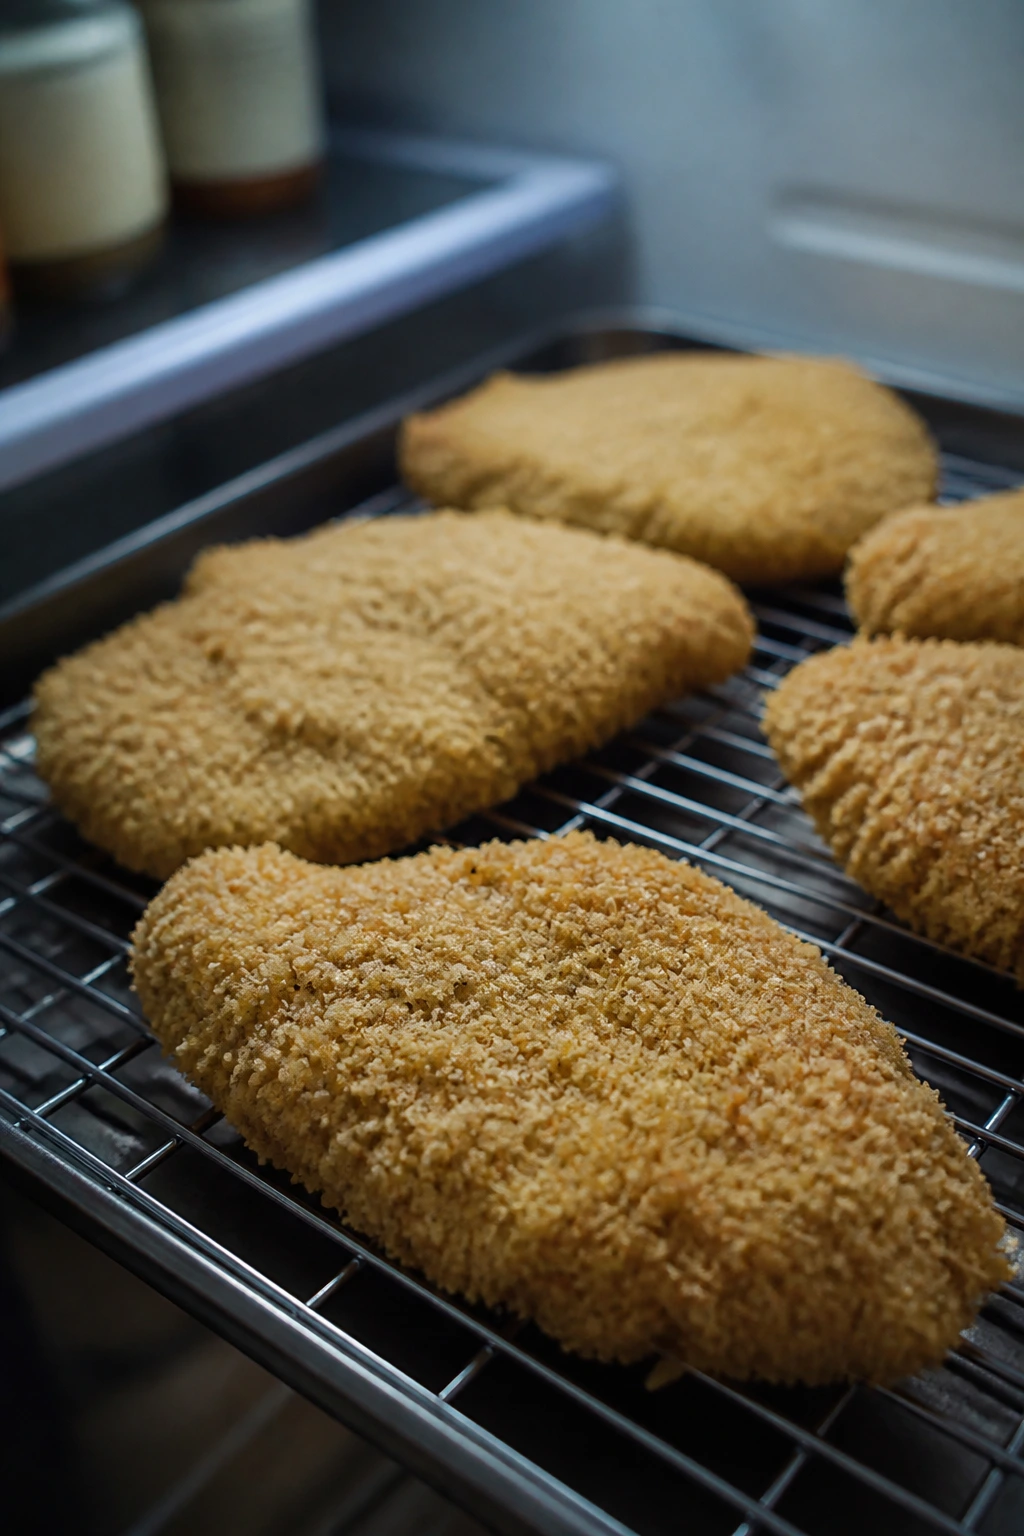
Wire rack set over a rimmed sheet pan — Useful if you need to rest the cutlets before serving or keep finished pieces crisp while the rest cook.
-
Sharp chef’s knife — A clean slice through the chicken breast gives you neat cutlets instead of ragged, uneven pieces.
The Skillet-to-Oven Method for a Crisp, Juicy Crust
Prep the Chicken:
-
Preheat the oven to 400°F (200°C) and set a rack in the center position. If your skillet is oven-safe, place it nearby so the transfer is easy once the chicken is browned.
-
Slice the chicken breasts horizontally into 4 cutlets, then lay them between two sheets of parchment or inside a zip-top bag and pound them to an even 1/2 inch thickness. Pat both sides dry with paper towels, then season lightly with the salt and pepper.
-
Set up three shallow bowls. In the first, whisk together the flour, garlic powder, and paprika. In the second, beat the eggs with the milk until smooth. In the third, mix the panko and Parmesan until the crumbs look evenly flecked.
Bread the Cutlets:
-
Dredge one cutlet in the flour mixture, turning to coat every surface, then shake off the excess. Dip it into the egg mixture and let the extra drip off for a second or two. Press it into the panko mixture, turning and patting so the crumbs cling to the edges as well as the flat sides.
-
Set the breaded cutlet on a plate or wire rack and repeat with the rest. Let the coated chicken sit for 5 minutes before cooking. Do not skip this rest. The crumbs hydrate just enough to stick instead of falling into the pan.
Cook and Finish:
-
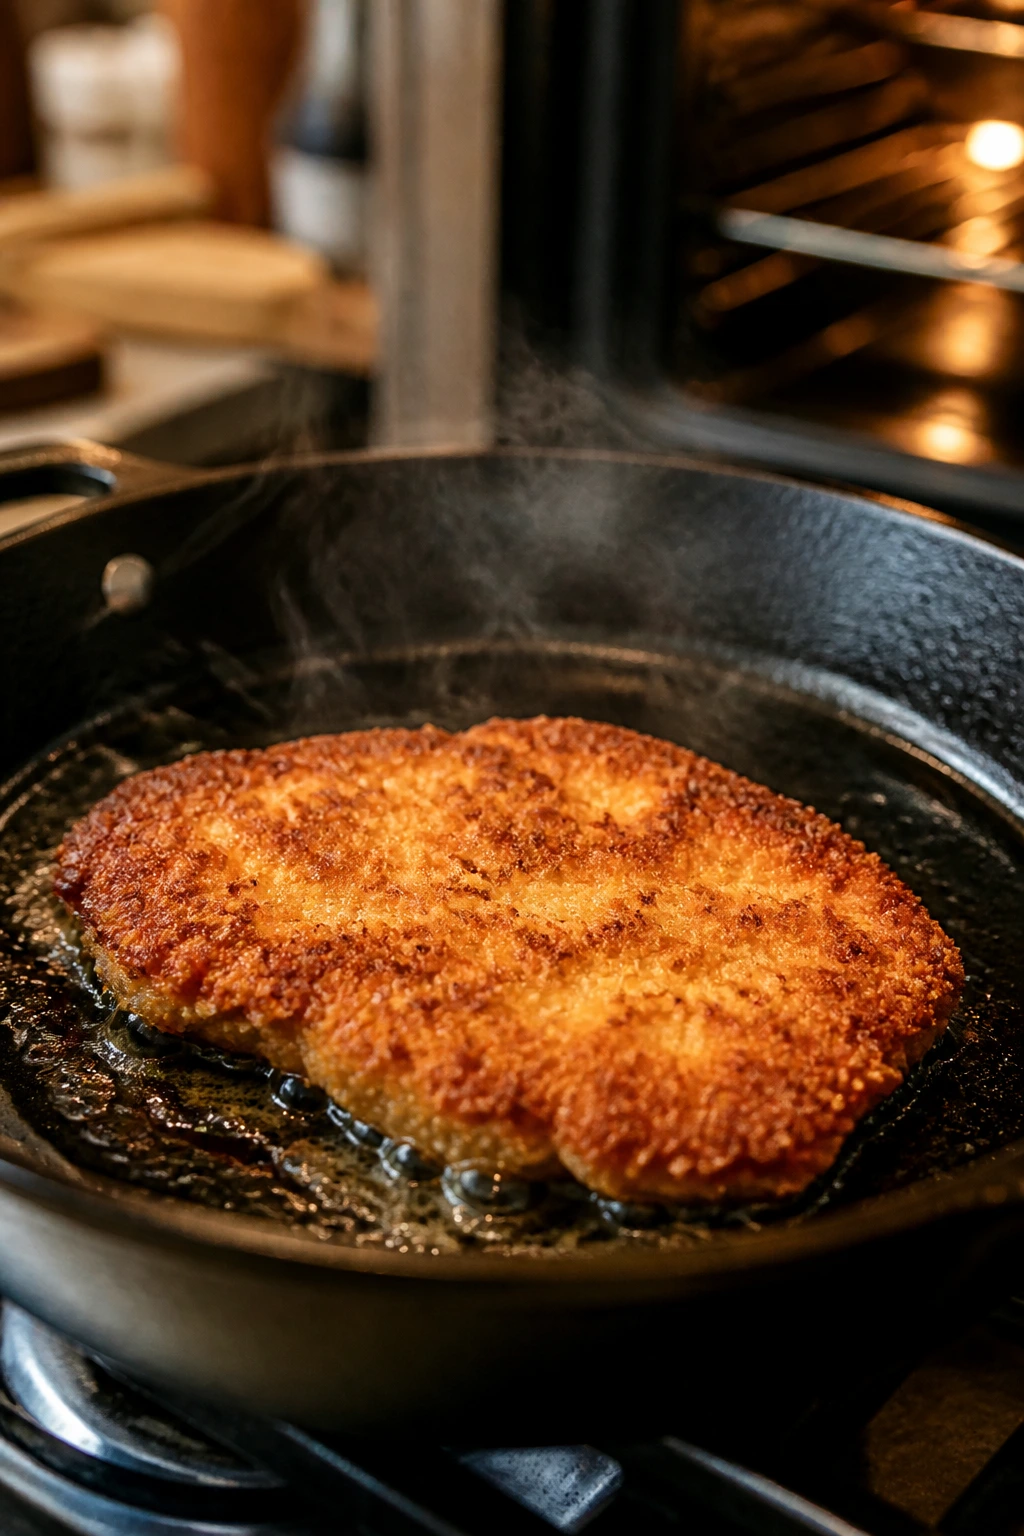
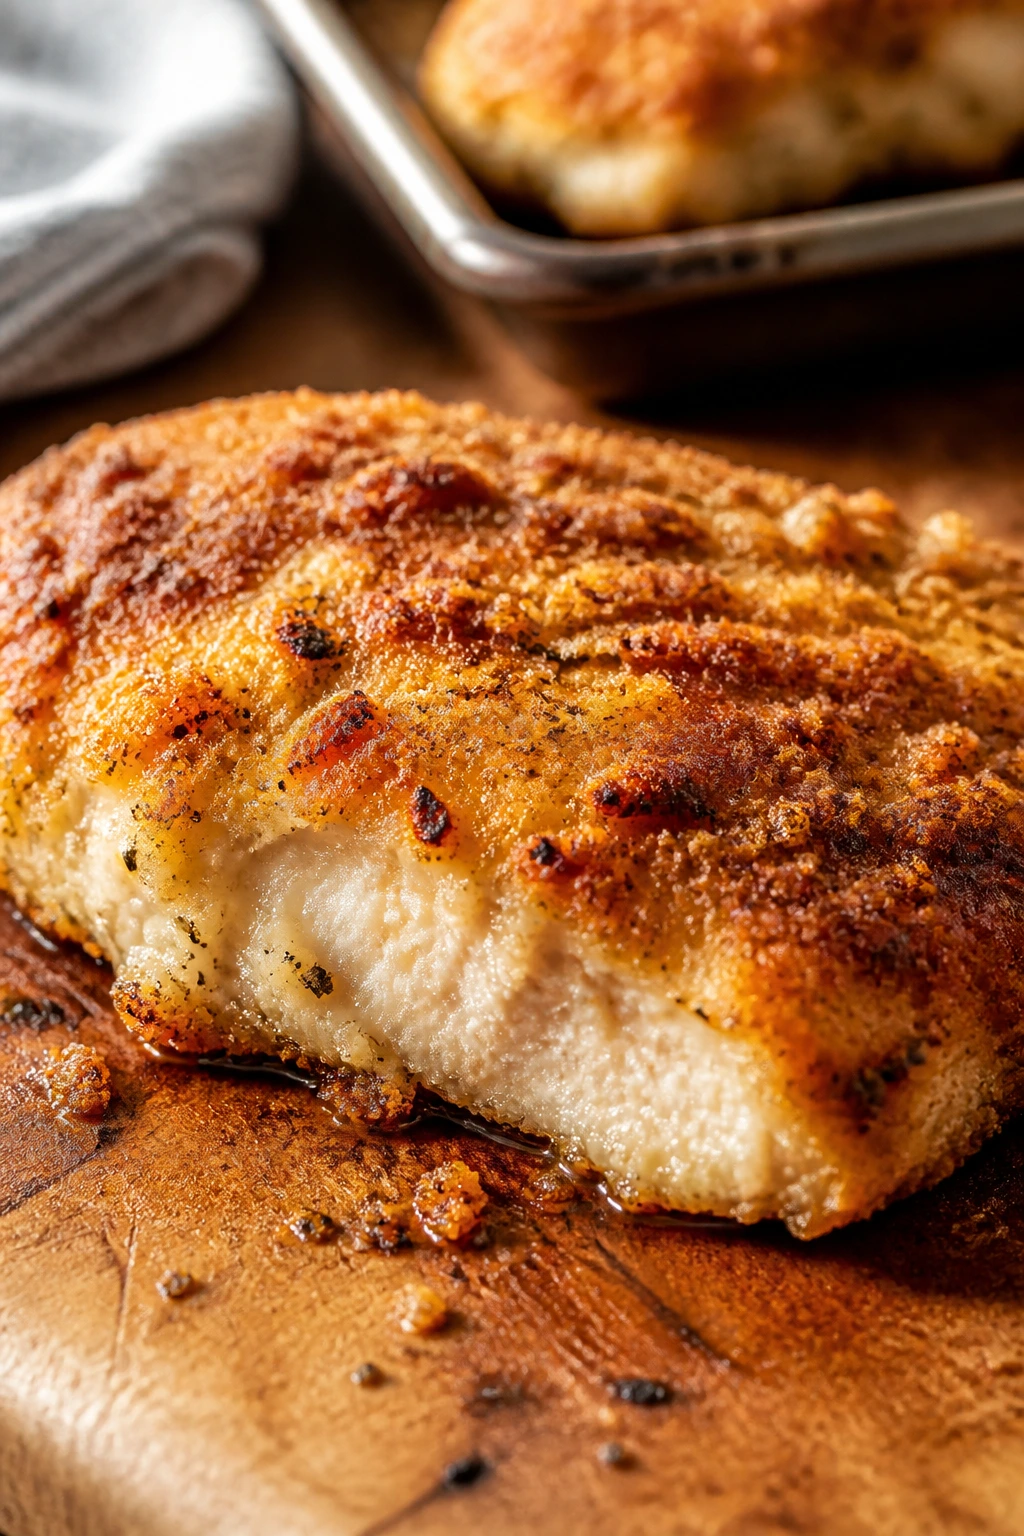
Heat the oil in a 12-inch oven-safe skillet over medium heat until it shimmers and moves easily across the pan. Add the cutlets in a single layer, leaving space around each one. Cook for 2 to 3 minutes on the first side, until the bottom is deep golden and the crust lifts cleanly when you nudge it with tongs.
-
Flip the cutlets gently, then transfer the whole skillet to the oven. Bake for 6 to 8 minutes, until the chicken reaches 165°F at the thickest part and the crust is crisp and brown. If your skillet is not oven-safe, move the chicken to a wire rack set over a rimmed sheet pan and bake there instead.
-
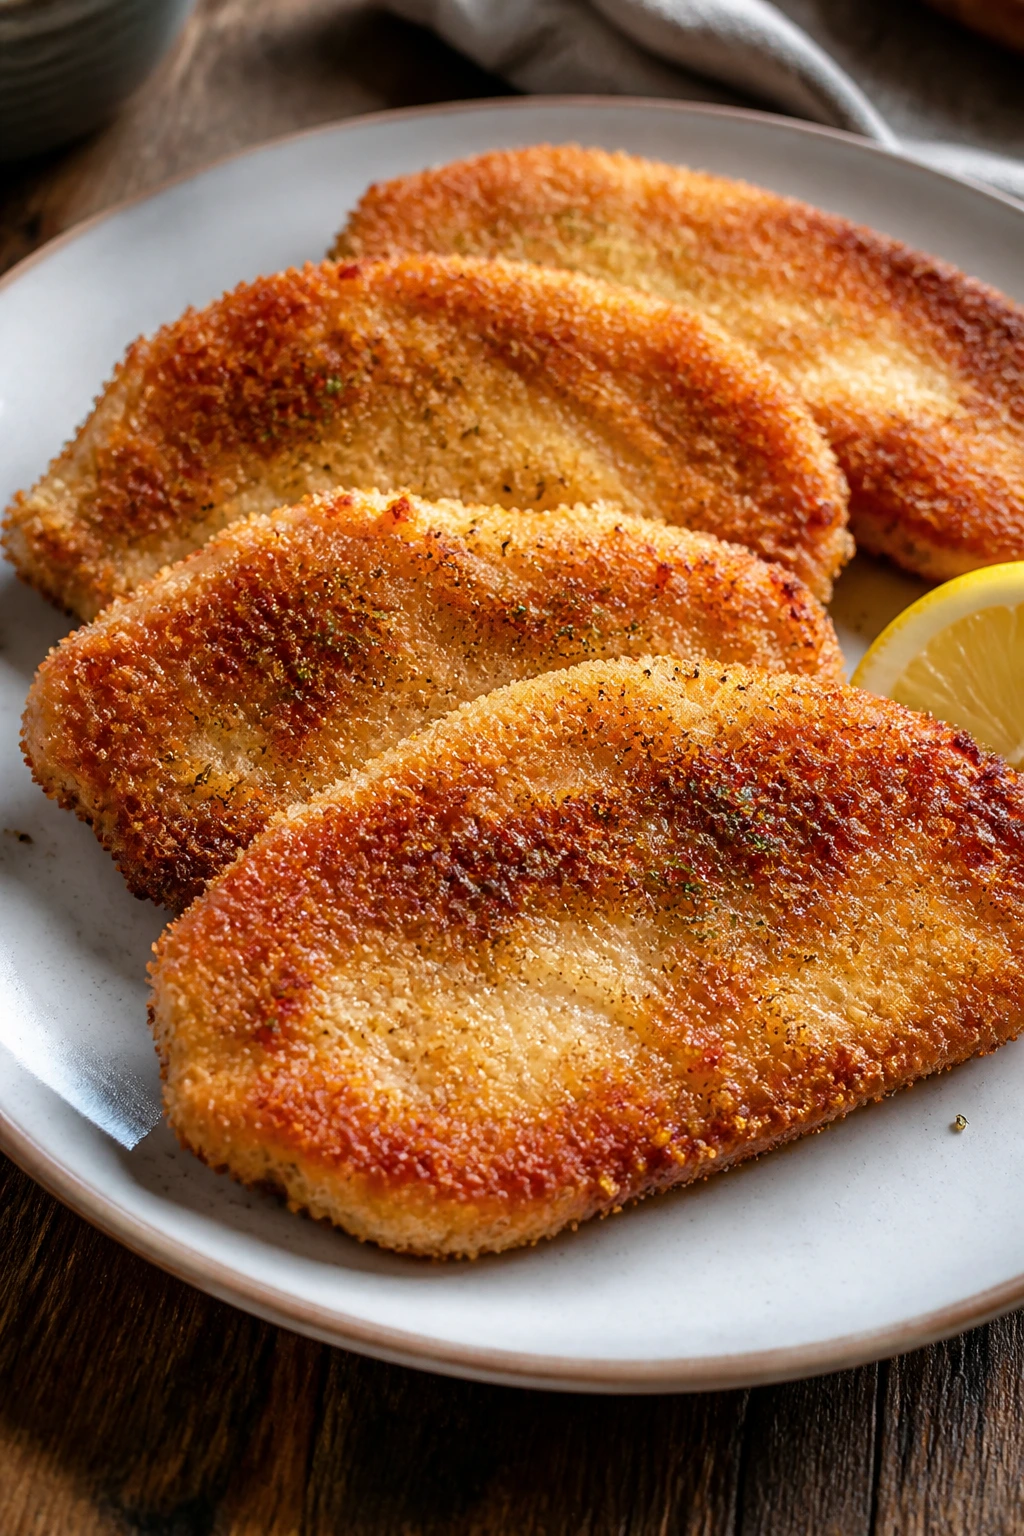
Let the chicken rest for 3 minutes before serving. Add lemon wedges at the table. If the crust looks a little pale after the oven finish, give it 1 minute under the broiler, watching like a hawk.
How to Serve It on a Weeknight Table
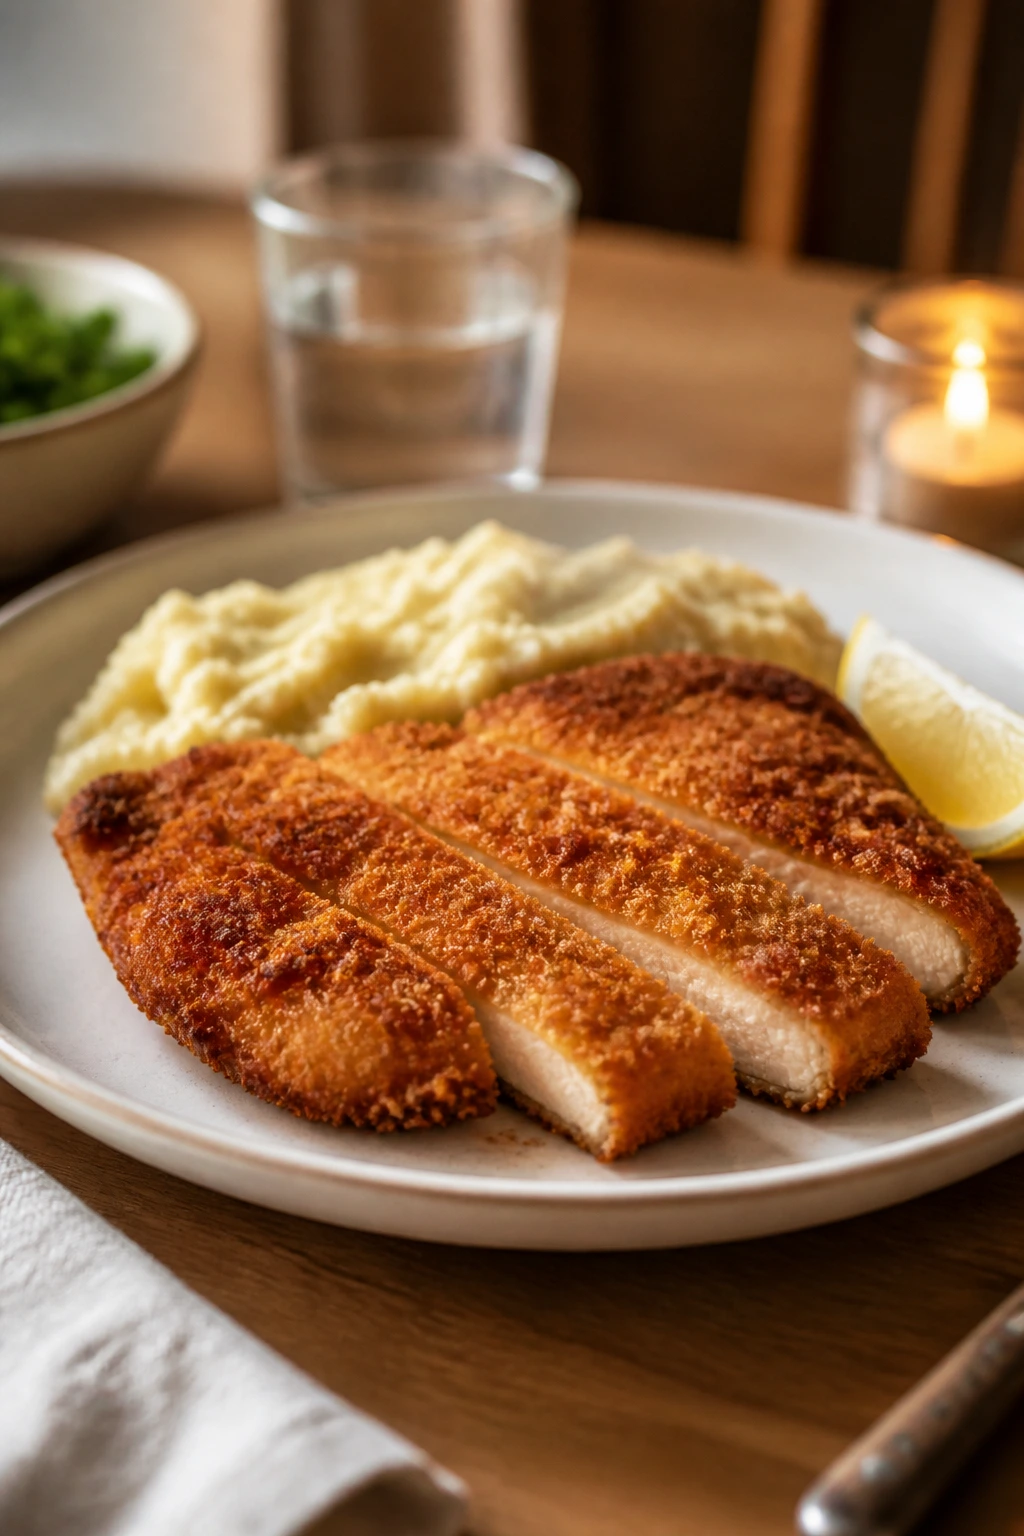
Presentation: Slide each cutlet onto a warm plate at a slight angle so the golden crust shows. If you’re feeding people who prefer plain food, keep the plate uncluttered: chicken, a simple side, and a lemon wedge is enough. No parsley confetti needed unless your table actually likes it.
Accompaniments: Buttered egg noodles, mashed potatoes, rice, peas, roasted carrots, or a quick cucumber salad all sit happily beside this chicken. I like something soft next to the crunch — mashed potatoes do that well — because the contrast makes the coating feel even crisper.
Portions: One average cutlet serves one adult; half a cutlet is usually enough for younger kids, especially if there are noodles or potatoes on the side. If you want a fuller dinner, plan on 1 1/2 cutlets per hungry adult and an extra side.
Beverage Pairing: Sparkling water with lemon keeps the plate light and clean. For a grown-up meal, a crisp pilsner or a dry riesling works nicely without overpowering the breading. Unsweetened iced tea is the quiet, reliable option that never argues with chicken.
Small Tweaks That Make the Chicken Even Better
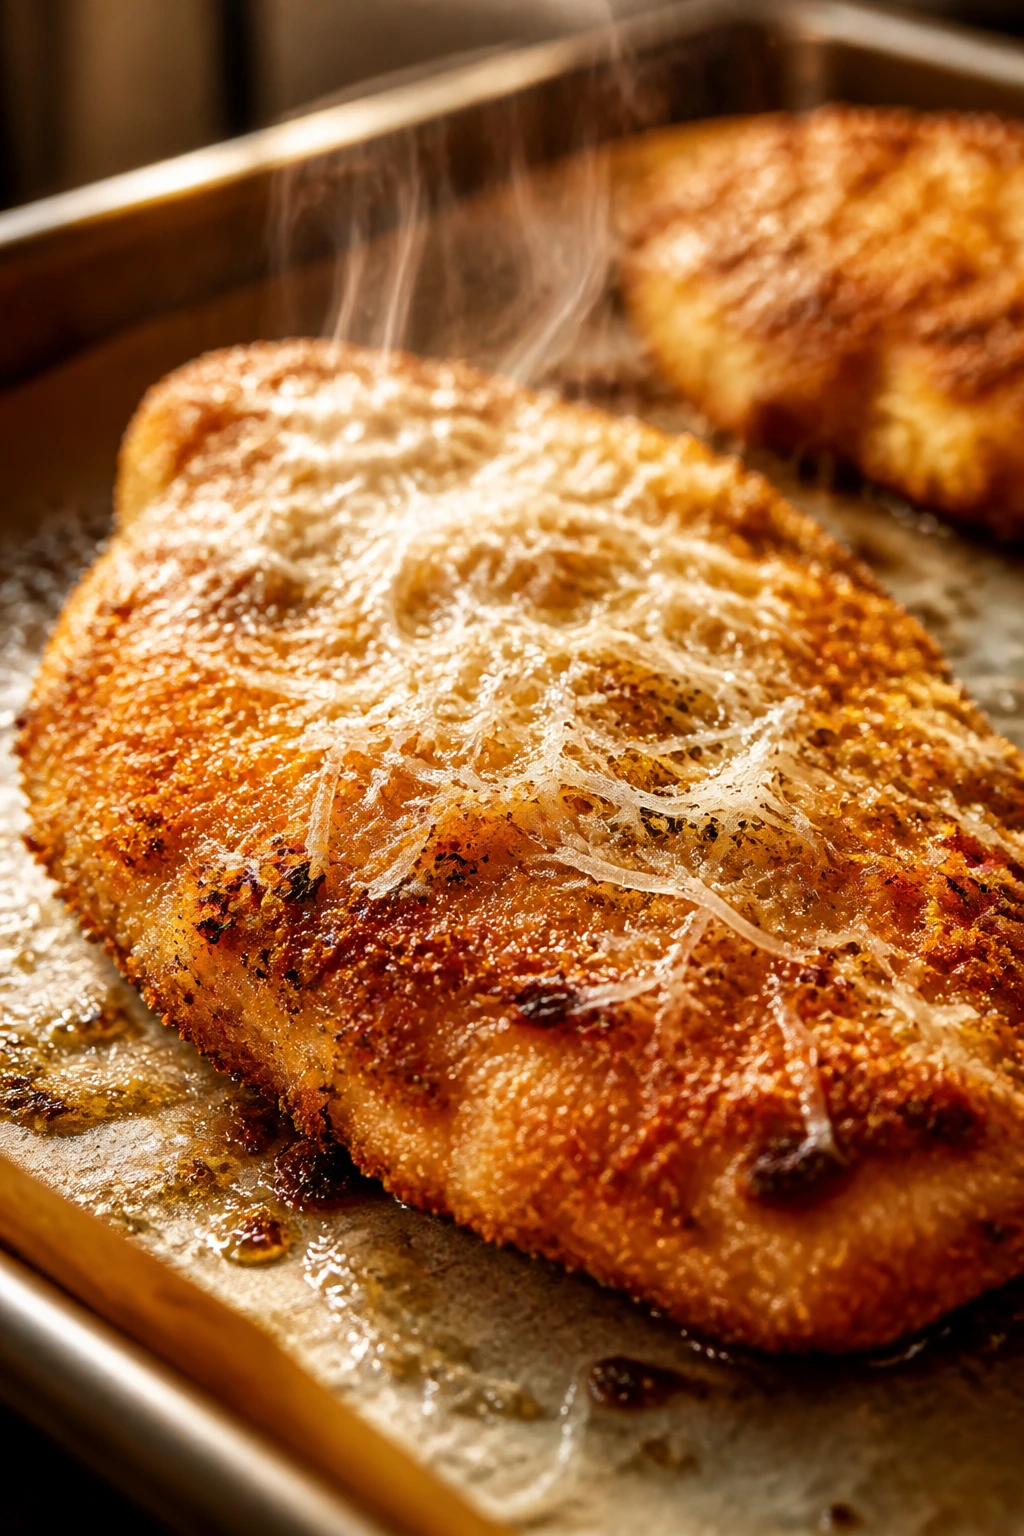
Flavor Enhancement: A tiny extra shower of finely grated Parmesan over the cutlets right after they come out of the oven adds salt and gives the crust a sharper savory edge. Do it while the chicken is hot so the cheese melts into the breading instead of sitting on top like dust.
Customization: If your household sees paprika as a warning sign, leave it out and use an extra 1/2 teaspoon of garlic powder. If you want a richer crust, add 2 more tablespoons of Parmesan to the panko, but keep it finely grated or the coating gets patchy.
Time-Saver: Bread the chicken earlier in the day and leave it on a wire rack in the fridge for up to 8 hours. The surface dries a little, which sounds wrong and feels wrong, but it actually helps the coating cling and brown.
Serving Suggestions: Put dips in small bowls off to the side instead of pouring anything over the chicken. Kids who want control usually eat more when they can decide whether a bite gets ketchup, ranch, or nothing at all.
Where the Crunch Usually Goes Wrong
Most breaded chicken problems start before the pan gets hot. The pan gets blamed. The chicken gets blamed. Usually the real issue is one of these:
-
Starting with wet chicken: If the surface is damp, the flour turns gummy and the coating slides around. Pat the cutlets dry with paper towels before they hit the flour bowl.
-
Leaving the breasts too thick: Thick chicken goes dark on the outside before it cooks through, and then you’re forced to choose between pale crumbs and dry meat. Slice and pound to an even 1/2 inch so the crust and the center finish together.
-
Crowding the skillet: Too many cutlets in one pan drops the heat and creates steam. The crust softens instead of browning. Cook in batches if needed; space is worth more than speed here.
-
Flipping too early: If the crust tears or sticks when you try to turn it, it wasn’t ready. Wait until the bottom is deep gold and the cutlet releases with a little nudge.
-
Chasing color instead of temperature: A brown crust does not guarantee cooked chicken. Use the thermometer and pull the chicken at 165°F. That little number saves you from either dry meat or another round in the oven.
-
Using heat that’s too low: Cool oil turns the crumbs dull and greasy. The oil should shimmer when the chicken goes in. If it looks lazy in the pan, wait a bit longer.
Easy Variations That Still Stay Picky-Eater Friendly
Air-Fryer Crunch Cutlets: Bread the chicken the same way, spray both sides lightly with oil, and cook in a preheated air fryer at 400°F for 8 to 10 minutes, flipping halfway. The crust comes out drier and a touch more delicate than skillet-and-oven chicken, but the cleanup is easier and the cooking is almost hands-off.
Cornflake Crunch: Swap the panko for 1 1/2 cups finely crushed cornflakes. The coating gets a slightly sweeter, louder crunch that many kids love, especially if they’re suspicious of anything that tastes too “breaded” or savory.
Gluten-Free Dinner Cutlets: Use a gluten-free all-purpose flour blend and gluten-free panko, or crushed cornflakes if you already know the household likes them. Keep the seasoning and technique the same; gluten-free crumbs usually need the same resting time before cooking so they don’t fall off.
Plain-Jane Parmesan-Free Version: Leave out the Parmesan and add an extra pinch of salt plus a little more garlic powder. This one is useful if dairy isn’t welcome or if you’re cooking for someone who likes their chicken plain enough to dunk into ketchup without debate.
Chicken Finger Night: Cut the chicken into strips instead of cutlets and shorten the oven finish by a couple of minutes. Strip shape makes the chicken feel more casual and more dip-friendly, which is exactly the point for many picky eaters.
Make-Ahead, Storage, and Reheating That Keeps the Crust Alive
Breaded chicken has one enemy that shows up everywhere: steam. Put hot cutlets into a sealed container and the crust softens almost immediately, so cooling matters.
Make-ahead: You can slice, pound, and bread the chicken up to 8 hours ahead. Set the breaded cutlets on a wire rack or plate in the fridge, uncovered or loosely covered, so the crust has a chance to dry and cling. That dry chill helps, which feels backwards until you cook it.
Refrigerator storage: Leftover cooked chicken keeps for 3 to 4 days in an airtight container. Let it cool on a rack first, not on a flat plate, or the bottom will steam and go soft.
Freezer storage: Cooked cutlets freeze for up to 2 months. Wrap them individually, freeze them in a single layer first, then move them to a freezer bag so the crust doesn’t get battered by other frozen items. For uncooked breaded chicken, freeze the cutlets on a tray until firm and cook from frozen or thaw overnight in the fridge; give them a few extra minutes in the oven if they start cold.
Reheating: The best comeback happens in a 375°F to 400°F oven or an air fryer for 8 to 12 minutes, depending on thickness, until the center is hot and the crust is crisp again. Set the chicken on a rack if you have one. A microwave will warm it, sure, but the breading turns floppy and sad fast, and there’s no polite way to describe that.
Questions Parents and Home Cooks Ask Most
Can I use chicken thighs instead of breasts?
Yes, boneless thighs work, and they stay juicy even if you miss the timing by a minute or two. They’re less uniform in shape, though, so the breading can look a little more rustic, and they usually need a bit more time in the oven.
Do I really need panko?
Panko gives you the lightest, crunchiest crust because the flakes are larger and drier than standard breadcrumbs. Regular breadcrumbs can work in a pinch, but they compress into a denser shell and don’t give that same clean crackle when you bite in.
Can I bake the chicken without searing it first?
You can, but the crust won’t be as deep and crisp. If you want a no-stovetop version, bake on a rack at 425°F and spray or drizzle the breaded chicken with oil before it goes in, then flip halfway through so both sides brown.
What if the breading falls off while I’m cooking?
That usually means the chicken was wet, the coating was pressed on too loosely, or the cutlet was moved before the first side set. Dry the chicken better, let the breaded cutlets sit for 5 minutes before cooking, and wait until the crust releases on its own before flipping.
Can I make this ahead for an after-school dinner?
Yes. Bread the cutlets in the morning or early afternoon, then chill them on a rack in the fridge. Cook them straight from the fridge when you’re ready; if they’re very cold, add a minute or so to the oven finish.
What sauce works best if my kids want one?
Keep it on the side. Ketchup, honey mustard, ranch, or even a little gravy all work, and placing the sauce beside the chicken instead of on top keeps the crust crisp for the people who don’t want their breading wet.
How do I know the chicken is done without cutting into it?
Use an instant-read thermometer and check the thickest part of the cutlet. You’re looking for 165°F. That’s the cleanest answer and the one that keeps you from guessing at a piece of chicken that’s too thick for the clock.
Can I freeze the breaded chicken before cooking it?
Yes, and it’s a useful move if you want to prep ahead. Freeze the breaded cutlets on a tray until solid, then store them in a freezer bag; cook from frozen or thaw them overnight in the fridge and cook as written.
Why This One Stays in the Rotation
A good weeknight chicken dinner doesn’t need drama. It needs a crust that actually stays crisp, chicken that doesn’t dry out, and flavors that don’t send picky eaters into a suspicious silence.
This one gets there with ordinary ingredients and a method that behaves. Thin cutlets, a dry breading station, a hot skillet, and a short oven finish — that’s the whole playbook, and it works because each step fixes the exact thing that usually goes wrong with breaded chicken.
Crispy Chicken Dinner for Picky Eaters — Recipe Card
Recipe Name: Crispy Chicken Dinner for Picky Eaters
Description: Thin chicken cutlets with a crunchy panko-Parmesan crust, browned in a skillet and finished in the oven for a juicy center and crisp outside. Mild seasoning keeps it friendly for cautious eaters while still tasting like a real dinner.
Prep Time: 25 minutes
Cook Time: 15 minutes
Total Time: 40 minutes
Course: Main Course, Dinner
Cuisine: American
Servings: 4 servings
Calories: About 420 kcal per serving
Ingredients
For the Chicken
- 1 1/2 pounds boneless, skinless chicken breasts, about 3 medium breasts, sliced horizontally into 4 thin cutlets and pounded to 1/2 inch thick
- 1 teaspoon kosher salt
- 1/2 teaspoon black pepper
For the Breading Station
- 1/2 cup all-purpose flour
- 1 teaspoon garlic powder
- 1/2 teaspoon sweet paprika
- 2 large eggs
- 2 tablespoons milk
- 1 1/2 cups panko breadcrumbs
- 1/3 cup finely grated Parmesan cheese
For Cooking and Serving
- 3 tablespoons neutral oil, such as canola, avocado, or light olive oil
- Lemon wedges, for serving
Instructions
-
Preheat the oven to 400°F (200°C) and set a rack in the center. Slice the chicken breasts into 4 cutlets, pound to even 1/2 inch thickness, and pat dry. Season with the salt and pepper.
-
Set up three shallow bowls. Mix the flour, garlic powder, and paprika in the first bowl. Whisk the eggs and milk in the second. Combine the panko and Parmesan in the third.
-
Dredge each cutlet in flour, dip in egg, then press into the panko mixture so the crumbs coat both sides and the edges. Let the breaded cutlets rest for 5 minutes.
-
Heat the oil in a 12-inch oven-safe skillet over medium heat until shimmering. Add the cutlets in a single layer and cook for 2 to 3 minutes on the first side, until deep golden.
-
Flip the cutlets, then transfer the skillet to the oven and bake for 6 to 8 minutes, or until the chicken reaches 165°F in the thickest part.
-
Rest for 3 minutes, then serve with lemon wedges.
Notes: For a milder crust, leave out the paprika and add 1/2 teaspoon more garlic powder. Reheat leftovers on a rack in a 375°F to 400°F oven or air fryer for the best crunch.