
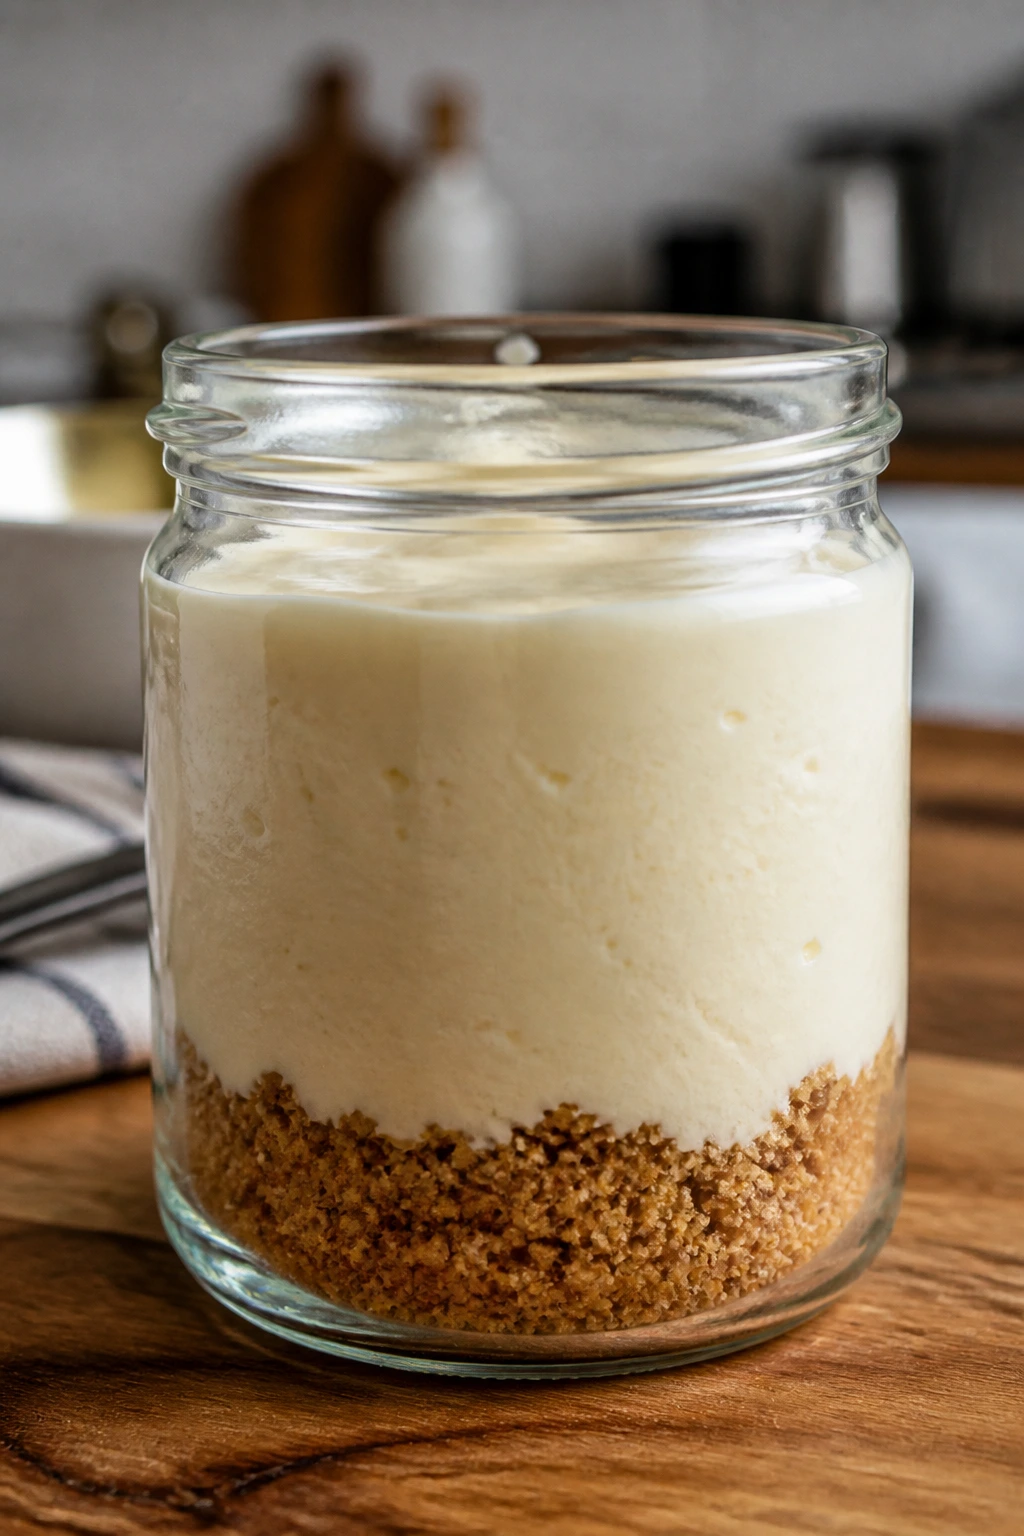
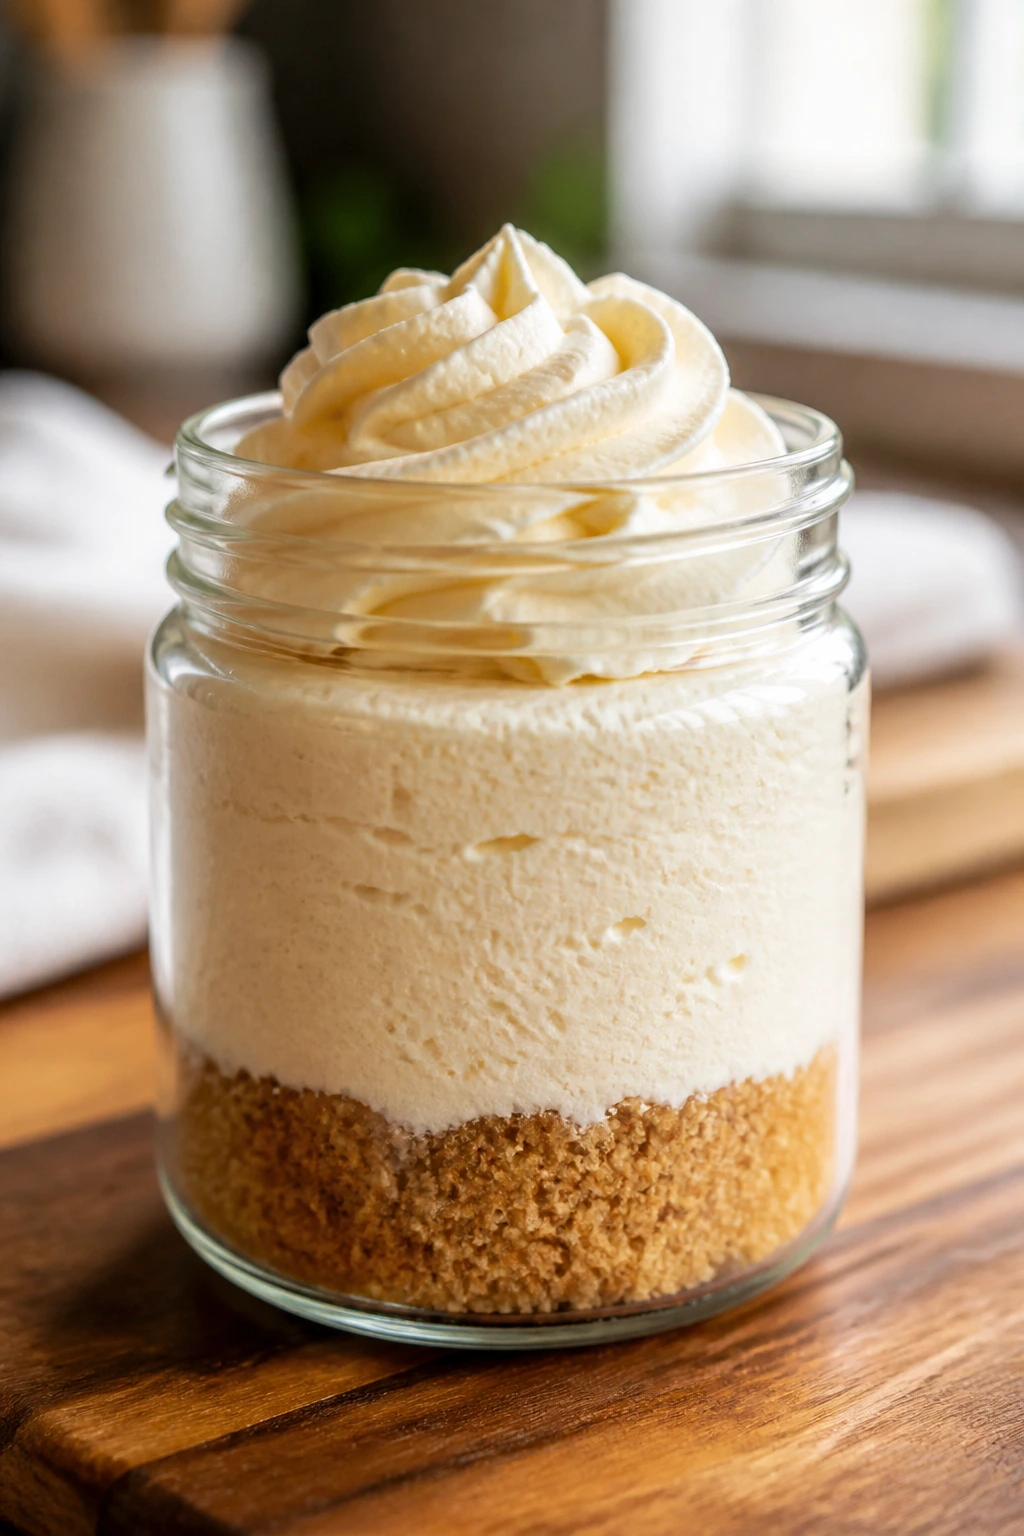
A fluffy cheesecake in a jar with cream cheese frosting gives you the best part of a bakery slice without the cracked top, the fussy water bath, or the knife-sawing through a chilled pan. You get three clean layers instead: buttery graham crumbs, a whipped cheesecake filling that tastes cool and light on the tongue, and a thick cap of frosting that holds its shape long enough to look intentional, not accidental.
Jars change the whole experience. The crumb stays put at the bottom, the filling stays airy if you fold it gently, and the frosting sits on top like a proper finishing layer instead of melting into the middle. That matters. A lot of dessert recipes look tidy only until the first spoon goes in; this one is built to stay neat even after a few minutes on the table.
The trick is balance. Too much butter and the crust turns greasy. Too much whipping and the filling turns grainy or slack. Too much frosting and the jar tastes like sugar with a cheesecake accent. Get the ratios right, and the texture lands in that sweet spot where each spoonful gives you cold creaminess, a little crunch, and a bright tang from the cream cheese and lemon.
Why These Fluffy Cheesecake Jars Earn a Second Spoon
-
No oven, no cracked top: The filling sets in the fridge, so you skip the water bath and the wait for a baked cheesecake to cool without splitting down the middle.
-
Each layer stays visible: Clear jars make it easy to see whether the crumb base is too thick, the filling is too soft, or the frosting is taking over the whole show.
-
Portion control is built in: Six jars means six neat servings, and nobody has to worry about cutting a clean wedge while the dessert is getting warm on the counter.
-
The frosting changes the finish: A piped top of cream cheese frosting gives the dessert the bakery-style look people expect from cheesecake, but you only use a little bit.
-
It gets better after chilling: The crumb settles, the filling firms up, and the vanilla-lemon flavor feels sharper and cleaner after a few hours in the fridge.
Yield: 6 jars, about 6 to 8 ounces each
Prep Time: 25 minutes
Cook Time: 0 minutes
Total Time: 2 hours 25 minutes
Difficulty: Intermediate — the method is straightforward, but the filling and frosting both need careful mixing so the texture stays light and smooth.
Chill/Rest Time: 2 hours minimum, overnight for the cleanest layers
Best Served: Chilled, with the frosting piped on after the filling has been spooned into the jars
Ingredient List for the Crust, Filling, and Frosting
For the Graham Cracker Crust
- 1 1/2 cups graham cracker crumbs, from about 12 full sheets
- 3 tablespoons granulated sugar
- 6 tablespoons unsalted butter, melted
- 1 pinch fine sea salt
For the Fluffy Cheesecake Filling
- 16 ounces full-fat cream cheese, softened to room temperature
- 3/4 cup powdered sugar, sifted
- 2 teaspoons pure vanilla extract
- 1 tablespoon fresh lemon juice
- 1 teaspoon finely grated lemon zest, optional but recommended
- 2 tablespoons sour cream, room temperature
- 1 cup heavy whipping cream, cold
For the Cream Cheese Frosting
- 4 ounces cream cheese, softened
- 4 tablespoons unsalted butter, softened
- 1 1/4 cups powdered sugar, sifted
- 1 teaspoon pure vanilla extract
- 1 to 2 tablespoons heavy cream or milk
- 1 pinch fine sea salt
For Garnish
- 1 cup fresh berries, such as strawberries, raspberries, or blueberries
- 2 tablespoons extra graham cracker crumbs
- 1 ounce chocolate, shaved or finely chopped, optional
Why Each Layer Matters More Than It Looks
Graham Cracker Crust
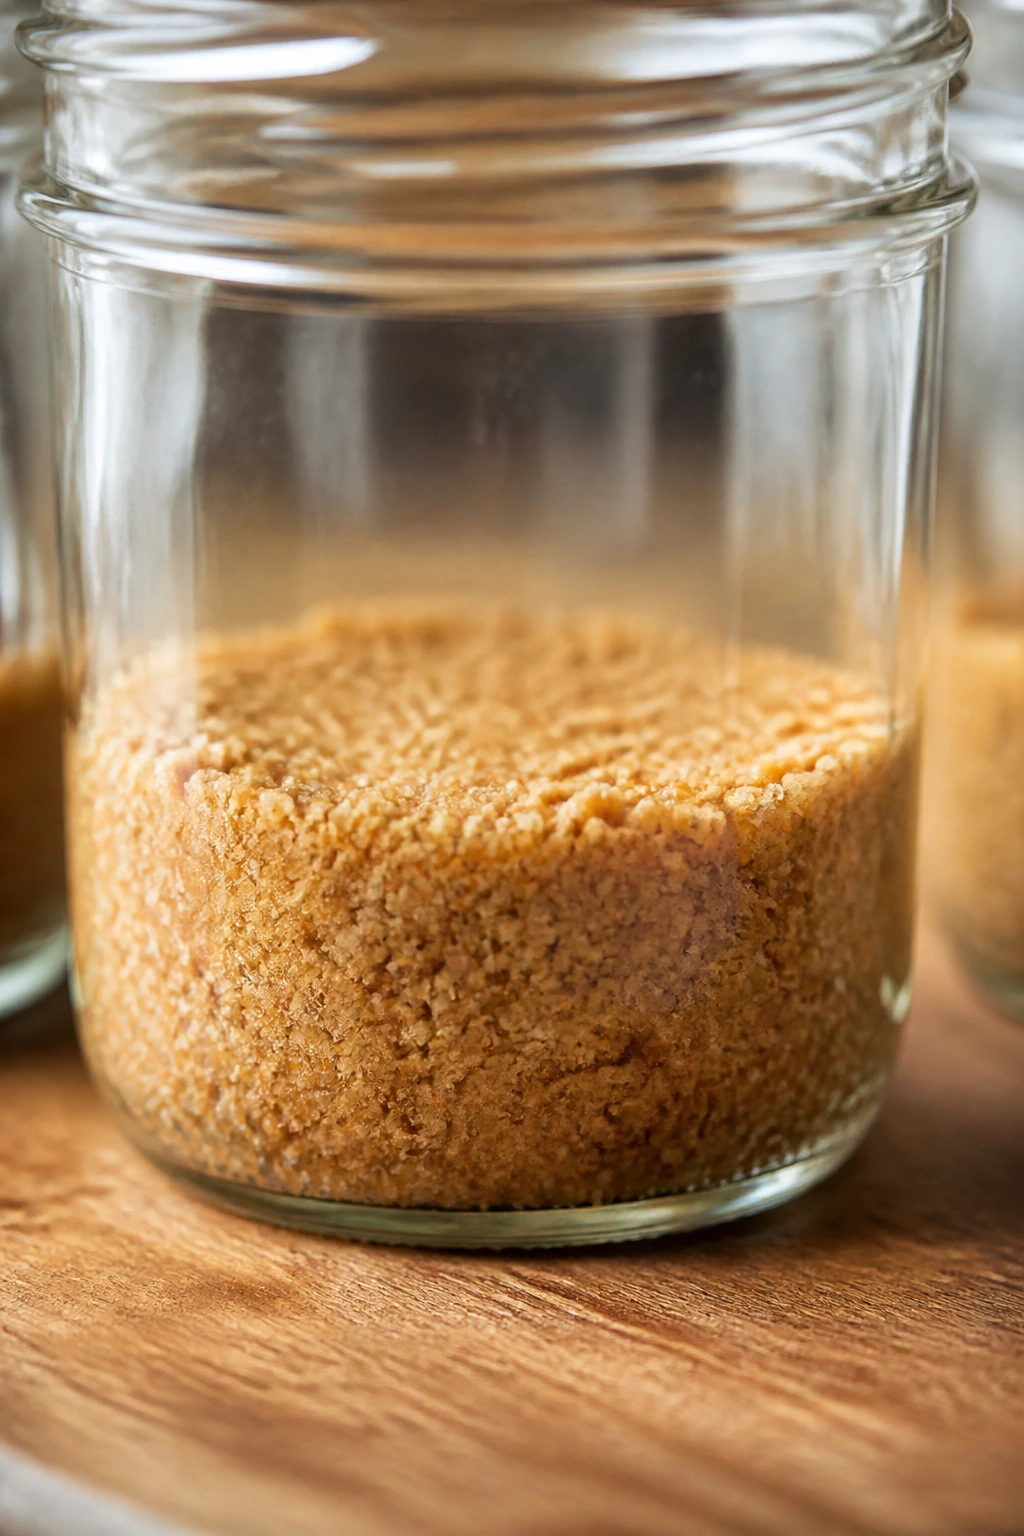
What to use: 1 1/2 cups graham cracker crumbs, 3 tablespoons granulated sugar, 6 tablespoons melted butter, and a pinch of salt. That gives you enough base for six small jars without turning the bottom into a thick cookie block.
Preparation: Crush the crackers finely so the crumbs look like coarse sand, not gravel. Mix the dry ingredients first, then pour in the melted butter and stir until every crumb looks lightly damp and holds together when pinched.
Substitutions: Vanilla wafers work if you want a sweeter base, and gluten-free graham-style crumbs hold up well if you buy them fine enough. Digestive biscuits are a little less sweet and bring a darker, toasted flavor.
Tips: The crust should feel like wet sand, not a paste. If a spoonful leaves grease on the bowl, you’ve gone too far with the butter, and the bottom of the jar will taste heavy instead of crisp.
Cheesecake Filling
What to use: 16 ounces full-fat cream cheese, 3/4 cup powdered sugar, 2 teaspoons vanilla, 1 tablespoon lemon juice, 1 teaspoon lemon zest if you want extra brightness, 2 tablespoons sour cream, and 1 cup cold heavy whipping cream. This combination gives you body from the cream cheese, tang from the dairy, and lift from the whipped cream.
Preparation: Let the cream cheese soften fully before you start. Cold cream cheese leaves tiny lumps that do not smooth out later, and those bits show up in the jar once the filling sets.
Substitutions: Mascarpone can replace half the cream cheese if you want a softer, richer filling. Greek yogurt can stand in for sour cream, though it brings a sharper tang and a looser texture.
Tips: Whip the cream separately to soft peaks, then fold it into the cream cheese mixture. That’s the move that gives the filling its mousse-like lift instead of a dense, heavy center.
Cream Cheese Frosting
What to use: 4 ounces cream cheese, 4 tablespoons softened butter, 1 1/4 cups powdered sugar, 1 teaspoon vanilla, 1 to 2 tablespoons cream or milk, and a pinch of salt. The smaller frosting batch keeps the top from drowning the cheesecake layer.
Preparation: Beat the cream cheese and butter until they look smooth and pale before you add the sugar. If you add sugar too early, the frosting can feel grainy and take longer to come together.
Substitutions: Milk works if you do not have cream, but add it slowly so the frosting stays pipeable. A dairy-free cream cheese and plant butter can work, though the frosting usually needs a longer chill to firm up.
Tips: Stop mixing the second the frosting turns fluffy and holds a soft ridge on the spatula. If it gets loose, it will slump over the sides of the jars instead of sitting in a clean swirl.
Garnishes & Finishes
What to use: Fresh berries, a spoonful of extra crumbs, and a little shaved chocolate if you like a more dessert-counter look. The garnish is small, but it gives the dessert a finished edge.
Preparation: Pat berries dry before you slice or scatter them. Wet fruit bleeds into the frosting and makes the top look soft and messy within minutes.
Substitutions: Toasted chopped pecans, sliced strawberries, lemon zest, or a thin drizzle of caramel can take the place of chocolate. Pick one finish and stop there; a jar looks better with one clear accent than with every topping in the cabinet.
Tips: Add delicate fruit right before serving if you want the cleanest top. If the jars need to sit longer, stick with dry toppings like crumbs, chocolate shavings, or toasted nuts.
The Tools That Keep the Jars Neat
- 6 to 8 clear jars or dessert cups, 6-ounce or 8-ounce size — Wide mouths make layering and piping easier, and they show the layers off without extra effort.
- Large mixing bowl — Needed for the filling, which expands more than you expect once the cream is folded in.
- Medium mixing bowl — Useful for the crust and the frosting so you’re not washing one bowl between every step.
- Hand mixer or stand mixer — A mixer matters here; the filling and frosting both need enough speed to turn smooth.
- Rubber spatula — Essential for folding the whipped cream into the cheesecake base without knocking the air out.
- Fine-mesh sieve — Sift the powdered sugar so the frosting does not pick up little hard lumps.
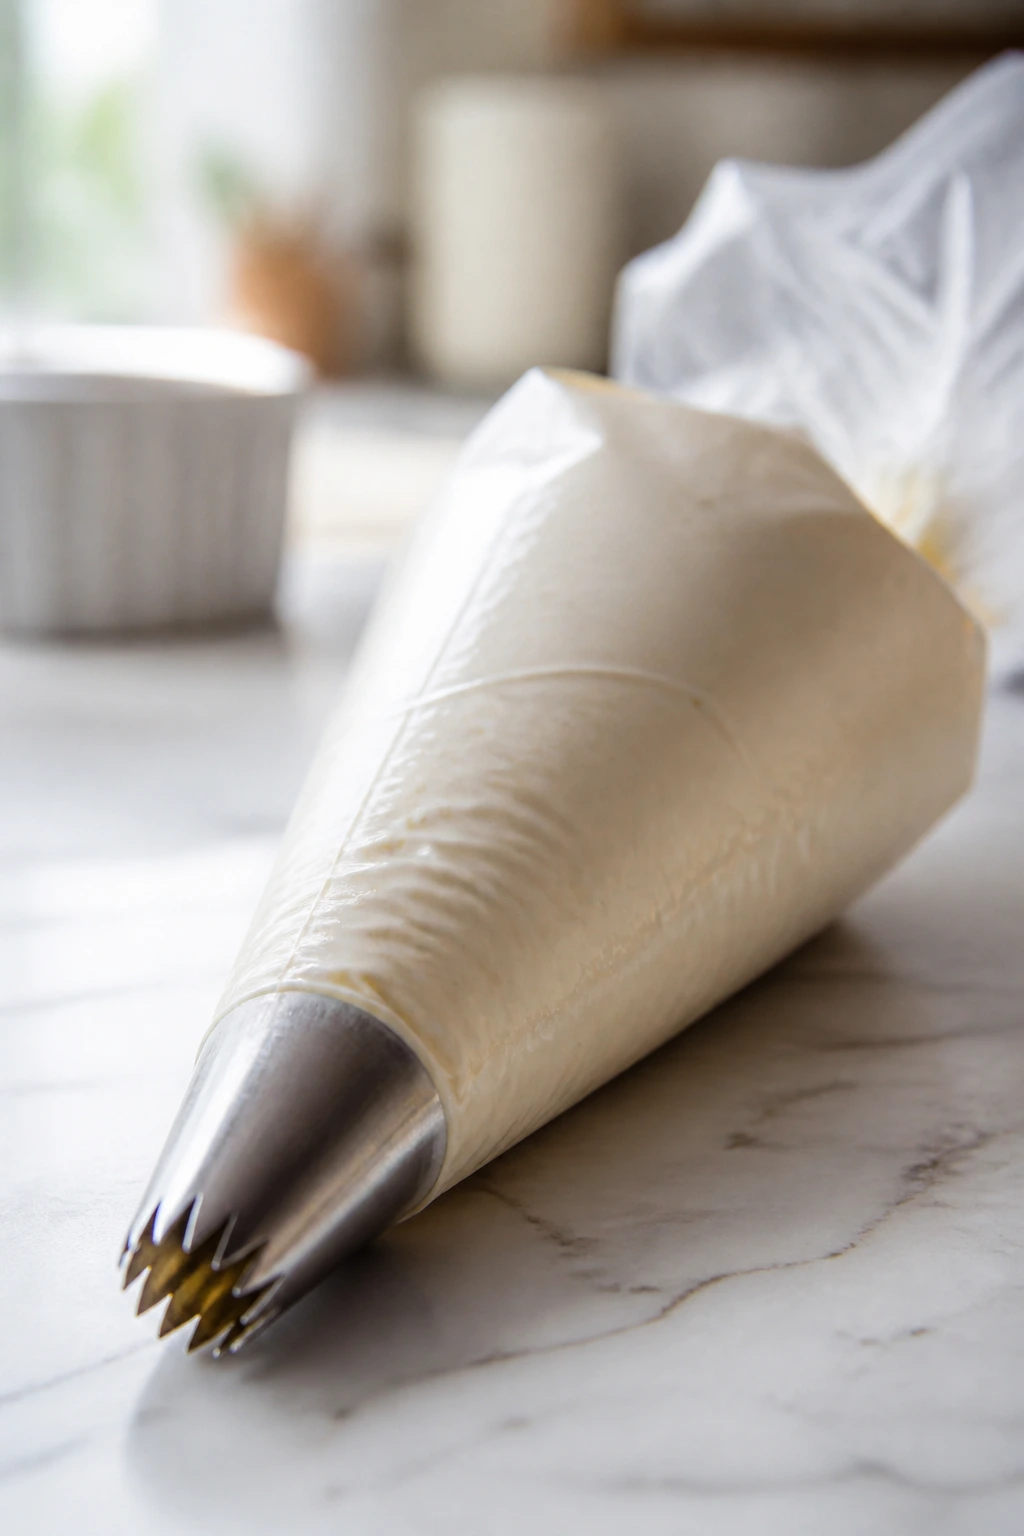
- Piping bag with a large star tip, or a zip-top bag — Helps the frosting land on top in a neat swirl instead of a mound.
- Measuring cups and spoons — The ratios matter, and this dessert does not forgive guesswork in the crust.
- Small spoon or tamper — Handy for pressing the crumb layer firmly into the bottom of each jar.
Building the Crumb Base
Prepare the crust mix:
- In a medium bowl, combine the 1 1/2 cups graham cracker crumbs, 3 tablespoons granulated sugar, and 1 pinch fine sea salt.
- Pour in the 6 tablespoons melted butter and stir until the crumbs look evenly damp and feel like wet sand when you pinch them together. If dry crumbs remain at the bottom, keep stirring for another 15 to 20 seconds.
Press the crust into the jars: 3. Divide the crumb mixture evenly among the jars, using about 2 to 3 tablespoons per jar depending on size. Press the crumbs down with the back of a small spoon or the bottom of a shot glass until the layer feels compact and level. 4. Chill the jars for 10 minutes while you make the filling. That short rest helps the crust set enough to stay distinct under the creamy layer.
A loose crust is the most common reason jar desserts start to look sloppy halfway through serving. Pressing the crumbs firmly matters more than adding extra butter, and that’s the part people usually get backward.
A good crust should look darkened only by the butter, not shiny or wet. If it glistens, dab away the excess before you press it into the jars.
Whipping the Cheesecake Filling
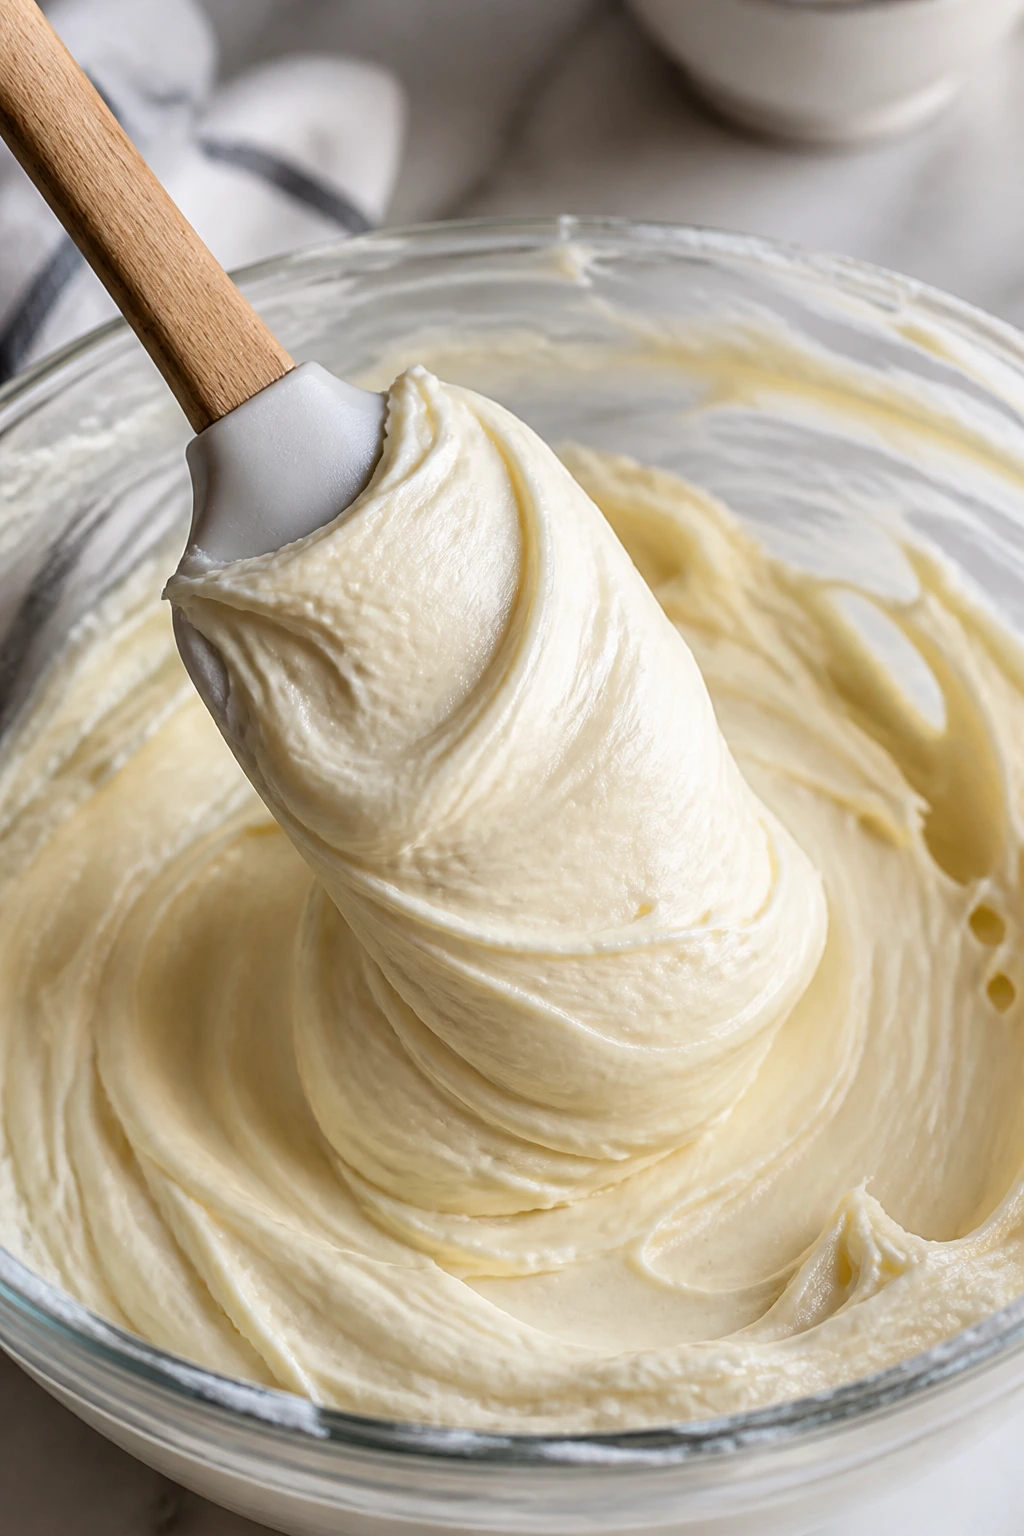
Beat the cream cheese base: 5. In a large bowl, beat the 16 ounces softened cream cheese with the 3/4 cup sifted powdered sugar, 2 teaspoons vanilla extract, 1 tablespoon lemon juice, 1 teaspoon lemon zest if using, and 2 tablespoons sour cream on medium speed for 1 to 2 minutes. Stop when the mixture looks smooth, thick, and a little lighter in color, scraping down the bowl once or twice.
Whip the cream separately: 6. In a chilled bowl, whip the 1 cup cold heavy whipping cream on medium-high speed for 1 1/2 to 2 minutes, until it reaches soft peaks. The whisk should leave soft ridges that bend over at the tip, not stiff peaks that stand straight up. Do not whip past soft peaks or the filling can turn grainy when you fold it in.
Fold the filling together: 7. Add one-third of the whipped cream to the cream cheese base and fold gently with a rubber spatula to loosen the mixture. Add the remaining whipped cream in two more additions, folding only until no white streaks remain. 8. Taste the filling. It should be lightly sweet with a clean tang from the lemon and sour cream. If you want a sharper edge, add a few extra drops of lemon juice; if it tastes too sharp, a tablespoon of powdered sugar can soften it.
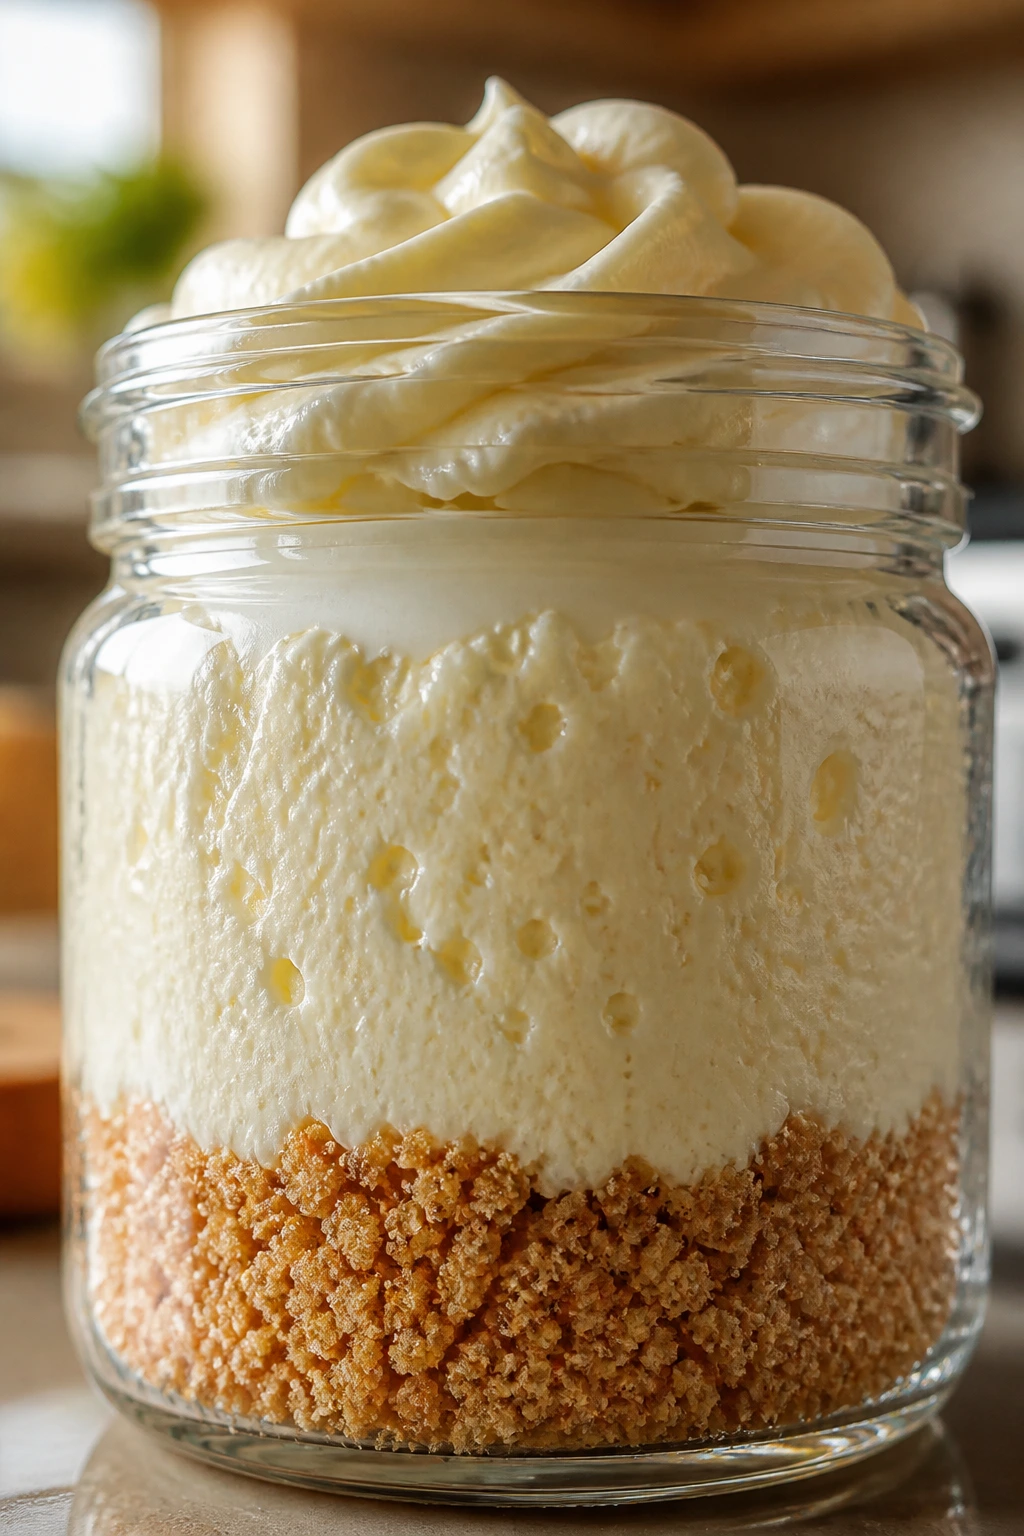
The filling should feel airy, not foamy. If you scoop a spoonful, it should hold a soft mound for a few seconds before settling.
That texture is the whole point of the recipe. If it pours like pudding, the cream was underwhipped or folded in too aggressively. If it feels stiff, the cream went too far and lost the easy, spoonable texture that makes these jars work.
Making the Cream Cheese Frosting
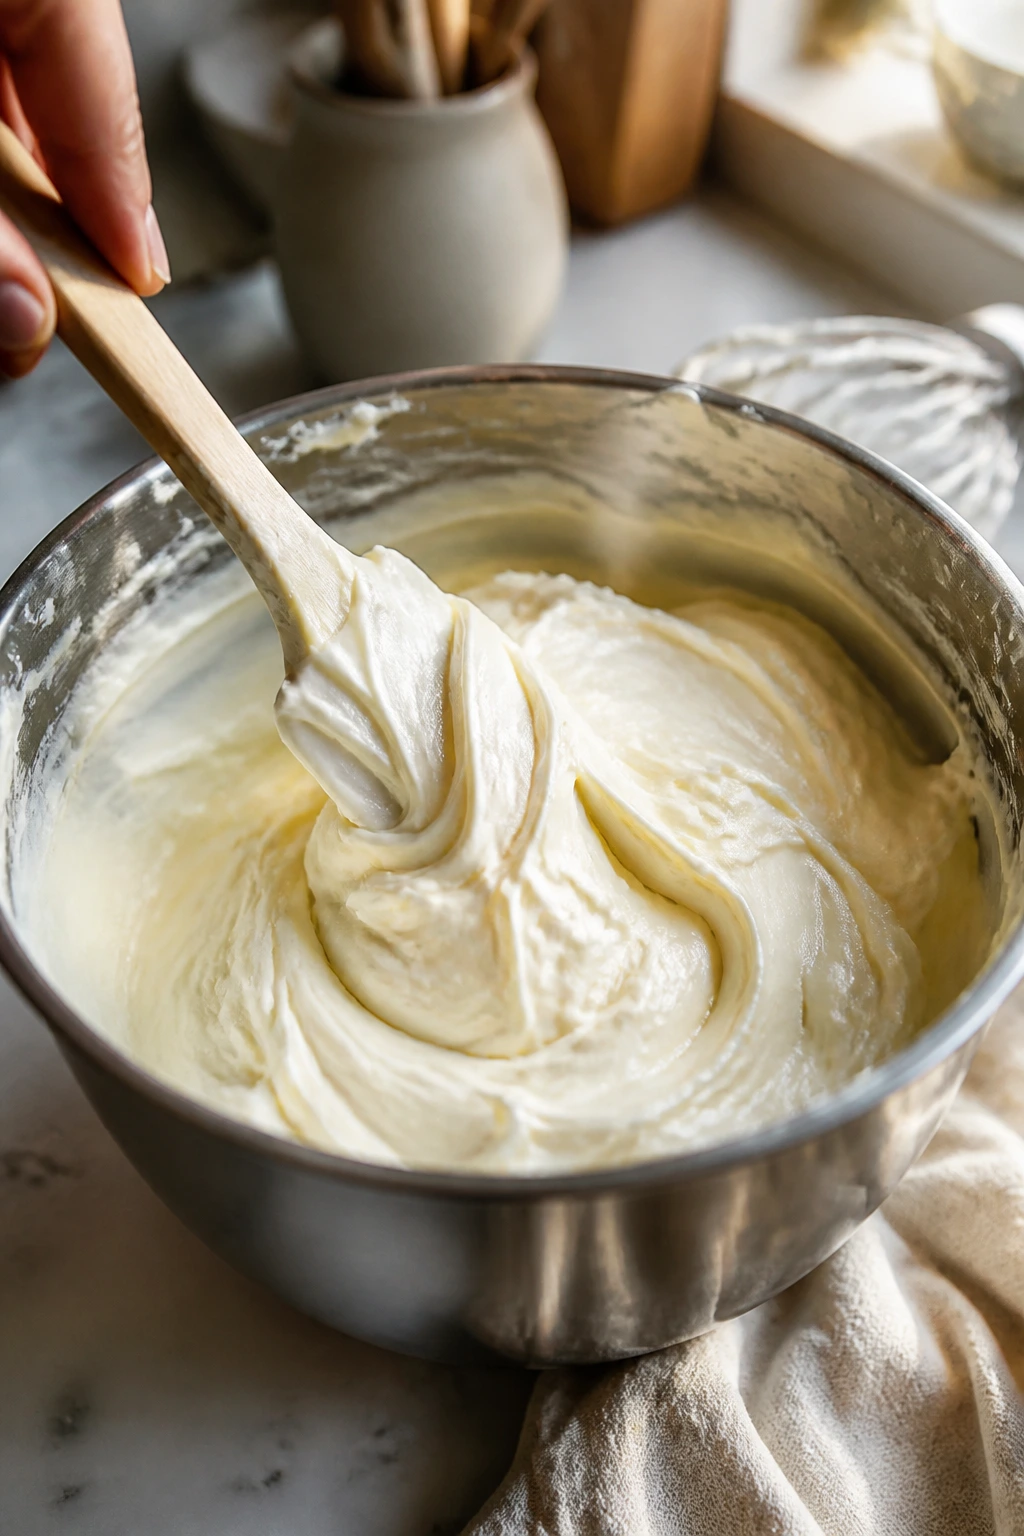
Beat the frosting until pipeable: 9. In a medium bowl, beat the 4 ounces softened cream cheese and 4 tablespoons softened butter together for 1 minute, until the mixture turns smooth and pale. Add the 1 1/4 cups sifted powdered sugar, 1 teaspoon vanilla extract, and 1 pinch fine sea salt, then beat on low until the sugar is absorbed.
Adjust the texture carefully: 10. Add 1 tablespoon heavy cream or milk and beat again for 20 to 30 seconds. If the frosting still feels too thick to pipe, add the second tablespoon a teaspoon at a time. It should hold a swirl but still move easily through a piping tip or spoon.
Cream cheese frosting can swing from too loose to too dense in about ten seconds if you are not paying attention. A good batch should look glossy and mound softly on a spoon without collapsing into a puddle.
If the frosting warms up while you’re assembling the jars, put the bowl in the fridge for 10 minutes. Cold frosting pipes cleaner, especially if your kitchen is warm or the jars have been sitting out for a while.
Assembling and Chilling the Jars
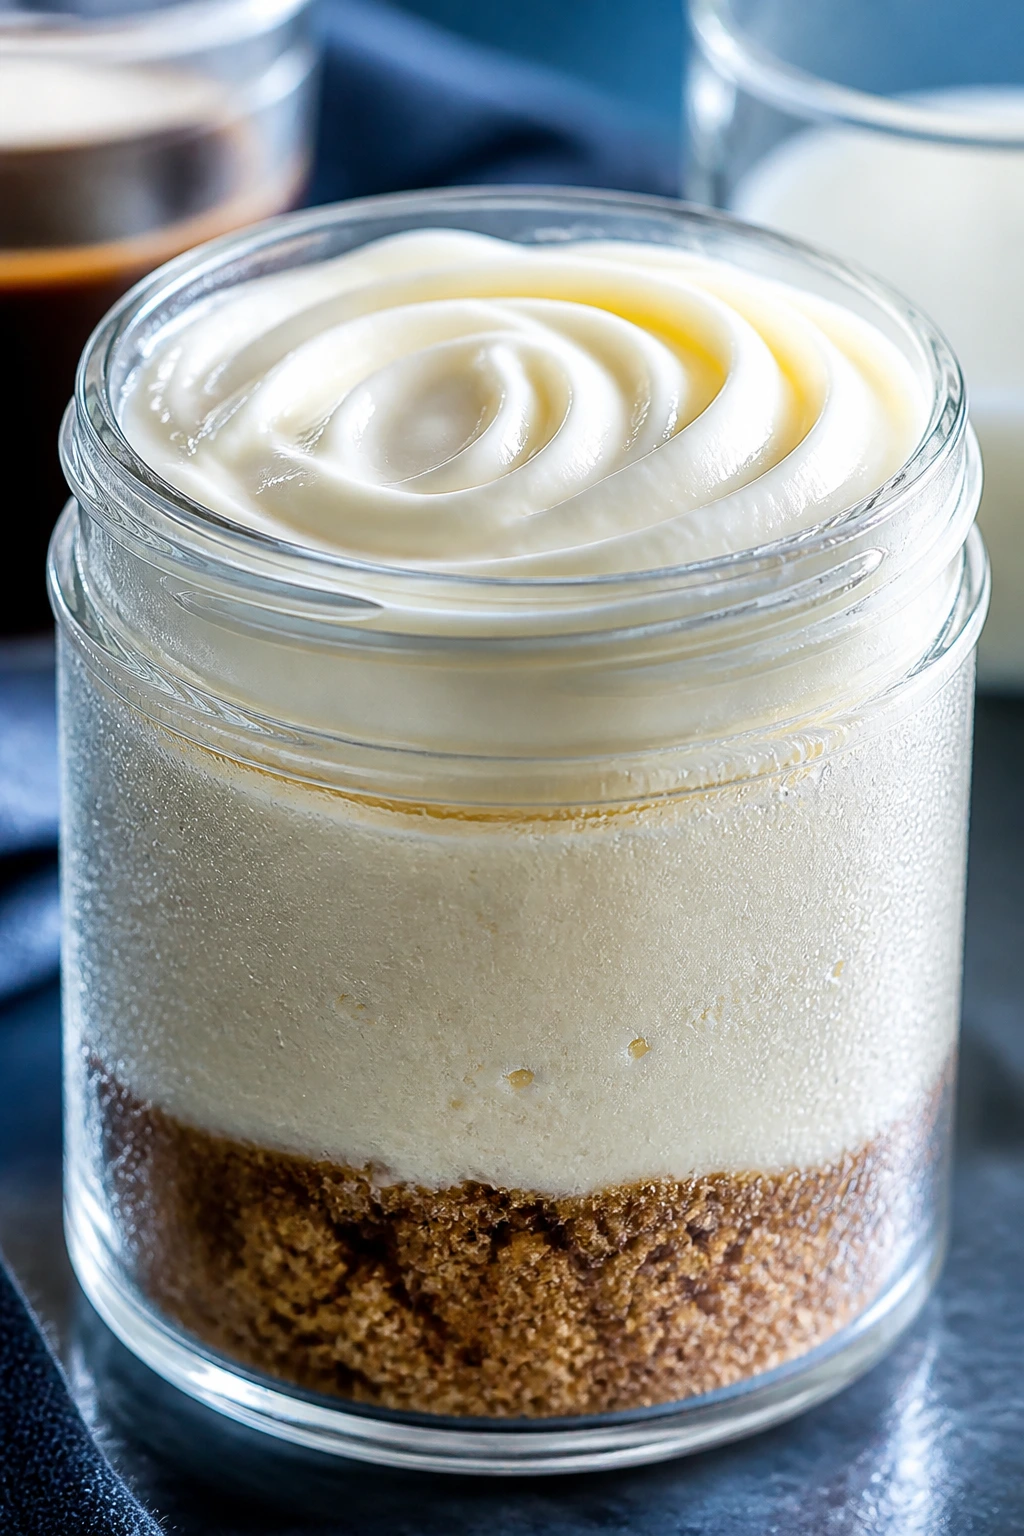
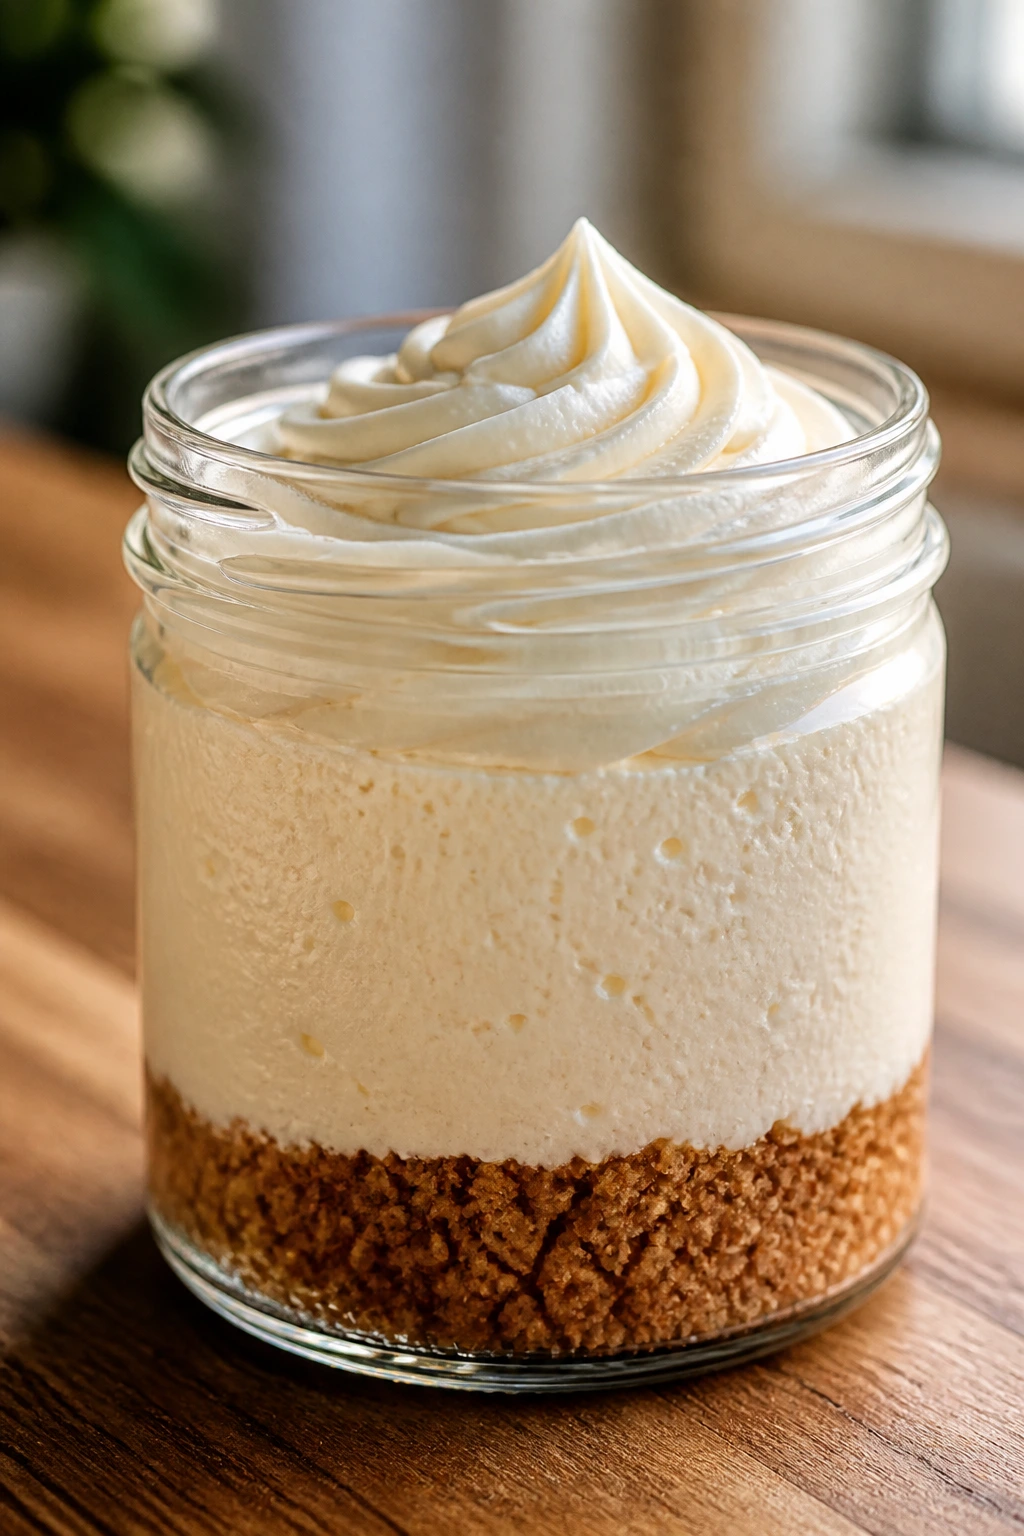
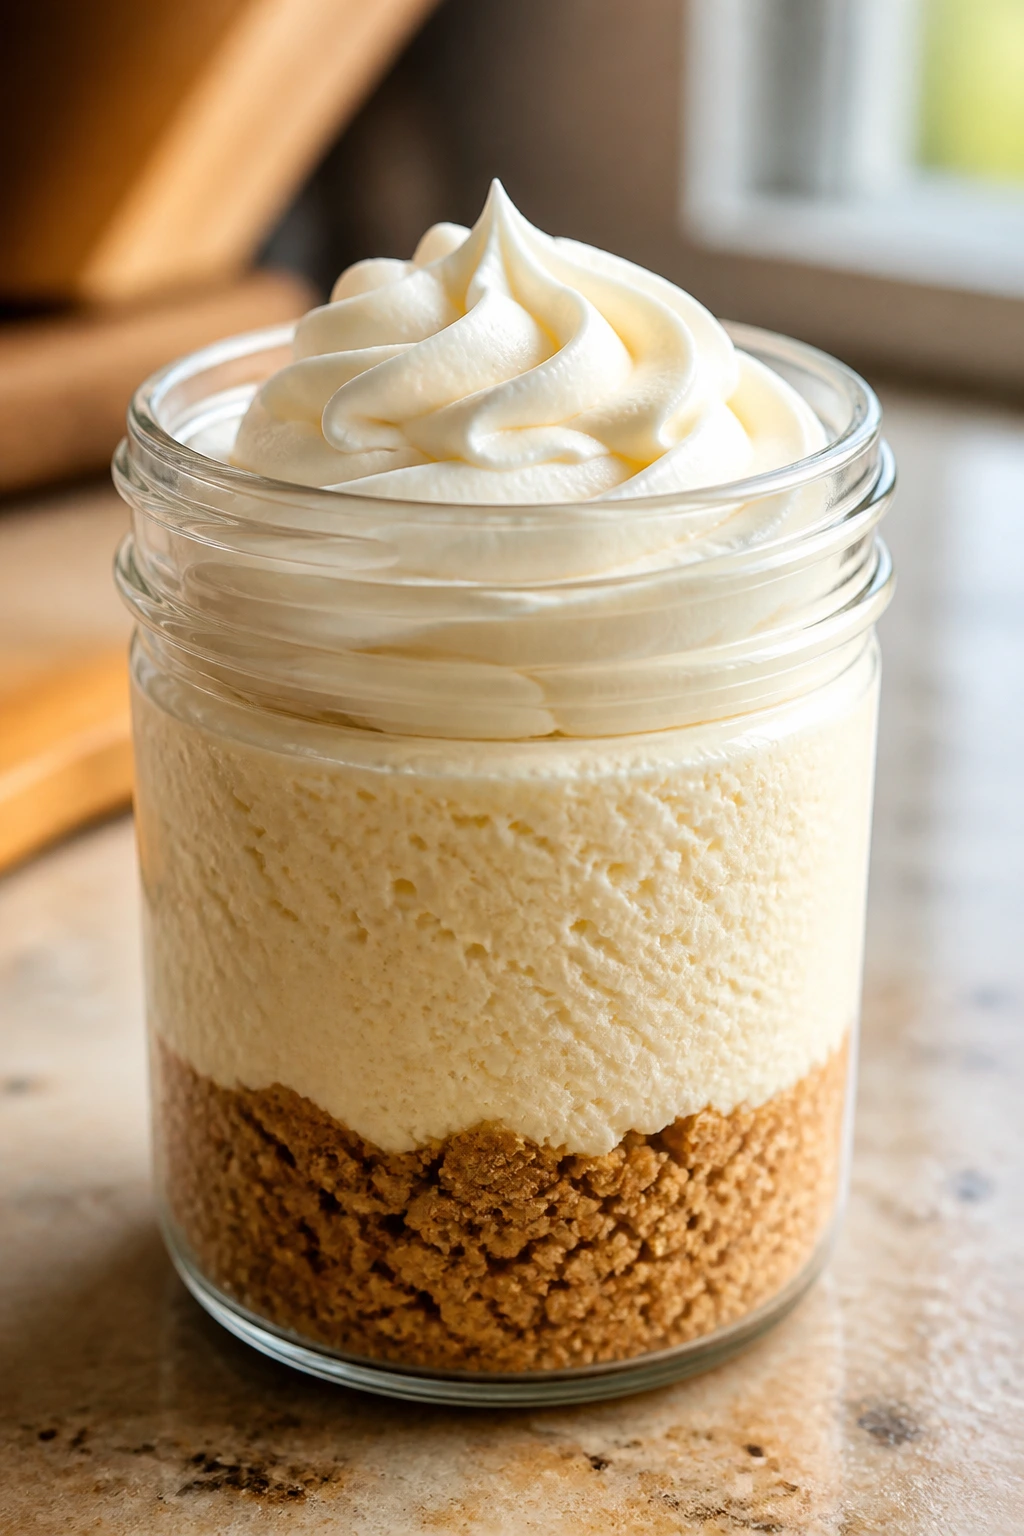
Layer the filling: 11. Spoon or pipe the cheesecake filling over the chilled crusts, dividing it evenly among the jars. Fill each jar about two-thirds full, leaving space for the frosting and garnishes. Tap each jar once on a folded kitchen towel to release air pockets.
Add the frosting and finish: 12. Pipe or spoon the cream cheese frosting over the top in a small swirl, a wave, or a simple round cap. Sprinkle with 2 tablespoons extra graham crumbs and add berries or chocolate just before serving if you want the top to stay sharp and dry. 13. Chill the jars for at least 2 hours before serving, or overnight if you want the cleanest layers and the firmest spoonful. If you’re using lids, wait until the frosting firms in the fridge for 20 to 30 minutes before sealing the jars.
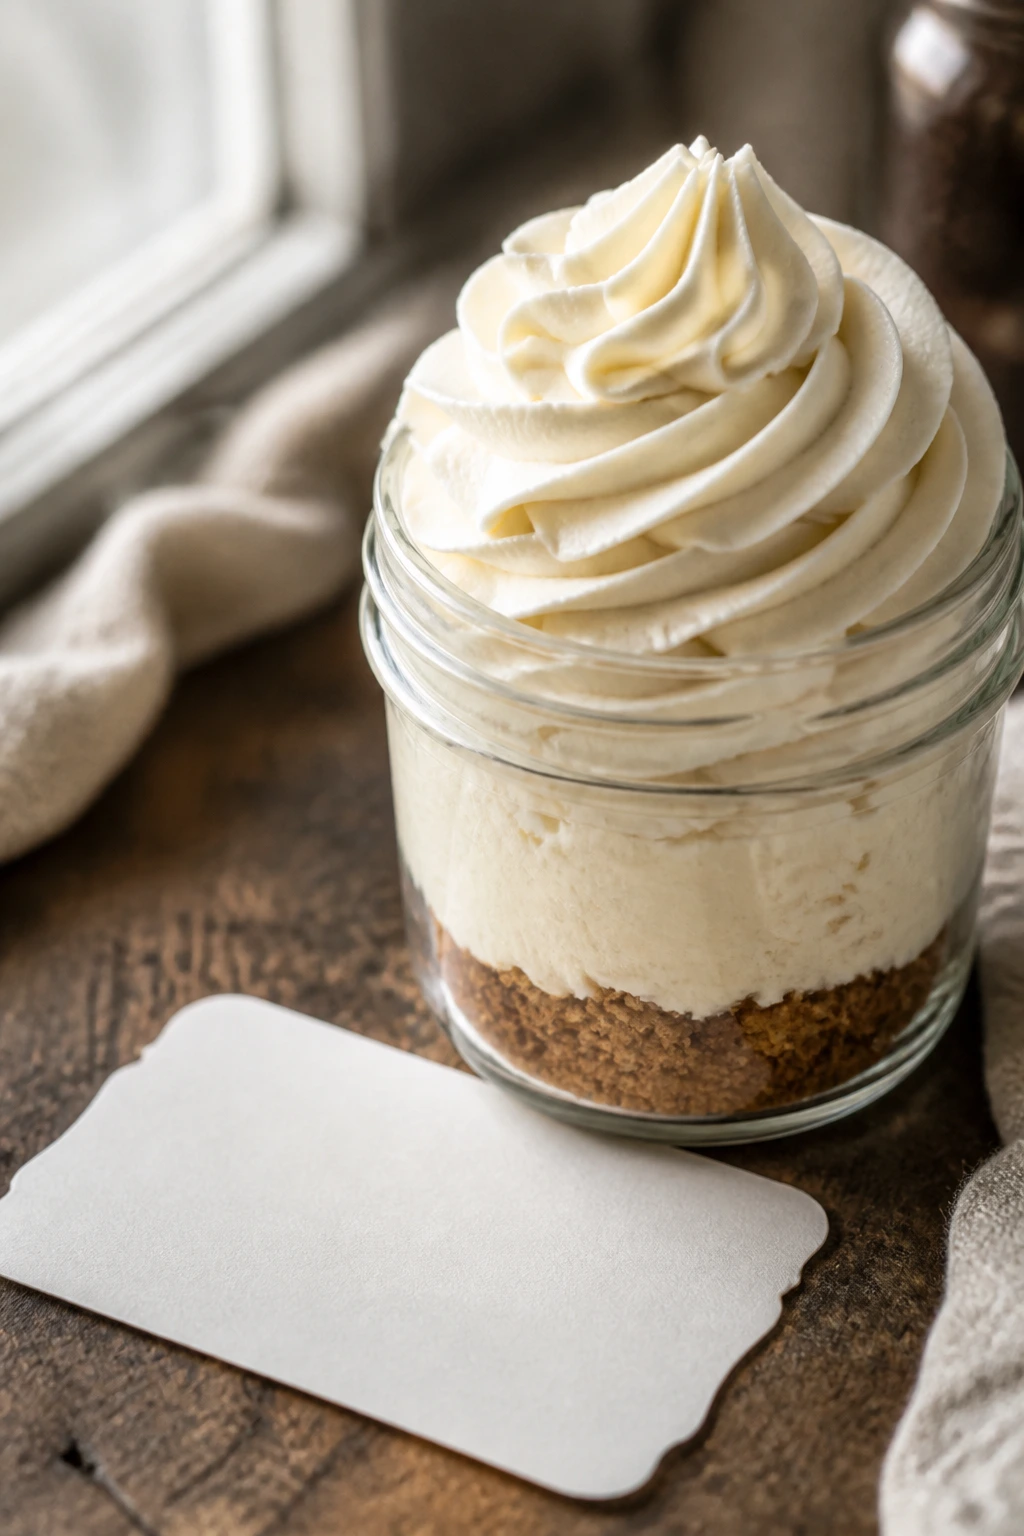
The layers settle as they chill, and that is a good thing. A cheesecake jar that looks a little soft right after assembly usually snaps into shape in the fridge.
Serve them cold. Not lukewarm, not half-chilled, not “I forgot about them on the counter while I answered messages.” Cold is what gives the filling its lift and keeps the frosting from sliding.
How to Serve Them Cold
Presentation:
Serve the jars straight from the fridge in clear glasses or lidded jars so the layers stay visible. A small offset spatula or the back of a spoon can smooth the frosting into a tidy swirl, but a looser finish works too if you top it with a few berries and a dusting of crumbs.
Accompaniments:
A small espresso, a cup of strong coffee, or a glass of cold milk fits the richness of the filling well. If you want something on the plate beside the jars, use crisp butter cookies, shortbread fingers, or a small bowl of sliced fruit rather than another soft dessert.
Portions:
Six 6-ounce jars feed six people with a proper dessert serving. If you want a lighter finish after a heavy meal, divide the mixture into eight smaller jars and use only a thin layer of frosting on top.
Beverage Pairing:
Fresh black coffee cuts through the sweetness, while cold brew plays nicely with the vanilla and cream cheese. If you want a softer pairing, a dessert wine with bright fruit notes works, though I still lean toward coffee because it keeps the dessert from feeling too soft.
Extra Tips for Cleaner Layers and Better Flavor
Flavor Enhancement: A tiny pinch of salt in the frosting does more than most people expect. It pulls the cream cheese forward and keeps the frosting from tasting flat, especially if your berries are sweet rather than tart. Toasting the graham crumbs in a dry skillet for 4 to 5 minutes before adding the butter also gives the crust a warmer, more cookie-like flavor.
Time-Saver: Make the crust and the cheesecake filling in the morning, then whip the frosting closer to serving time. The filling actually benefits from a longer chill, and you’ll get a cleaner frosting swirl if you pipe it onto already-cold jars.
Pro Move: Use a piping bag for both the filling and the frosting if you want the layers to look crisp. It’s not required, but it keeps the sides of the jar cleaner and gives you more control over how much ends up in each layer. A wide round tip is easier for the filling; a star tip gives the frosting a stronger shape.
Cost-Saver: Store-brand cream cheese and graham crumbs work fine here. Save the fancy finishing touches for the berries or the chocolate shave, because those are the things people actually notice.
Make-It-Yours: If you like a less sweet dessert, cut the frosting sugar down by 1/4 cup and lean on lemon zest for flavor instead. If you want a richer version, add a few tablespoons of mascarpone to the filling in place of some of the cream cheese.
Mistakes That Make Cheesecake Jars Weep or Sink

-
Starting with cold cream cheese: The filling ends up speckled with tiny soft lumps that never fully disappear. Let the cream cheese sit out long enough that a finger presses in cleanly, then beat it before anything else goes into the bowl.
-
Overwhipping the cream: The filling can look fluffy for a minute, then turn grainy and heavy after folding. Stop at soft peaks, when the cream holds shape but the tip droops over instead of standing stiff.
-
Packing the crust too loosely or too wet: A loose crust slides around when the spoon hits it, while a greasy one tastes heavy and can pool at the bottom. Press the crumbs firmly, but use the exact amount of butter listed so the base stays sandy, not oily.
-
Adding frosting before the filling is cold: The topping can slip or lean if the cheesecake layer is still soft. Give the jars at least 2 hours in the refrigerator before piping the frosting if you want a sharp top.
-
Overfilling the jars: The layers smear against the lid or climb too high and turn messy after the first bite. Leave space at the top so the frosting has room to sit without getting smashed.
-
Skipping the chill time entirely: The filling tastes looser, the frosting softens, and the crust loses its clean edge. This dessert needs the fridge. There is no shortcut that gives the same texture.
Variations That Change the Flavor Without Breaking the Shape
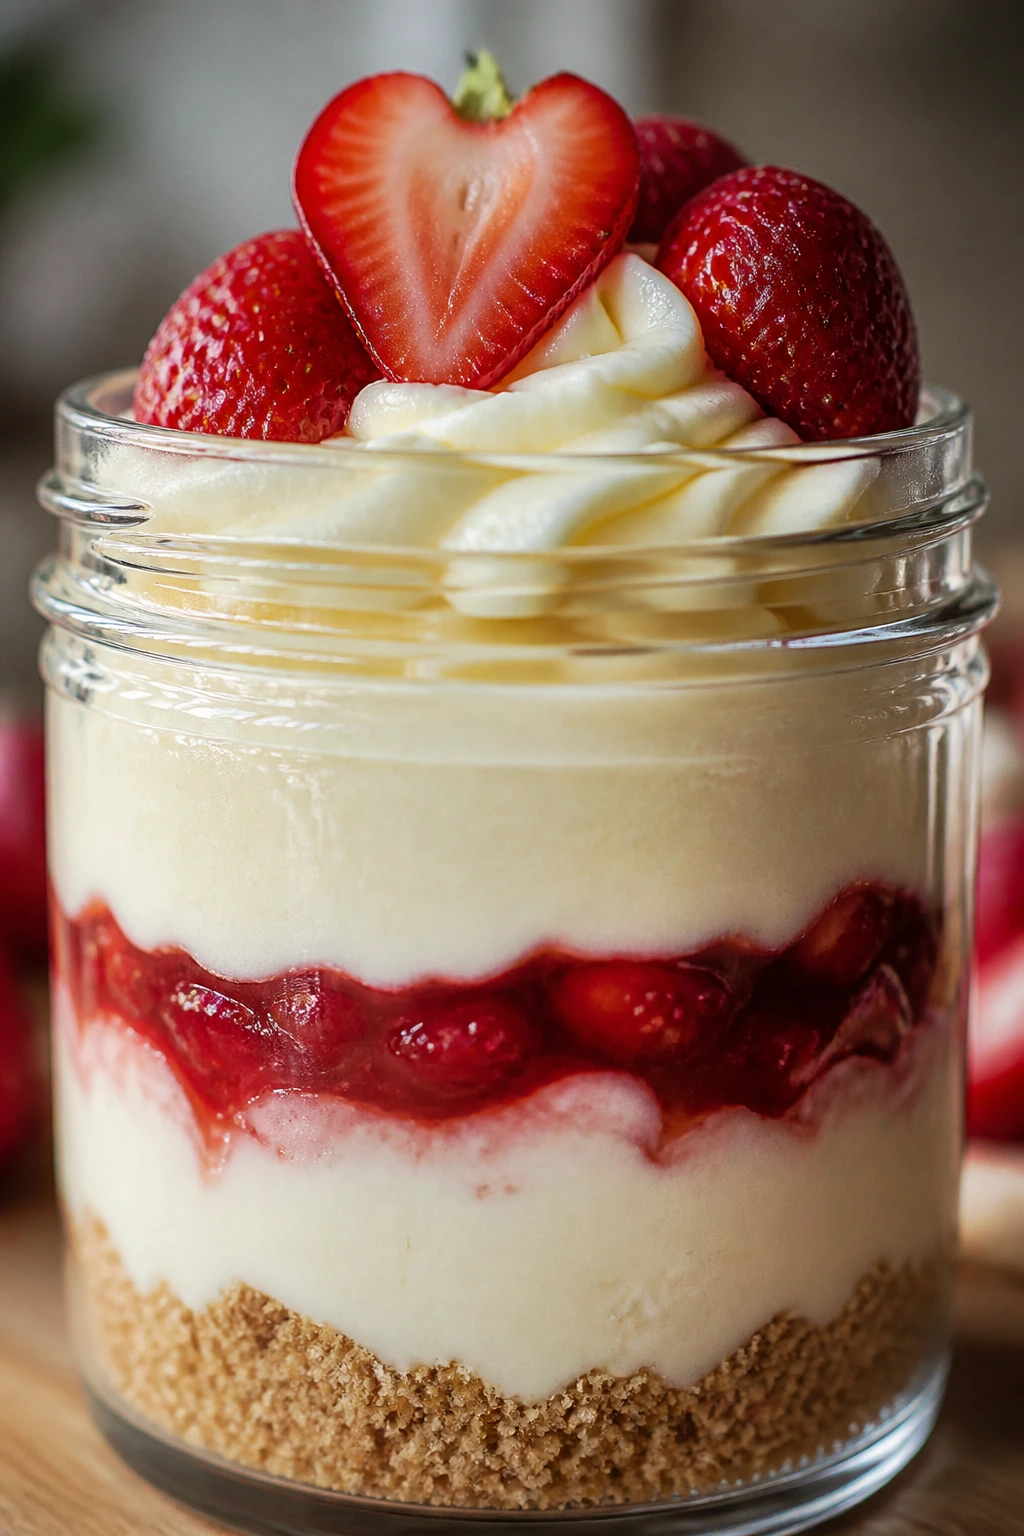
Strawberry Patch Jars
Add 1 to 2 tablespoons of strawberry jam between the filling and the frosting, then top with sliced strawberries. The jam brings a glossy fruit layer that softens the tang of the cream cheese and makes the dessert taste like a strawberry shortcake cousin.
Chocolate Cookie Crust Jars
Swap the graham crumbs for 1 1/2 cups chocolate cookie crumbs and reduce the crust sugar to 1 tablespoon. This version tastes deeper and a little less sweet, which works well if you want the frosting to stay in the background.
Lemon-Zest Brulee Style
Double the lemon zest in the filling and finish with a small shower of extra zest over the frosting. If you like a brighter dessert, this version cuts through the richness and keeps every spoonful tasting fresh rather than heavy.
Salted Caramel Pecan Jars
Drizzle 1 teaspoon of caramel over the filling before piping on the frosting, then finish with 2 tablespoons toasted chopped pecans. The caramel sits between the layers and gives you a sticky, crunchy hit that plays well with the cool filling.
Gluten-Free Graham Jar
Use certified gluten-free graham-style crumbs in place of the regular crackers, keeping the butter and sugar amounts the same. That swap keeps the texture nearly identical, which is rare enough to be worth saying out loud.
Storing, Freezing, and Making Them Ahead
These cheesecake jars hold well in the refrigerator for 3 to 4 days when covered with lids or wrapped tightly with plastic wrap. The filling stays smooth, and the frosting keeps its shape if you do not pile on wet fruit too early. If you’re using berries, add them right before serving so they do not bleed into the top.
At room temperature, keep the jars out for no more than 2 hours. That window shrinks if the room is warm or if the jars are sitting in direct sun at a gathering. Dairy desserts soften faster than people think, and once the frosting starts to droop, the clean layers disappear.
Freezing works best if you freeze the jars without the frosting and fresh fruit. The unfrosted filled jars can be frozen for up to 1 month if they’re wrapped tightly, then thawed overnight in the refrigerator. I do not love freezing the fully frosted version; the frosting can lose its smooth feel after thawing, and the top often looks a little tired.
If you want to make the dessert ahead, make the crust and filling a full day early, assemble the jars, and chill them overnight. Pipe the frosting after the jars have had time to set if you want the neatest finish, or pipe it right away if you are not worried about a little softness. Either way, the dessert tastes cleaner and more settled the next day.
There is no reheating step here, and that is part of the charm. A jar dessert should come out cold, held in a spoon, with the crumb staying crumbly instead of turning mushy.
Fluffy Cheesecake in a Jar FAQ
Can I make these cheesecake jars without a piping bag?
Yes. A spoon works fine for both the filling and the frosting, and a zip-top bag with one corner snipped off gives you a cleaner swirl if you want a little more control. The flavor does not change either way.
Why is my filling loose instead of fluffy?
Most of the time, the cream was underwhipped or folded into the cream cheese too aggressively. The fix is to whip the cream to soft peaks first, then fold gently in two or three additions so the air stays in the mixture.
Can I use whipped topping instead of heavy cream?
You can, but the filling will taste sweeter and a bit less fresh. If you use whipped topping, fold it in at the same point you would add the whipped cream and reduce the powdered sugar a little so the dessert does not become cloying.
What size jars work best for this recipe?
Six-ounce jars give you a tidy single serving, while 8-ounce jars leave more room for frosting and toppings. Wide-mouth jars are easier to fill and easier to eat from, which matters more than people think when the dessert has two layers of cream on top.
Can I make these a day ahead?
Yes, and I think they taste better that way. The crumb firms up, the cheesecake filling sets, and the flavors settle into each other instead of tasting separate.
How do I keep the crust from getting soggy?
Use the exact butter amount, press the crust firmly, and keep the jars chilled until serving. If you’re adding juicy fruit, put it on right before the jars hit the table so the juice does not soak into the filling.
Can I freeze the finished jars with frosting?
You can, but I would not call it the best route. The frosting may lose some of its smooth texture after thawing, so freezing the unfrosted jars and adding fresh frosting later gives a better result.
A Dessert That Keeps Its Shape
A dessert like this works because every part knows its place. The crumb stays at the bottom, the filling stays airy, and the cream cheese frosting gives you that last bakery-style finish without asking the cheesecake to do too much. That sounds fussy on paper. In practice, it’s the opposite: you scoop, chill, pipe, and serve.
I like jar desserts for one plain reason. They hold their own. No cracked top to hide, no awkward slicing, no wobbly wedges sliding across a plate. Just cold cheesecake, a little tang, a little crunch, and a frosting swirl that makes the whole thing feel polished without becoming precious.
Fluffy Cheesecake in a Jar with Cream Cheese Frosting — Recipe Card
Recipe Name: Fluffy Cheesecake in a Jar with Cream Cheese Frosting
Description: Layers of buttery graham cracker crumbs, a whipped no-bake cheesecake filling, and a piped cream cheese frosting finish. Served in jars, each spoonful stays neat, cold, and balanced between creamy, tangy, and sweet.
Prep Time: 25 minutes
Cook Time: 0 minutes
Total Time: 2 hours 25 minutes
Course: Dessert
Cuisine: American
Servings: 6 servings
Calories: 510 kcal
Ingredients
For the Graham Cracker Crust
- 1 1/2 cups graham cracker crumbs, from about 12 full sheets
- 3 tablespoons granulated sugar
- 6 tablespoons unsalted butter, melted
- 1 pinch fine sea salt
For the Fluffy Cheesecake Filling
- 16 ounces full-fat cream cheese, softened to room temperature
- 3/4 cup powdered sugar, sifted
- 2 teaspoons pure vanilla extract
- 1 tablespoon fresh lemon juice
- 1 teaspoon finely grated lemon zest, optional but recommended
- 2 tablespoons sour cream, room temperature
- 1 cup heavy whipping cream, cold
For the Cream Cheese Frosting
- 4 ounces cream cheese, softened
- 4 tablespoons unsalted butter, softened
- 1 1/4 cups powdered sugar, sifted
- 1 teaspoon pure vanilla extract
- 1 to 2 tablespoons heavy cream or milk
- 1 pinch fine sea salt
For Garnish
- 1 cup fresh berries, such as strawberries, raspberries, or blueberries
- 2 tablespoons extra graham cracker crumbs
- 1 ounce chocolate, shaved or finely chopped, optional
Instructions
-
Mix the graham cracker crumbs, granulated sugar, and salt in a medium bowl. Stir in the melted butter until the mixture looks evenly damp and holds together when pinched.
-
Divide the crust mixture among the jars and press it firmly into the bottom of each one. Chill the jars for 10 minutes.
-
Beat the cream cheese, powdered sugar, vanilla, lemon juice, lemon zest if using, and sour cream in a large bowl until smooth and fluffy.
-
Whip the cold heavy cream in a separate chilled bowl to soft peaks.
-
Fold the whipped cream into the cream cheese mixture in 2 to 3 additions until no white streaks remain.
-
Beat the cream cheese, butter, powdered sugar, vanilla, salt, and cream or milk together in a medium bowl until smooth and pipeable.
-
Spoon or pipe the cheesecake filling over the crusts, filling each jar about two-thirds full.
-
Pipe or spoon the cream cheese frosting over the top and finish with berries, crumbs, or chocolate.
-
Chill the jars for at least 2 hours before serving, or overnight for the cleanest layers.
Notes: Use full-fat cream cheese for the best texture; low-fat versions turn looser. Add fresh berries at the last minute so the tops stay neat. If the frosting feels too soft, chill it for 10 minutes before piping.