
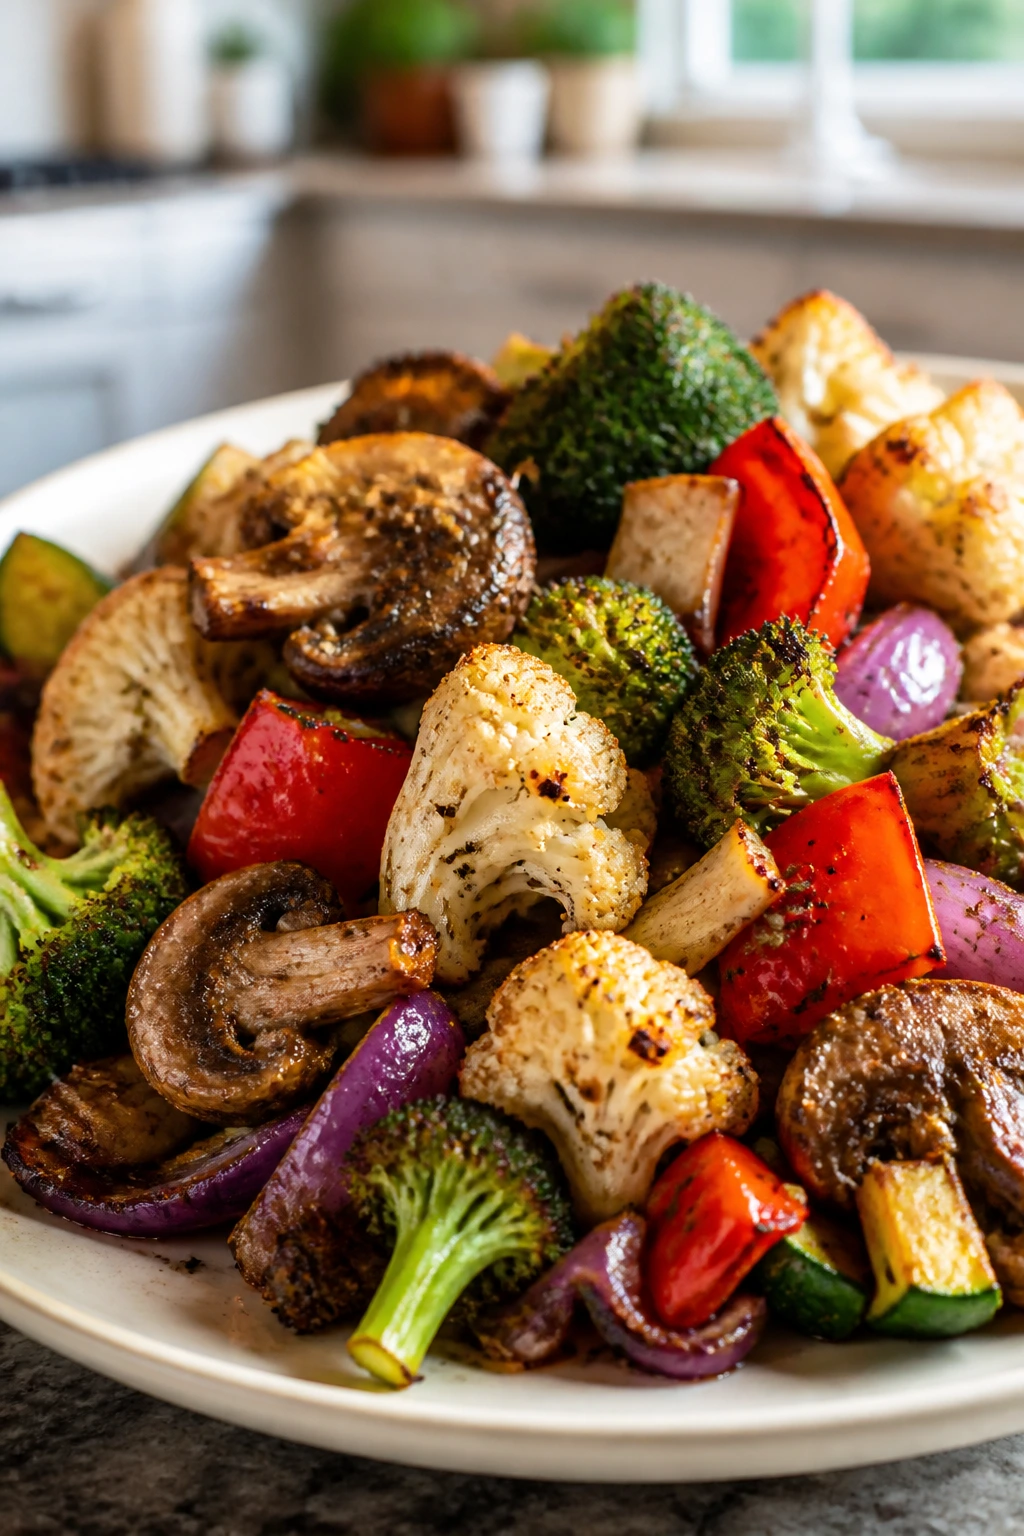
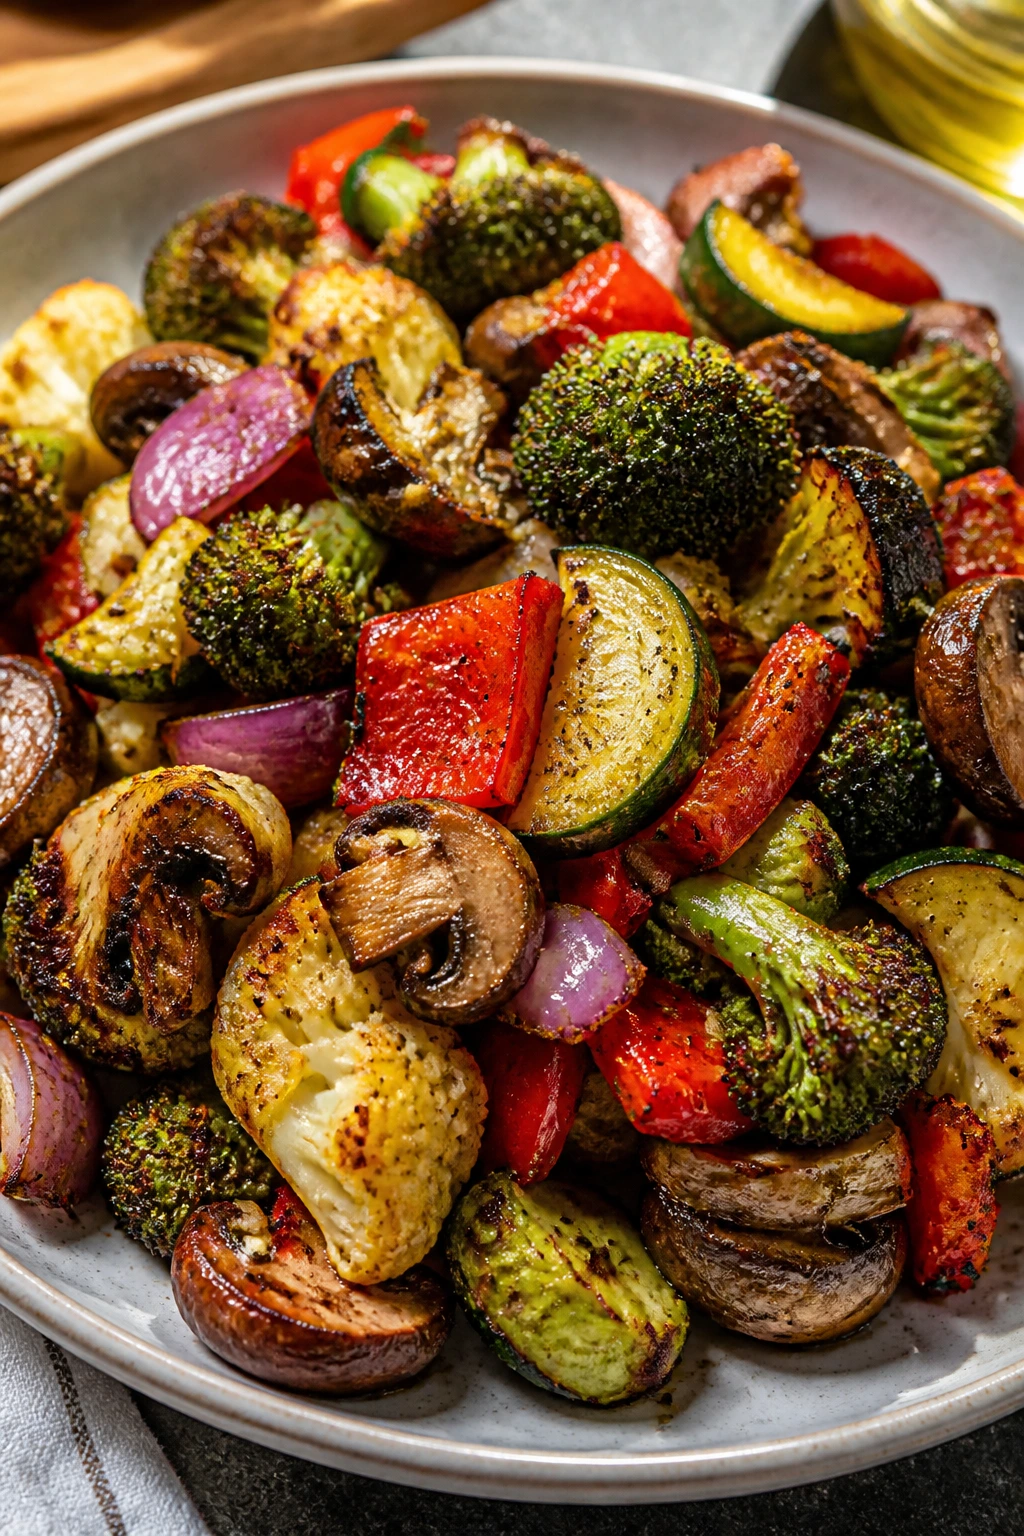
Garlicky air fryer vegetables are the rare side dish that can pull their weight at dinner. Get the heat right, keep the pieces dry, and you’ll pull out a basket with bronzed broccoli tips, sweet onion edges, mushrooms that have shrunk into something earthy and concentrated, and garlic that smells warm instead of sharp. That matters. A lot.
The air fryer is a small machine, but it behaves like a very fussy little convection oven. It rewards dry surfaces, even cuts, and a light hand with oil. It punishes crowding. It also has no patience for wet vegetables straight from the sink, which is why so many batches come out pale and soft when they should have color and bite.
What makes this version worth making is the finish. Garlic powder in the seasoning keeps the flavor broad and steady, then fresh garlic gets stirred through the hot vegetables at the end with lemon juice and parsley so the whole bowl tastes bright, not heavy. The difference is easy to taste. One version smells like steamed lunch. The other smells like dinner.
Why This Basket Works So Well
-
Bronzed edges, not limp vegetables: The air fryer pushes hot air across every cut surface, so broccoli and cauliflower pick up those roasted tips that taste nutty instead of watery.
-
Garlic in two stages: Garlic powder seasons the vegetables before they cook, while fresh grated garlic goes in at the end, which keeps the flavor strong without turning bitter in the basket.
-
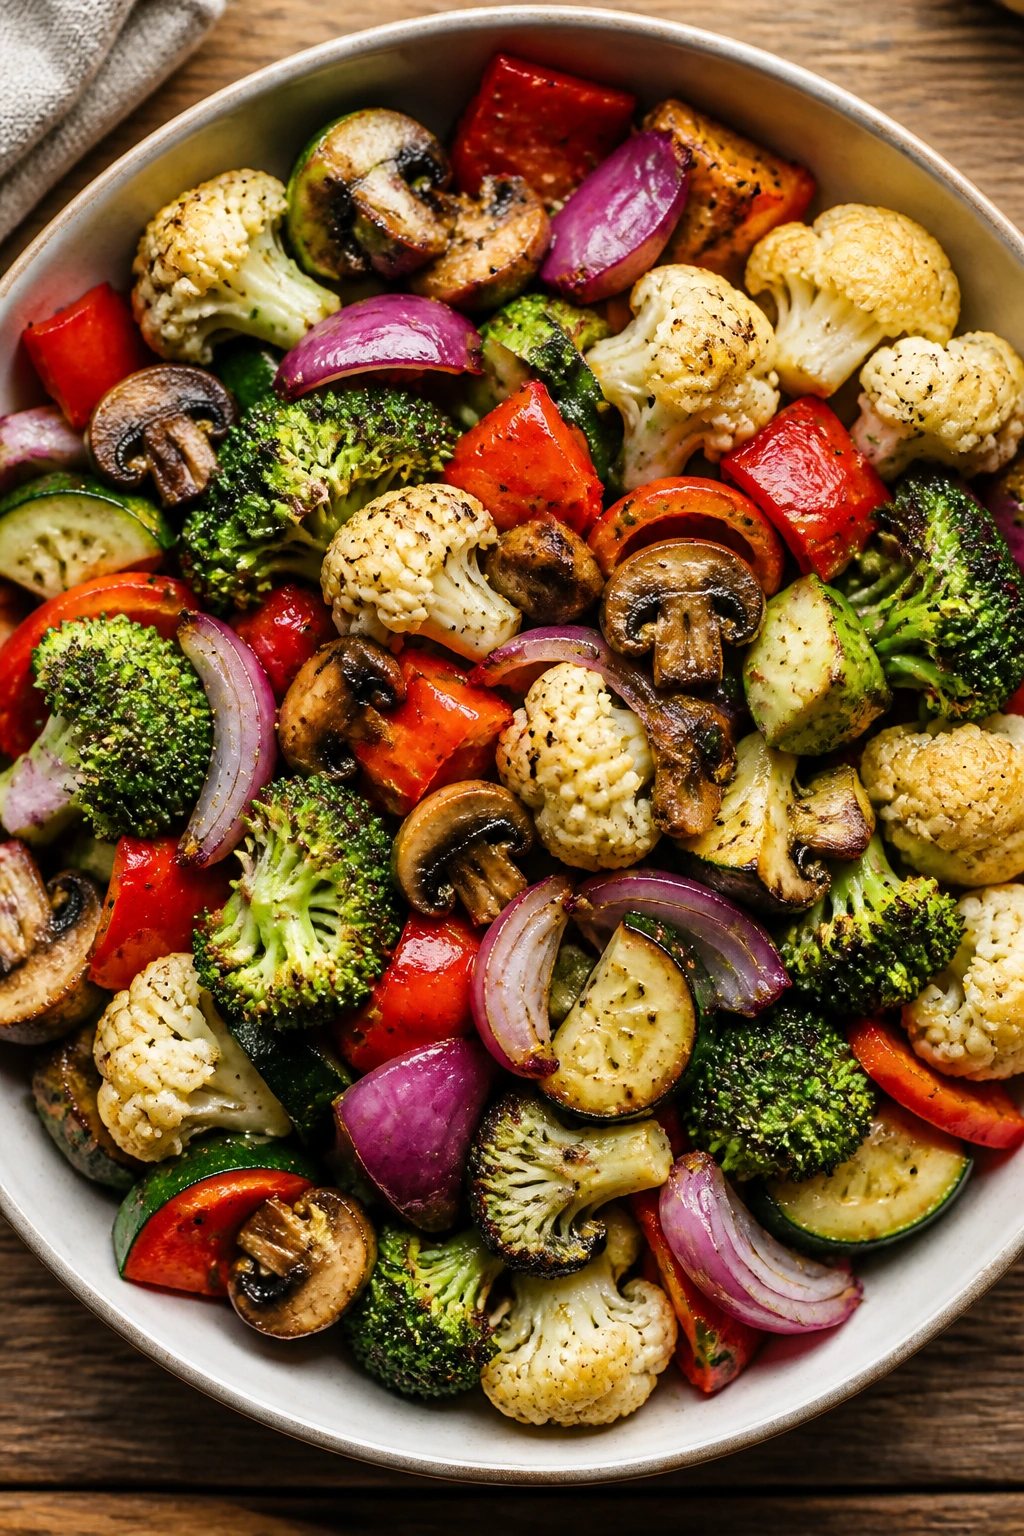
A short ingredient list that still feels complete: Broccoli, cauliflower, peppers, zucchini, mushrooms, and onion give you color, texture, and enough variety that every forkful lands differently.
-
Dinner-ready with a little planning: Spoon these over quinoa, tuck them beside tofu, or pile them next to eggs and toast. The vegetables are the main event if you want them to be.
-
Easy to scale up or down: A small basket can handle half the batch in two rounds, and the seasoning still tastes balanced either way. No need to rebuild the recipe.
-
Works with pantry seasoning, not a long shopping list: Olive oil, garlic, salt, pepper, smoked paprika, lemon, and parsley do the heavy lifting. Nothing fussy.
Yield: Serves 4 as a side or 2 to 3 as a light main
Prep Time: 15 minutes
Cook Time: 12 minutes
Total Time: 27 minutes
Difficulty: Beginner — the only real skill is cutting the vegetables into pieces that cook at the same pace.
Best Served: Hot from the basket, with the garlic-lemon finish still glossy on the vegetables.
What Makes Air Fryer Vegetables Taste Roasted Instead of Steamed
The key difference is surface moisture. If you’ve ever thrown wet vegetables into a hot basket and wondered why they came out floppy, that’s the culprit. Steam forms fast in a tight space, and steam softens the edges before browning can happen. Dry vegetables, by contrast, let the hot air do its work.
That’s why this recipe starts with a dry towel, not a heroic amount of oil. Oil helps carry seasoning and encourages color, but it can’t fix water clinging to broccoli or mushrooms. Three minutes spent drying the vegetables is worth more than another tablespoon of oil.
The other piece is cut size. Broccoli florets shouldn’t look like tiny pebbles. Zucchini shouldn’t be shaved into paper-thin half-moons. If the pieces are too small, the basket turns them into mush before the browning catches up. If they’re too large, the outside colors while the inside stays stubborn. The sweet spot is a generous bite: big enough to hold structure, small enough to cook through in 10 to 12 minutes.
And then there’s the basket itself. Air fryers differ more than people admit. Some run hot and darken vegetables fast; others need the full time and a little more. That’s why the first shake matters. It isn’t a ceremony. It’s what keeps one side from sitting against the basket while the rest of the batch browns unevenly.
What Goes Into the Bowl
For the Vegetables:
-
1 large head broccoli, cut into 1½-inch florets
These give the batch its best browned edges and hold up without turning soft. -
1 small head cauliflower, cut into 1½-inch florets
Cauliflower picks up seasoning well and turns sweet at the edges. -
1 red bell pepper, seeded and cut into 1-inch pieces
The pepper adds color and a softer, juicy contrast. -
1 medium zucchini, cut into ¾-inch half-moons
Keep the slices thick enough to stay intact in the hot basket. -
8 oz cremini mushrooms, halved if large
They shrink and concentrate, which gives the bowl depth. -
1 small red onion, cut into 1-inch wedges
The onion turns silky and lightly sweet where the edges catch. -
2 tablespoons extra-virgin olive oil
Enough to coat the vegetables lightly without making them greasy. -
1 teaspoon garlic powder
This carries the garlic flavor through the high heat. -
1 teaspoon kosher salt
Salting before cooking helps season the vegetables all the way through. -
½ teaspoon black pepper
Sharpens the finish and keeps the bowl from tasting flat. -
½ teaspoon smoked paprika
Adds a little warmth and a roasted note that fits the air fryer.
For the Garlic Finish:
-
3 cloves garlic, finely grated or minced
Fresh garlic goes in after cooking so it stays fragrant, not bitter. -
1 tablespoon lemon juice
Brightens the whole batch and keeps the vegetables from tasting heavy. -
1 tablespoon extra-virgin olive oil
Helps the garlic coat the hot vegetables evenly. -
1 tablespoon chopped fresh parsley
Gives the bowl a clean, green finish. -
2 tablespoons grated Parmesan or nutritional yeast, optional
Use Parmesan for salty richness or nutritional yeast for a dairy-free savory note. -
Pinch of red pepper flakes, optional
Good if you want a little heat at the end.
Broccoli and Cauliflower: The Spine of the Dish
What to use: 1 large head broccoli and 1 small head cauliflower, both cut into 1½-inch florets. These two handle the air fryer better than wetter, more delicate vegetables and give the dish the browned, roasted look people want from a healthy dinner.
Preparation: Trim off thick woody stems, then split the florets so the flat sides are visible. That little detail matters because flat sides pick up color faster than spindly stems.
Substitutions: Brussels sprouts work well here, and so does cabbage cut into wedges if that’s what you have. If you swap in carrots, slice them thinner so they cook at the same pace.
Tips: Keep the florets fairly dry and don’t chase tiny pieces. Small bits burn before the big ones finish, and you end up with a basket full of uneven textures.
Peppers, Zucchini, Mushrooms, and Onion: The Softer Pieces
What to use: 1 red bell pepper, 1 medium zucchini, 8 oz cremini mushrooms, and 1 small red onion. These give the dish enough sweetness and moisture that it doesn’t feel like a bowl of crunchy brassicas and nothing else.
Preparation: Cut the pepper into clean, square-ish pieces, not long ribbons. Slice the zucchini thick enough to survive the cook, and halve the mushrooms if they’re on the larger side so they release moisture more evenly.
Substitutions: Yellow peppers, shallots, and even sliced fennel can stand in for part of this group. If you dislike zucchini, use extra mushrooms or a second pepper instead.
Tips: Mushrooms should be wiped clean or rinsed fast and dried well; they soak up water at the surface and will steam if left damp. Onions roast best when they’re cut into wedges that stay attached at the root end.
Garlic and Oil: The Difference Between Strong and Burnt
What to use: 2 tablespoons olive oil for the vegetables and 1 tablespoon olive oil for the garlic finish, plus 3 cloves garlic. That split keeps the flavor layered instead of muddy.
Preparation: Mix the dry seasonings into the oil before tossing the vegetables so every piece gets an even coat. Grate or mince the garlic very finely for the finish so it softens quickly when it hits the hot vegetables.
Substitutions: Avocado oil works if you want a neutral oil with a higher smoke point. If fresh garlic is too sharp for you, use roasted garlic paste in the finish instead.
Tips: Don’t put raw garlic in the basket at the start. It goes from fragrant to bitter in a hurry, and the basket floor is no place for delicate garlic.
Seasonings and Finish: Where the Bowl Comes Together
What to use: 1 teaspoon garlic powder, 1 teaspoon kosher salt, ½ teaspoon black pepper, ½ teaspoon smoked paprika, 1 tablespoon lemon juice, parsley, and optional Parmesan or nutritional yeast. This is a short list, but it’s enough.
Preparation: Stir the dry spices into the oil before tossing, then mix the lemon juice, grated garlic, and parsley in a separate bowl while the vegetables cook. The goal is to move fast once the vegetables come out.
Substitutions: Smoked paprika can be swapped for sweet paprika or a pinch of cumin if you want a different profile. Lemon zest can step in for part of the juice if you want a sharper perfume.
Tips: Add the Parmesan only after cooking so it clings to the hot surfaces. If you add it too early, it melts into the basket and stops doing its job.
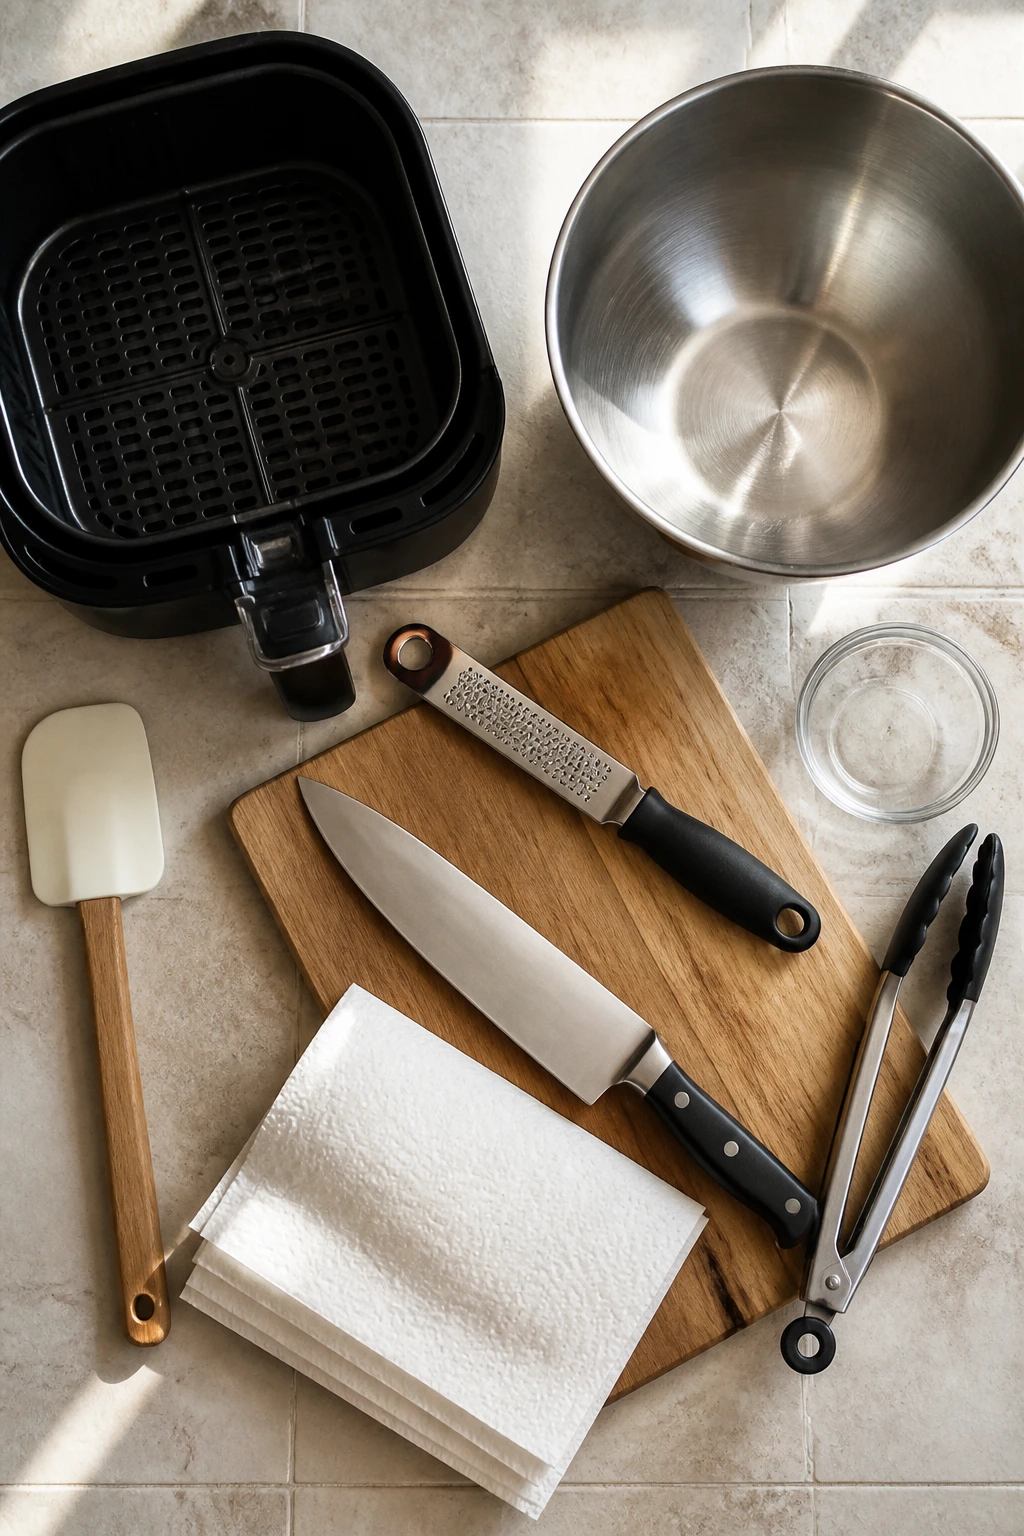
The Tools That Keep the Basket Honest
-
Air fryer basket or tray-style air fryer — A 5-quart basket or larger makes a single batch more realistic; a smaller unit may need two rounds.
-
Large mixing bowl — Big enough to toss the vegetables without crushing the florets or spilling oil across the counter.
-
Chef’s knife and sturdy cutting board — A clean cut matters more than fancy knife work here, and a damp towel under the board keeps it from sliding.
-
Microplane or fine grater — Best tool for the garlic finish because it turns the cloves into a soft paste that coats the vegetables instead of sticking in clumps.
-
Silicone spatula or tongs — Useful for turning the vegetables without scraping the basket coating.
-
Small bowl — For the garlic-lemon finish, which is easier to add all at once than to improvise in the basket.
-
Paper towels or a clean kitchen towel — Not glamorous, but they matter. Dry vegetables brown better.
Step-by-Step: From Raw Vegetables to Dinner
Prep the Vegetables
-
Preheat the air fryer to 390°F (200°C) for 3 to 4 minutes. If your model runs hot, stick with 390°F rather than pushing it higher; the garlic finish needs the vegetables to be browned, not scorched.
-
Wash the broccoli, cauliflower, pepper, zucchini, mushrooms, and onion, then dry them thoroughly. Any visible water will steam the vegetables and mute the browning. If the mushrooms are dirty, wipe them clean with a damp towel instead of soaking them.
-
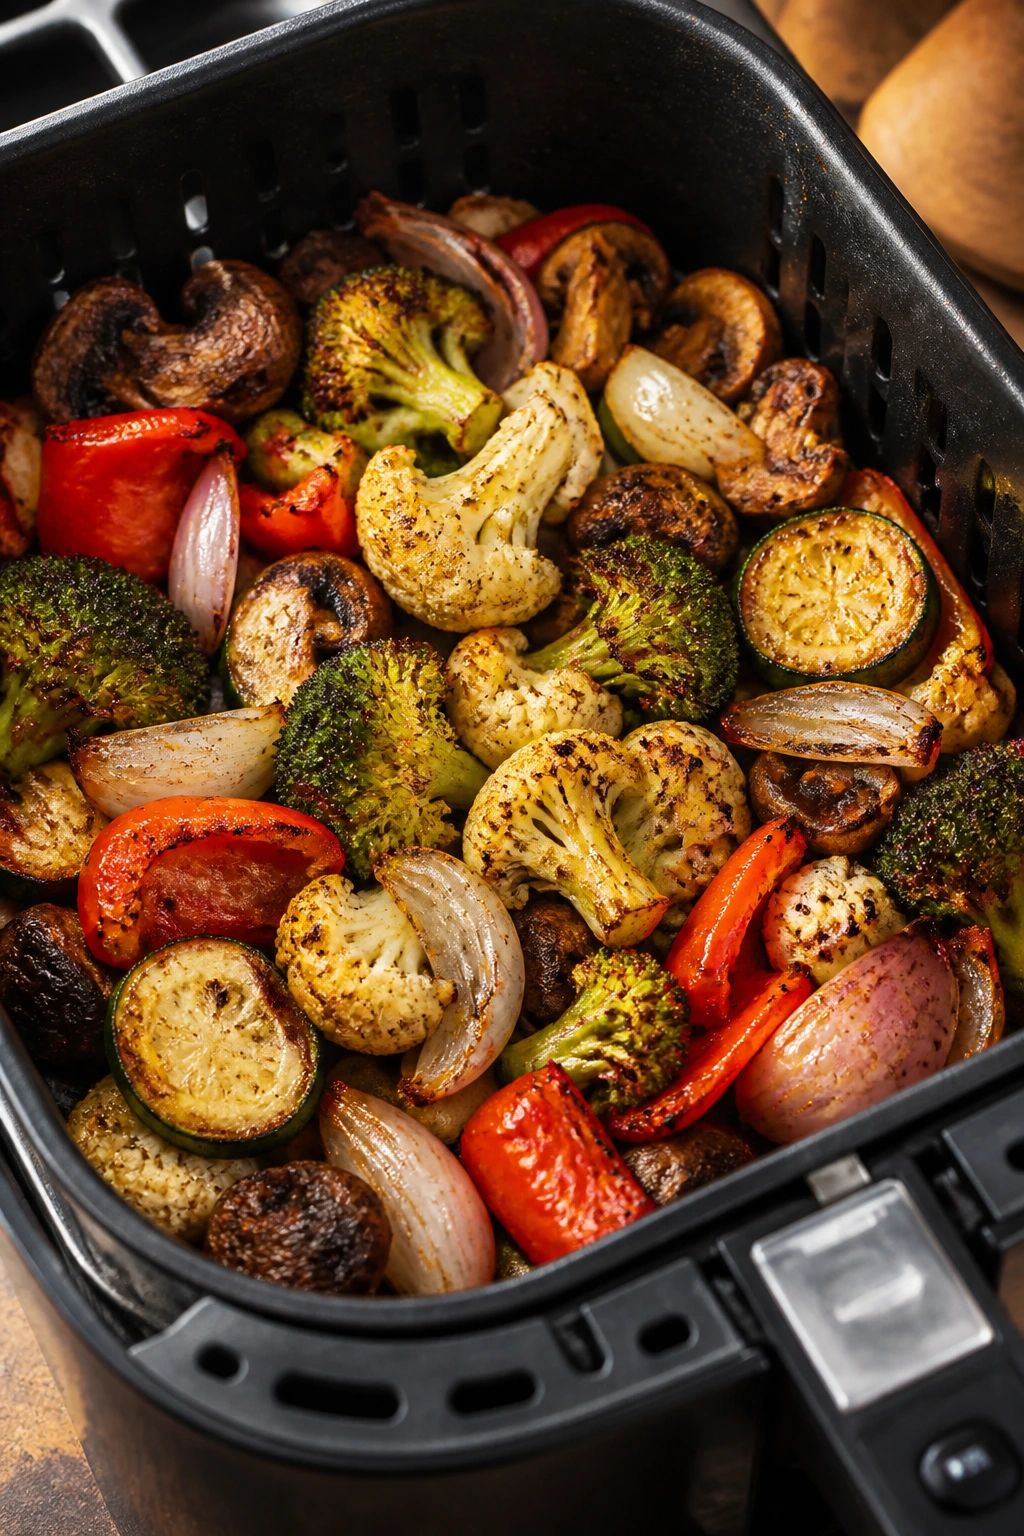
Cut the broccoli and cauliflower into 1½-inch florets, the pepper into 1-inch pieces, the zucchini into ¾-inch half-moons, the mushrooms in half if needed, and the onion into 1-inch wedges. Try to keep the pieces in a similar size range so the basket finishes together.
Season and Load the Basket
-
Place the vegetables in a large bowl and drizzle with 2 tablespoons olive oil. Add the garlic powder, salt, black pepper, and smoked paprika, then toss until every piece looks lightly coated rather than slick. The vegetables should glisten, not drip.
-
Transfer the vegetables to the air fryer basket in a single layer if possible. A little overlap is fine. A heavy mound is not. If your basket is small, cook in two batches instead of crowding everything into one pile.
Cook and Finish
-
Air fry for 10 to 12 minutes, shaking the basket after about 6 minutes. Keep an eye on the broccoli tips and onion edges; you want the broccoli to darken at the crowns and the cauliflower to show little toasted spots, while the zucchini stays tender but not collapsed.
-
While the vegetables cook, mix the minced garlic, lemon juice, 1 tablespoon olive oil, parsley, optional Parmesan or nutritional yeast, and red pepper flakes in a small bowl. Let it sit for 1 minute so the garlic softens slightly in the lemon juice.
-
Tip the hot vegetables into a serving bowl and spoon the garlic finish over the top. Toss gently, then taste. Add a pinch more salt or a squeeze more lemon if the bowl needs it. Serve immediately while the edges are still crisp and the garlic is warm.
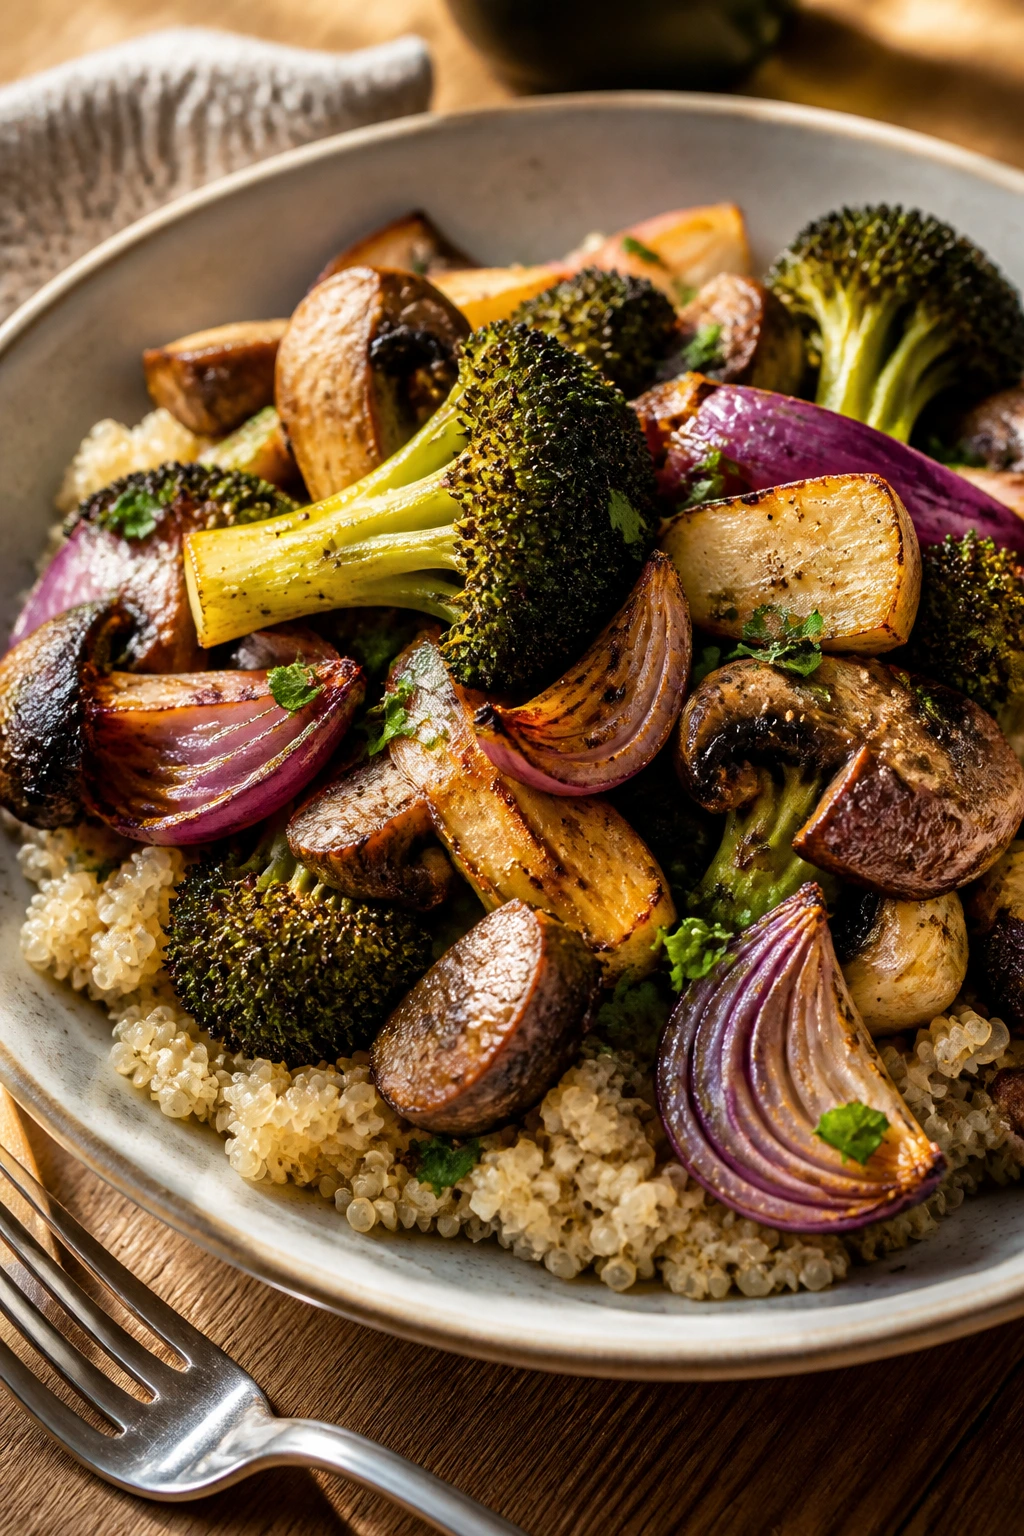
How to Serve These Garlicky Air Fryer Vegetables Like a Proper Meal
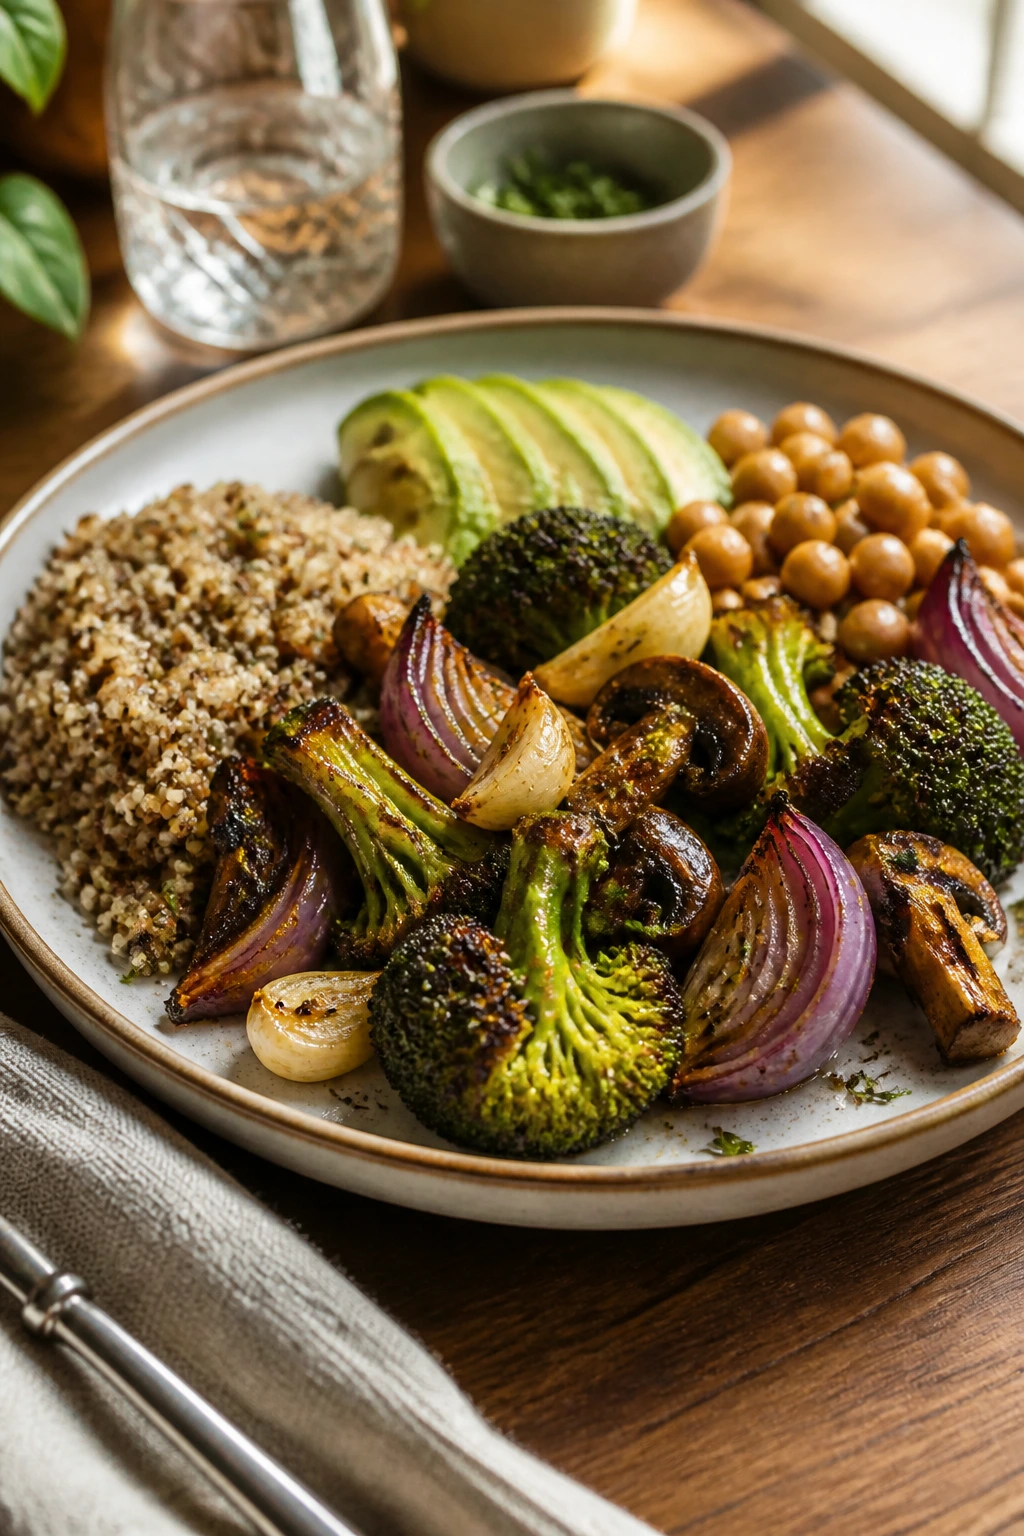
Presentation: Pile the vegetables into a shallow bowl rather than a deep one. You’ll see the browned broccoli tips, the glossy onion edges, and the parsley better that way, and the whole thing looks deliberate instead of dumped out of a basket.
Accompaniments: For a true dinner plate, spoon the vegetables over quinoa, brown rice, or farro, then add chickpeas, baked tofu, grilled chicken, or a jammy egg if you eat eggs. If you want something lighter, serve them with lemony yogurt on the side and a thick slice of toast to catch the garlic oil.
Portions: As a side dish, this makes 4 servings. As a main, it feeds 2 to 3 people once you add a grain or protein. If you’re feeding a bigger table, scale the vegetables up but plan on cooking in batches so the texture stays right.
Beverage Pairing: A cold glass of sparkling water with lemon keeps the garlic and oil feeling bright. If you want wine, a dry Sauvignon Blanc or Pinot Grigio fits the lemony finish better than anything oaky or heavy.
Small Tweaks That Change the Whole Batch
Flavor Enhancement: Grate the garlic on a microplane instead of chopping it coarse. The finer texture melts into the hot vegetables faster, so every bite tastes seasoned instead of giving you one sharp garlic hit and then nothing.
Time-Saver: Buy pre-cut broccoli and cauliflower florets if the knife work is what slows you down, but still dry them thoroughly before seasoning. Packaged vegetables often carry surface moisture that needs to go before they hit the basket.
Cost-Saver: Use whatever sturdy vegetables are cheap and in season, but keep the ratio sensible. Broccoli, cauliflower, onion, and mushrooms tend to be reliable, and they handle reheating better than watery vegetables like tomatoes.
Make-It-Yours: If you want more protein at the table, add chickpeas to the basket after patting them dry and give them an extra 2 to 3 minutes. If you want more richness, a spoonful of tahini whisked with lemon juice makes a fast drizzle that works with the garlic finish.
Serving Suggestions: A final dusting of lemon zest makes the garlic smell fresher. A few toasted sesame seeds or a pinch of chopped dill can also shift the bowl in a good direction without changing the whole recipe.
Common Mistakes That Make Vegetables Go Soft
-
Crowding the basket: When the vegetables stack in a thick layer, they trap steam and pale out instead of browning. Fix it by cooking in two batches or using slightly less vegetable in each round.
-
Using wet vegetables: A rinse without a proper dry-down leaves a film of water that turns to steam almost immediately. Pat the vegetables dry with a kitchen towel before they ever touch the oil.
-
Adding fresh garlic too early: Raw garlic in the basket burns fast and turns bitter. Put the fresh garlic in the lemon finish at the end and keep the garlic powder for the seasoning step.
-
Cutting zucchini too thin: Thin slices collapse before the broccoli and cauliflower finish, and then the whole bowl feels mushy. Use thick half-moons, about ¾-inch, so the zucchini stays in the conversation.
-
Skipping the basket shake: One side can brown while the other side sits pale against the metal. Shake once halfway through and again if the vegetables are packed close.
-
Using too much oil: More oil does not make vegetables taste more roasted. It can make them slippery and soft, which is the opposite of what you want. Stick to the measured amount and let the heat do the rest.
Flavor Variations Worth Repeating

Lemon-Parmesan Finish
Add 2 tablespoons grated Parmesan and a little extra lemon zest to the garlic finish. The cheese clings to the hot broccoli and cauliflower, and the lemon keeps the bowl from tasting heavy.
Chili Crisp Garlic
Swap the parsley for 1 to 2 teaspoons chili crisp at the end and skip the Parmesan. That gives the vegetables a savory, spicy finish with crunchy bits that settle into the florets.
Mediterranean Chickpea Bowl
Add one 15-ounce can chickpeas, drained and dried well, for the final 2 to 3 minutes of cooking. Finish with crumbled feta, extra lemon juice, and a little chopped dill if you want dinner to feel more substantial.
Brussels and Carrot Swap
Replace the cauliflower and zucchini with 2 cups halved Brussels sprouts and 1 cup carrot coins cut ¼-inch thick. Start those firmer vegetables first and give them 3 extra minutes before adding the peppers and mushrooms so the basket finishes at the same pace.
Make-Ahead, Storage, and Reheating
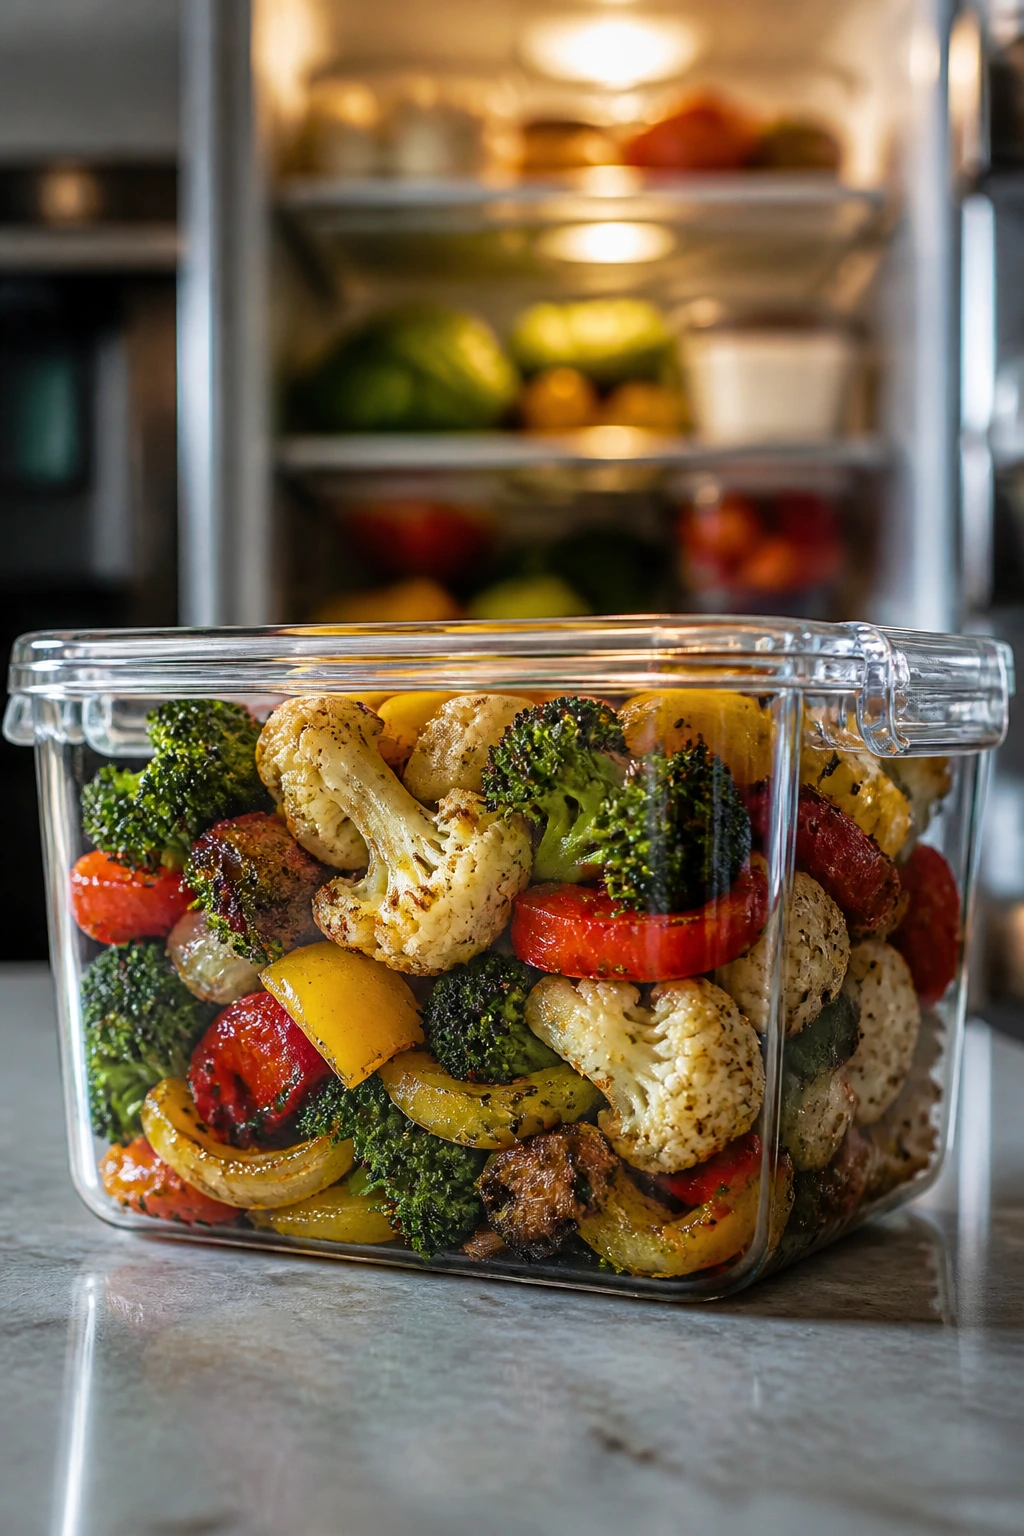
Fresh from the basket is the sweet spot. That said, leftovers do hold up better than you’d expect if you treat them right. Cool the vegetables in a shallow bowl for no more than 2 hours before storing, because a sealed hot container traps steam and softens the edges fast.
For the fridge, keep the vegetables in an airtight container for 3 to 4 days. If the batch includes a lot of zucchini, expect the texture to soften a bit by day three. That does not mean the vegetables are bad; it means they’re better suited to being reheated and tucked into a grain bowl than served straight out of the container.
The freezer is possible, but it changes the texture. Broccoli and cauliflower freeze more gracefully than zucchini and mushrooms, so if freezing is part of your plan, keep the zucchini out of the batch or reduce it. Pack the cooled vegetables in a freezer-safe bag or container for up to 2 months, then reheat from frozen in the air fryer at 380°F for 8 to 10 minutes until hot.
Reheating in the air fryer at 375°F for 4 to 6 minutes gives the best result for leftovers from the fridge. A skillet over medium heat with a teaspoon of oil works too, especially if you want a little fresh browning. The microwave is the least satisfying option, but if that’s what you’ve got, use short bursts and stop before the vegetables turn limp.
For make-ahead prep, chop the vegetables up to 24 hours in advance and store them dry in the fridge with a paper towel in the container. The dry seasoning mix can be stirred together 3 days ahead. Make the garlic finish right before serving; it takes under a minute, and it tastes far better when it hasn’t sat around.
Questions People Ask Before They Start
Can I use frozen vegetables?
Yes, but the texture will be softer and the basket may need a few extra minutes. Use frozen broccoli, cauliflower, or green beans without thawing first, and expect less browning than you get from fresh vegetables because the surface moisture is higher.
How do I keep the garlic from burning?
Use garlic powder in the seasoning and fresh garlic only in the finish after the vegetables come out of the fryer. If you want the fresh garlic less sharp, stir it into the lemon juice and olive oil a minute early so it softens before the toss.
Do I have to preheat the air fryer?
You don’t have to, but I wouldn’t skip it here. A preheated basket gives the vegetables immediate heat on contact, which is part of how you get the browned edges instead of a slow steam.
Can this become a full dinner on its own?
Absolutely, but it needs a partner with a little substance. Add quinoa, brown rice, farro, chickpeas, tofu, a fried egg, or beans, and the bowl stops feeling like a side dish and starts feeling like dinner.
Why did my vegetables come out soggy?
Usually it’s one of three things: the vegetables were wet, the basket was crowded, or the oil was heavy enough to weigh everything down. Dry the vegetables well, cook in batches if needed, and keep the oil measured rather than poured.
Can I make this in the oven instead?
Yes. Roast the vegetables on a sheet pan at 425°F for about 20 to 25 minutes, flipping once halfway through, then add the garlic finish after they come out. You won’t get the same basket-style crisping, but the flavor still lands.
What vegetables cook at the same speed as this mix?
Broccoli, cauliflower, bell peppers, mushrooms, onions, and thick zucchini all sit in the same general window. Thin carrots, sweet potatoes, or Brussels sprouts need a different cut or a head start, which is why they’re better as a variation than a casual swap.
Why I Keep Coming Back to Garlicky Air Fryer Vegetables
A good vegetable recipe shouldn’t feel like a favor you’re doing for the rest of the plate. It should taste deliberate. These garlicky air fryer vegetables do that without asking for much beyond a dry towel, a hot basket, and the discipline to add the garlic at the end where it belongs.
What I like most is the balance. The broccoli and cauliflower bring the roastiness, the pepper and onion keep things sweet, the mushrooms give the bowl weight, and the lemon-garlic finish keeps the whole thing awake. That’s a lot of useful work from a short ingredient list.
Once a vegetable dish can stand up to dinner without turning soft or dull, it earns a permanent spot in the rotation. This one does.
Garlicky Air Fryer Vegetables — Recipe Card
Recipe Name: Garlicky Air Fryer Vegetables
Description: A mix of broccoli, cauliflower, bell pepper, zucchini, mushrooms, and red onion cooked in the air fryer until browned at the edges, then tossed with fresh garlic, lemon, parsley, and a little olive oil. It works as a side dish or a light main with grains or protein.
Prep Time: 15 minutes
Cook Time: 12 minutes
Total Time: 27 minutes
Course: Side Dish, Main Course
Cuisine: American
Servings: 4 servings
Calories: about 175 kcal per serving
Ingredients
For the Vegetables:
- 1 large head broccoli, cut into 1½-inch florets
- 1 small head cauliflower, cut into 1½-inch florets
- 1 red bell pepper, seeded and cut into 1-inch pieces
- 1 medium zucchini, cut into ¾-inch half-moons
- 8 oz cremini mushrooms, halved if large
- 1 small red onion, cut into 1-inch wedges
- 2 tablespoons extra-virgin olive oil
- 1 teaspoon garlic powder
- 1 teaspoon kosher salt
- ½ teaspoon black pepper
- ½ teaspoon smoked paprika
For the Garlic Finish:
- 3 cloves garlic, finely grated or minced
- 1 tablespoon lemon juice
- 1 tablespoon extra-virgin olive oil
- 1 tablespoon chopped fresh parsley
- 2 tablespoons grated Parmesan or nutritional yeast, optional
- Pinch of red pepper flakes, optional
Instructions
-
Preheat the air fryer to 390°F (200°C) for 3 to 4 minutes.
-
Wash the vegetables and dry them thoroughly.
-
Cut the broccoli, cauliflower, pepper, zucchini, mushrooms, and onion into the sizes listed above.
-
Toss the vegetables with 2 tablespoons olive oil, garlic powder, salt, black pepper, and smoked paprika.
-
Place the vegetables in the air fryer basket in a single layer or slightly mounded.
-
Air fry for 10 to 12 minutes, shaking the basket halfway through, until the broccoli tips are browned and the cauliflower has toasted spots.
-
Mix the garlic, lemon juice, 1 tablespoon olive oil, parsley, and optional Parmesan or nutritional yeast in a small bowl.
-
Toss the hot vegetables with the garlic finish and serve right away.
Notes: Dry vegetables brown better, don’t crowd the basket, and add the fresh garlic only after cooking. If your air fryer runs hot, check at 10 minutes.