
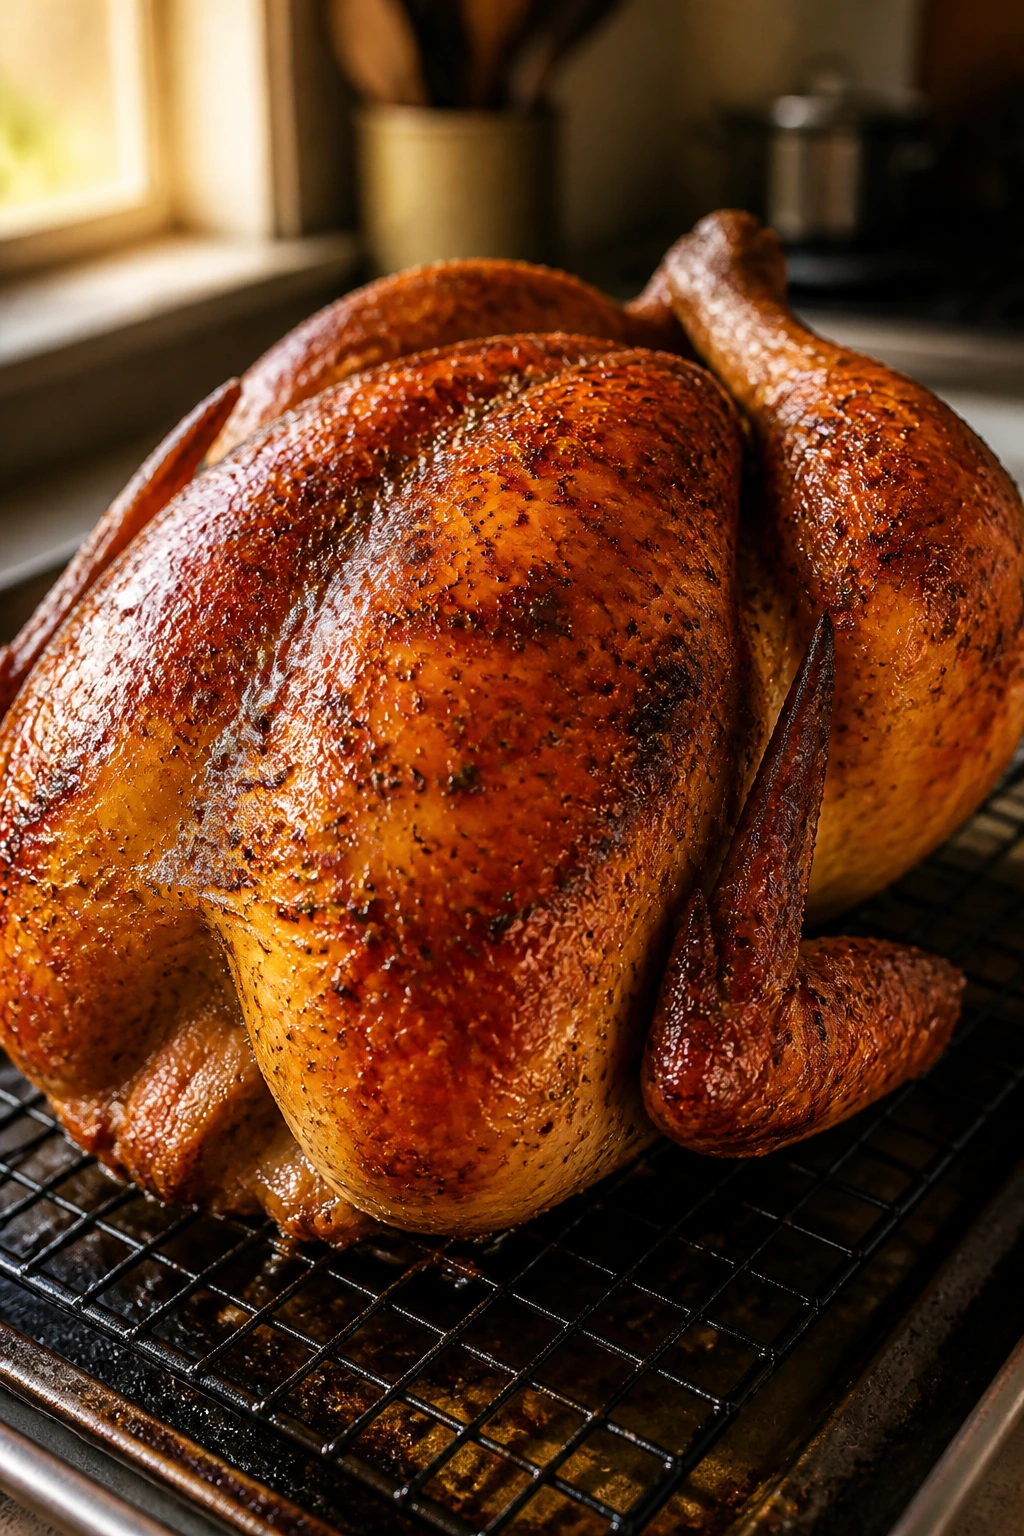
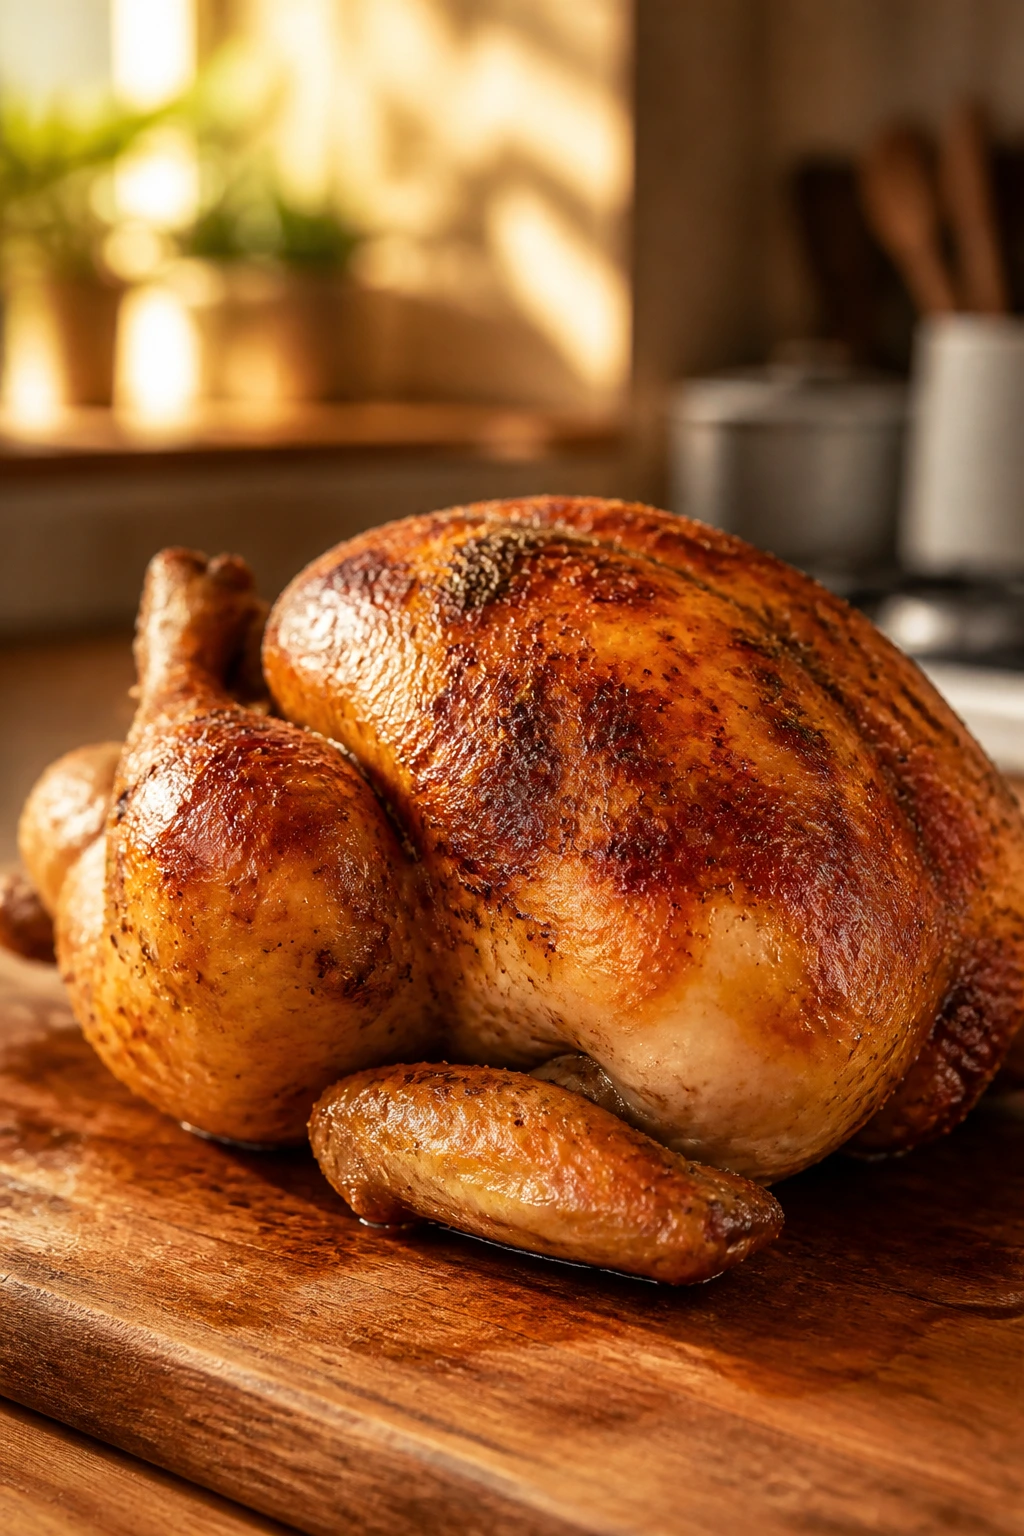
A good rotisserie chicken does not need a spit or a deli case. Give me a 4-pound bird, a hot oven, and a spice rub that smells like paprika, garlic, and thyme, and I’ll take that over the pale supermarket version every time.
The reason this works so well for weeknight dinners is almost embarrassingly practical. One chicken gives you a hot dinner, leftover slices for wraps or sandwiches, and bones that are still worth simmering for stock after the plates are cleared. That kind of stretch matters when the fridge is half full and nobody wants to stand at the stove for an hour.
The trick is not mysterious. Dry skin. Enough salt. A little fat under the breast skin. And a roast that stops when the thermometer says stop — not when the clock says you should be done. Breasts can go from juicy to dry in a narrow window, and thighs need a touch more heat than people usually give them, which is why so many home-roasted birds end up underseasoned in the middle and overcooked at the edges.
This version keeps the process plain and repeatable. You pat the chicken dry, work a butter-and-spice paste under the skin, tuck in lemon, onion, and garlic, then roast on a rack until the skin turns deep amber and the juices settle back into the meat. It’s the kind of dinner that looks like you tried harder than you did, which is one of my favorite kitchen cheats.
Why This Rotisserie Chicken Works So Well for Weeknight Dinners
- One bird, multiple meals: A 4- to 4 1/2-pound chicken feeds dinner tonight and still leaves enough meat for sandwiches, soup, or quesadillas tomorrow.
- The skin gets real color: A hot start at 425°F dries and browns the skin fast enough to give you crisp, seasoned edges instead of soft, steamed patches.
- The meat stays juicy: Butter under the skin and a rest at the end keep the breast slices moist even after the bird is carved.
- The seasoning tastes cooked, not dusted on: Paprika, garlic powder, onion powder, thyme, and a little brown sugar toast in the oven and smell like an actual rotisserie chicken, not a dry spice cabinet.
- You do not need special gear: A rack, a pan, and an instant-read thermometer handle the whole job.
- It fits a normal evening: The hands-on work is about 20 minutes, then the oven does the heavy lifting while you make rice, potatoes, or a salad.
Yield: Serves 4 to 6
Prep Time: 20 minutes
Cook Time: 1 hour 15 minutes
Total Time: 1 hour 35 minutes
Difficulty: Beginner — the steps are straightforward, but the thermometer check matters more than guesswork.
Chill/Rest Time: Optional 8 to 24 hours for a dry brine in the fridge; 15 to 20 minutes resting after roasting
Best Served: Warm, carved within 20 minutes of leaving the cutting board
Ingredient List and What Each Piece Does
For the Chicken
- 1 whole chicken, 4 to 4 1/2 pounds, giblets removed and patted dry
- 1 tablespoon kosher salt, or 2 teaspoons fine sea salt if that’s what you keep on hand
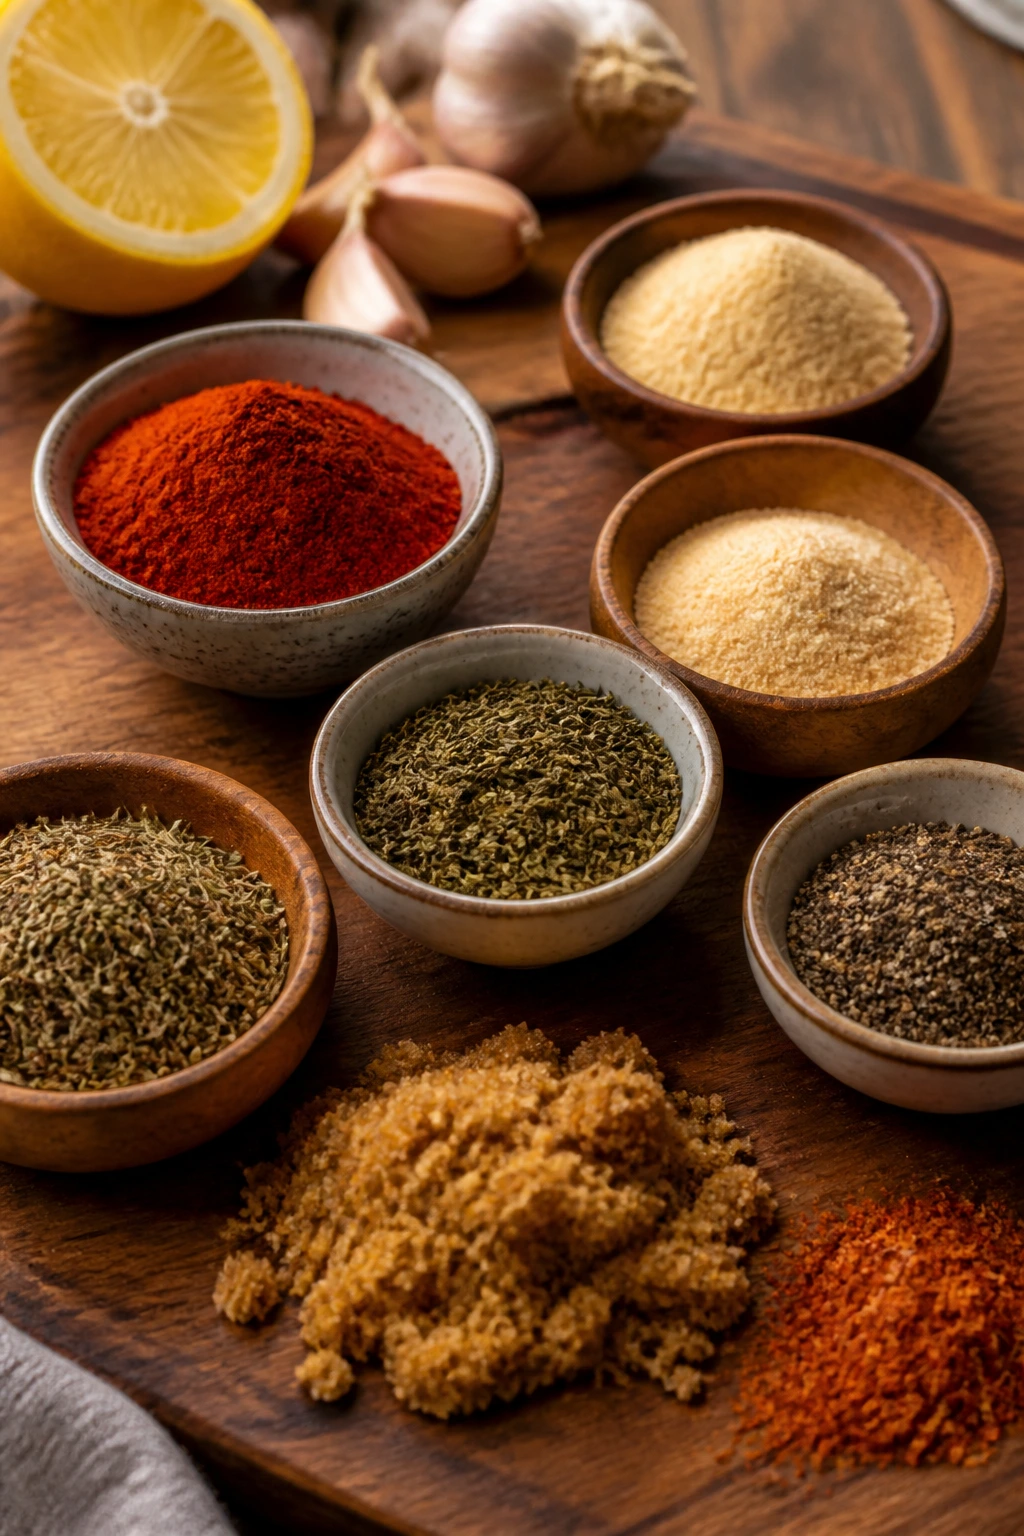
For the Rotisserie Rub
- 2 teaspoons paprika
- 1 teaspoon garlic powder
- 1 teaspoon onion powder
- 1 teaspoon dried thyme
- 1/2 teaspoon dried rosemary, crushed between your fingers
- 1/2 teaspoon black pepper
- 1/2 teaspoon brown sugar
- 1/4 teaspoon cayenne pepper, optional
For the Butter Layer
- 2 tablespoons unsalted butter, softened
- 1 tablespoon olive oil
For the Cavity Aromatics
- 1 lemon, halved
- 1 small yellow onion, cut into 4 wedges
- 4 garlic cloves, smashed
For Serving
- 1 tablespoon chopped parsley, optional
The Chicken
What to use: One whole chicken in the 4- to 4 1/2-pound range is the sweet spot here. It cooks through before the breast dries out, and the skin still has room to crisp.
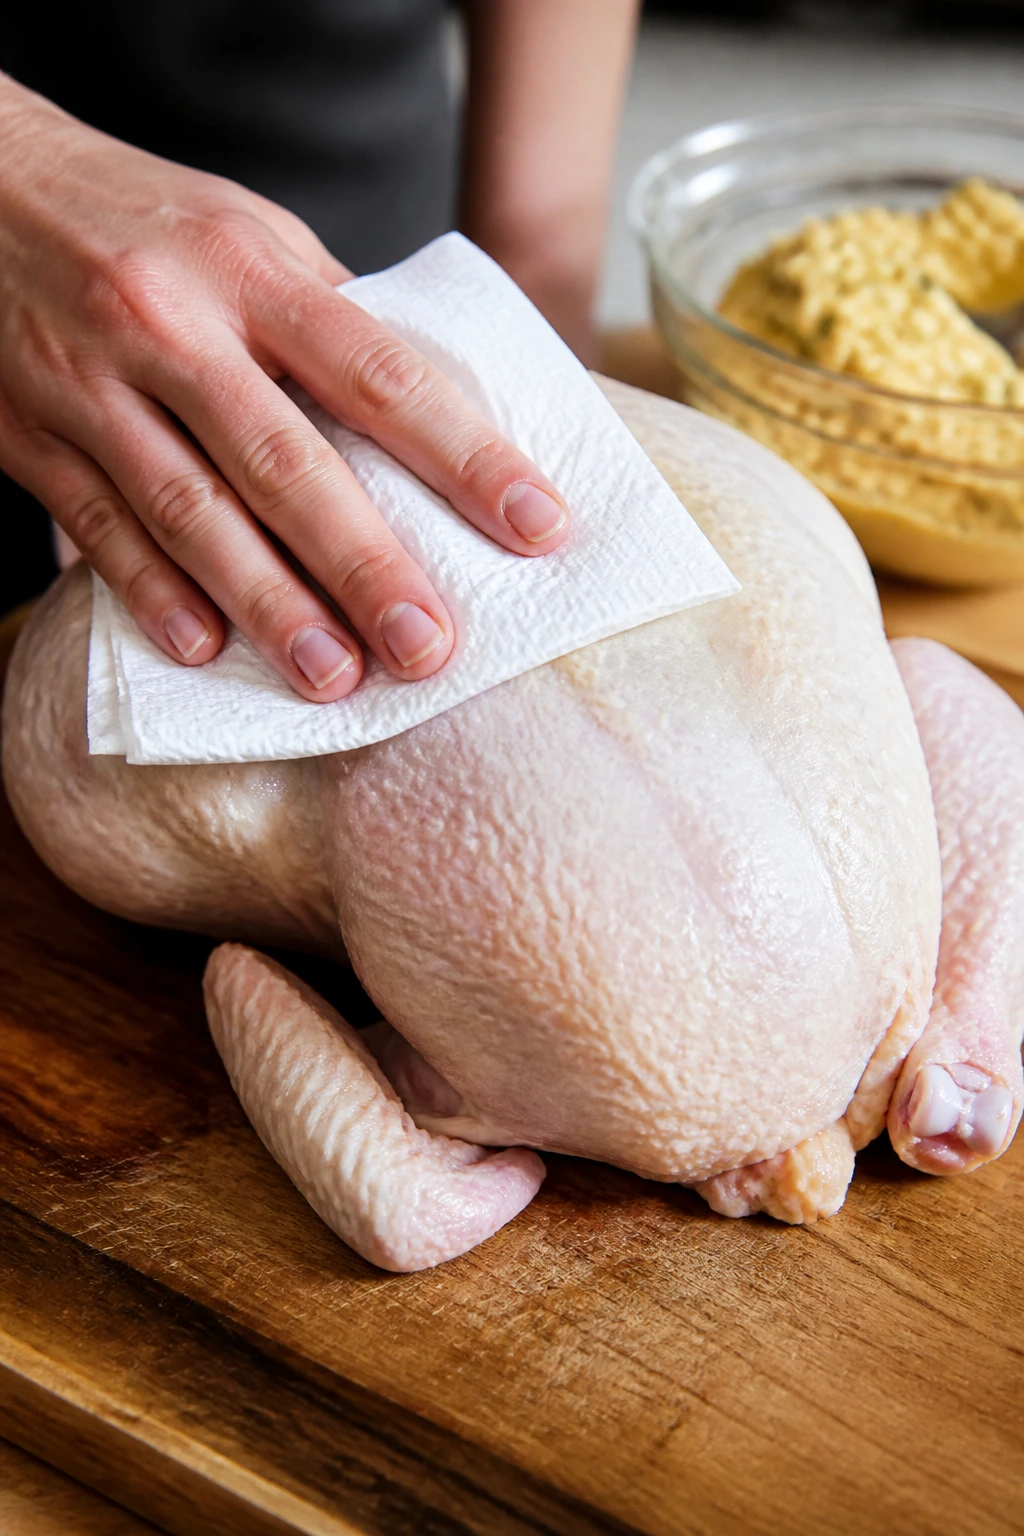
Preparation: Pull out the giblets, then blot the entire chicken with paper towels until the skin feels dry and a little tacky.
Substitutions: If you only have a larger bird, the same rub still works, but the roast will take longer and the breast needs closer watching. You can also use the seasoning on chicken pieces, though the timing changes.
Tips: A chicken that has not been swimming in excess liquid under the packaging tends to brown better. If the tray has a puddle in it, drain it off before you start.
The Rotisserie Rub
What to use: Paprika, garlic powder, onion powder, thyme, rosemary, black pepper, brown sugar, and a little cayenne if you like a faint kick.
Preparation: Crush the rosemary a bit before mixing so the needles don’t stay sharp and woody on the bird. Stir the spices into the softened butter until the paste turns deep brick-red.
Substitutions: Smoked paprika can replace sweet paprika if you want a deeper, woodier flavor. If you do not keep rosemary around, use extra thyme.
Tips: The brown sugar is not there to make the chicken taste sweet. It helps the skin color evenly and rounds out the salt, which matters when the oven is hot enough to brown fast.
Butter and Oil
What to use: Two tablespoons softened unsalted butter and 1 tablespoon olive oil.
Preparation: Let the butter sit out long enough to mash easily with a spoon. If it starts to melt into a slick, chill it for a few minutes before mixing.
Substitutions: Ghee works if you want a dairy-free fat with a buttery flavor. Olive oil alone also works, though the skin will be a little less rich.
Tips: The oil loosens the butter just enough to spread under the skin without tearing it, and that small change makes the rub easier to work with on a weeknight when you are not in the mood for a struggle.
Cavity Aromatics
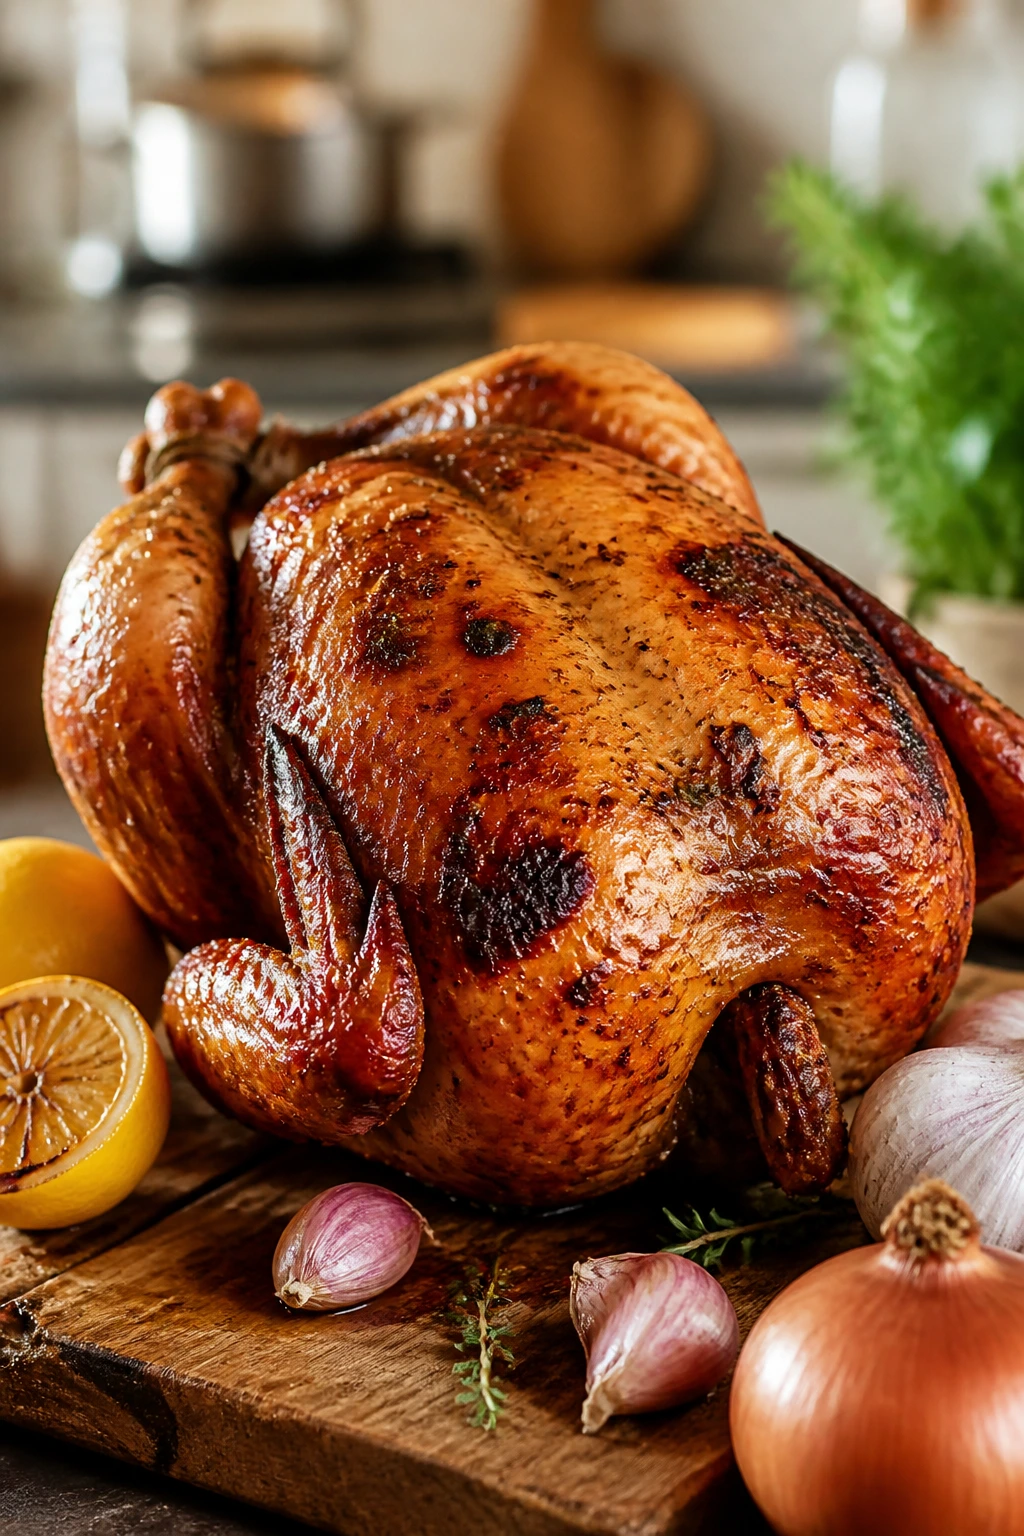
What to use: One lemon, one small onion, and four smashed garlic cloves.
Preparation: Cut the onion into chunky wedges so it perfumes the cavity instead of melting into mush. Halve the lemon and smash the garlic just enough to split the skins.
Substitutions: Orange can replace lemon for a slightly sweeter fragrance. A few sprigs of thyme or parsley can go in too, but keep the cavity loose.
Tips: Do not pack the bird full. You want the aromatics to scent the chicken from the inside, not turn it into a stuffed roast that cooks unevenly.
Serving Finish
What to use: A tablespoon of chopped parsley, optional, for a fresh finish.
Preparation: Chop it at the last minute so it stays bright and doesn’t wilt into a dark pile.
Substitutions: Chives or dill can work if parsley is not in the drawer.
Tips: Fresh herbs are not required, but they wake up the plate, especially if you’re serving the chicken with plain rice or potatoes.
The Equipment That Makes Roasting Easier
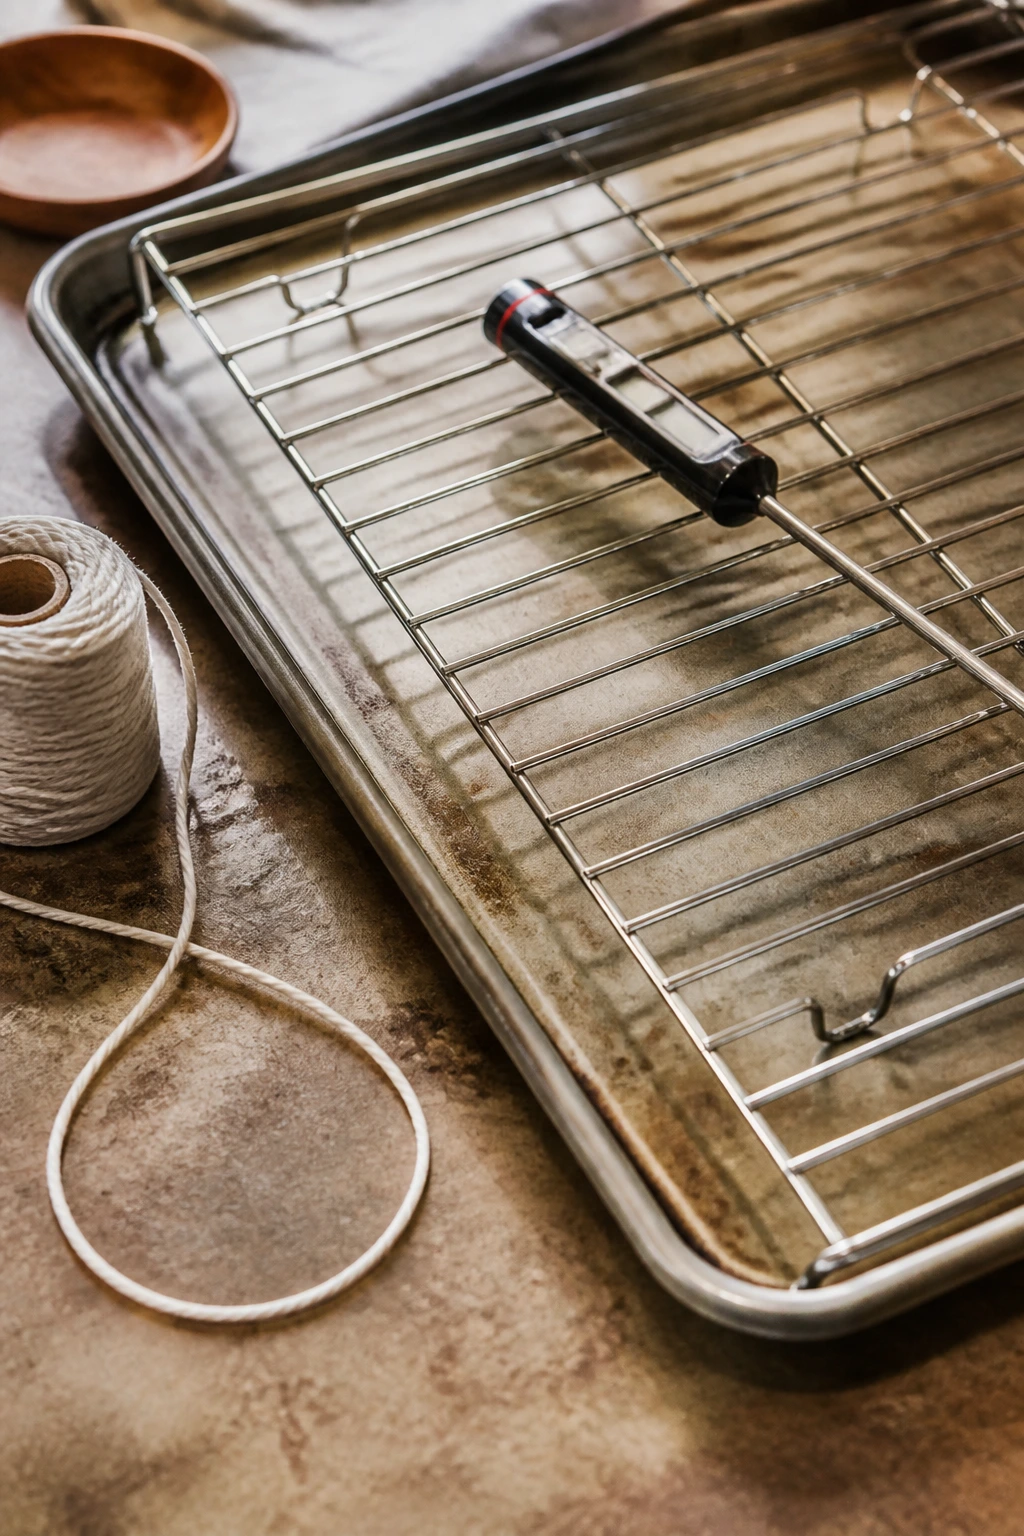
- Rimmed sheet pan or roasting pan: Catching drips matters; otherwise the spice butter burns on the oven floor and smokes.
- Wire rack: This keeps hot air circulating under the chicken so the underside roasts instead of steaming.
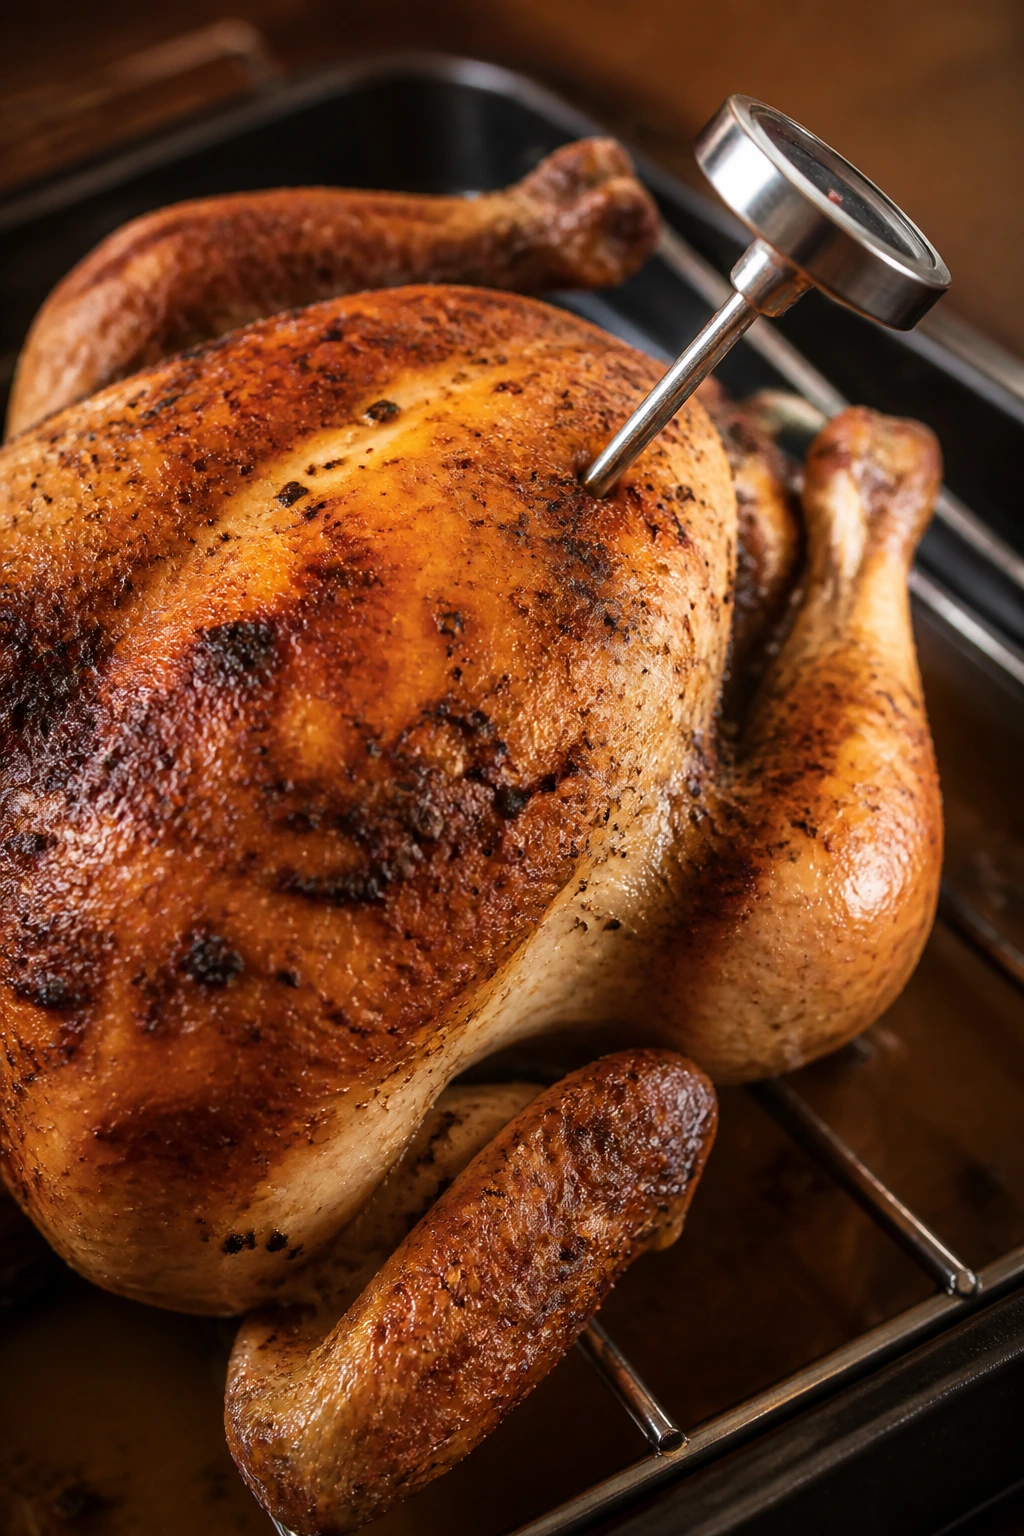
- Instant-read thermometer: The breast and thigh rarely finish at the same time, and this tool keeps you from guessing.
- Kitchen twine: Useful for tying the legs together so the bird cooks in a compact shape.
- Small bowl: For mixing the spice butter into a spreadable paste.
- Paper towels: Dry skin browns better. End of story.
- Carving board with a groove: It keeps the juices from running everywhere when you cut the bird.
- Chef’s knife or carving knife: Either works, but a sharp knife makes cleaner slices and fewer ragged shreds.
- Foil: Handy if the breast browns before the thighs are done.
What Gives It That Rotisserie Counter Flavor
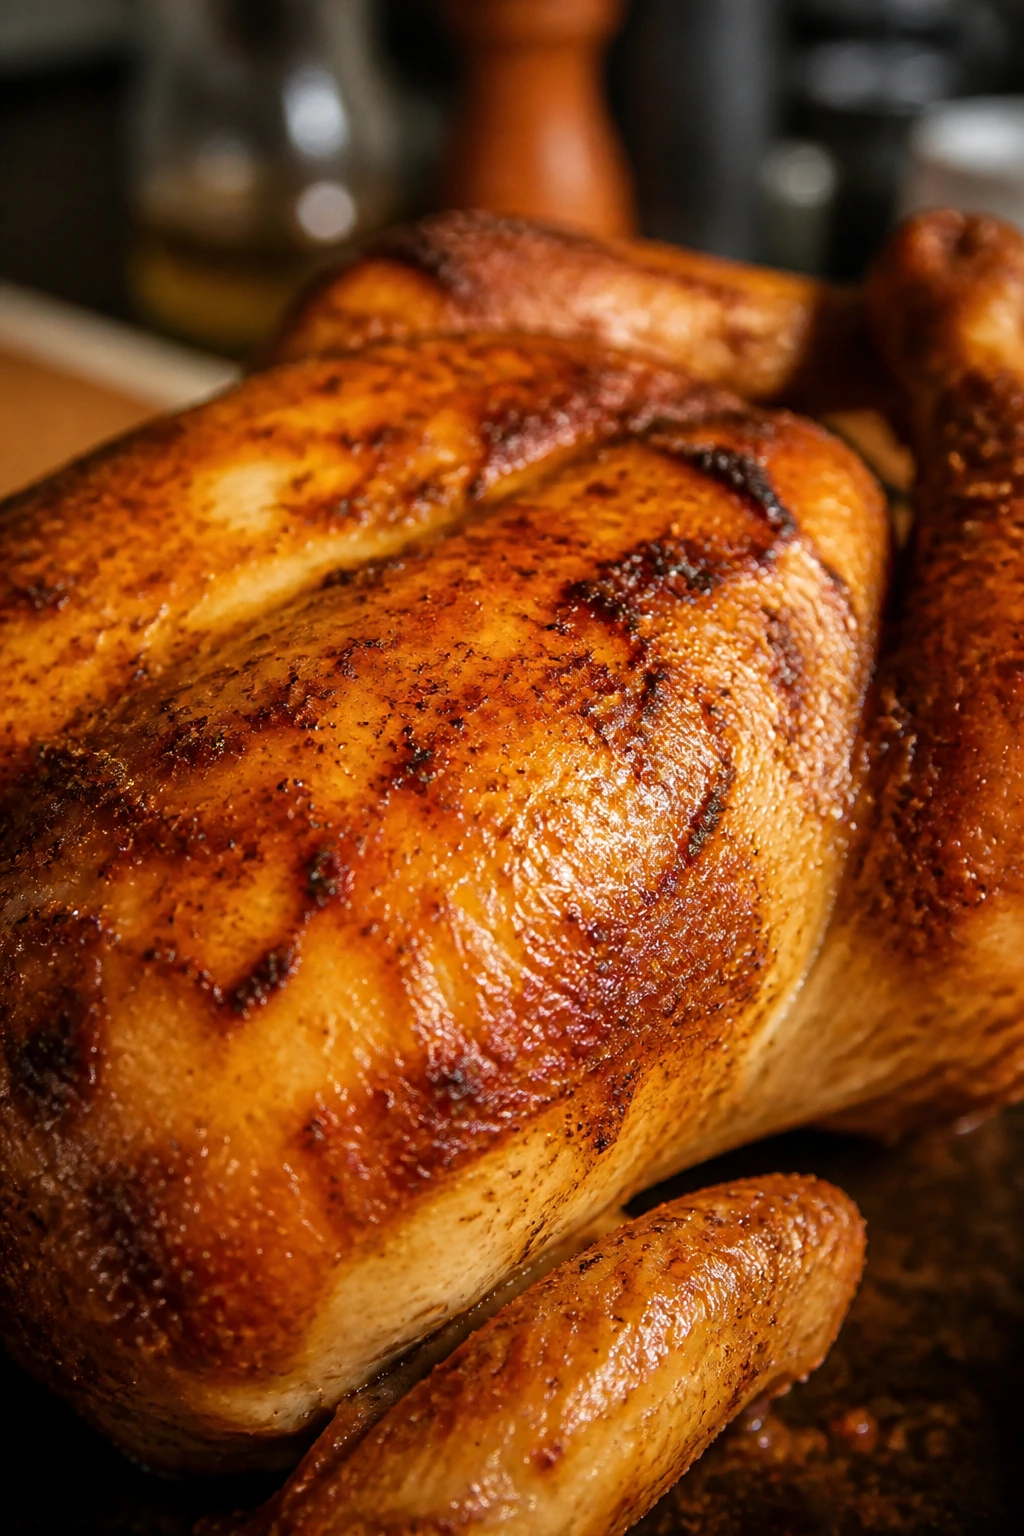
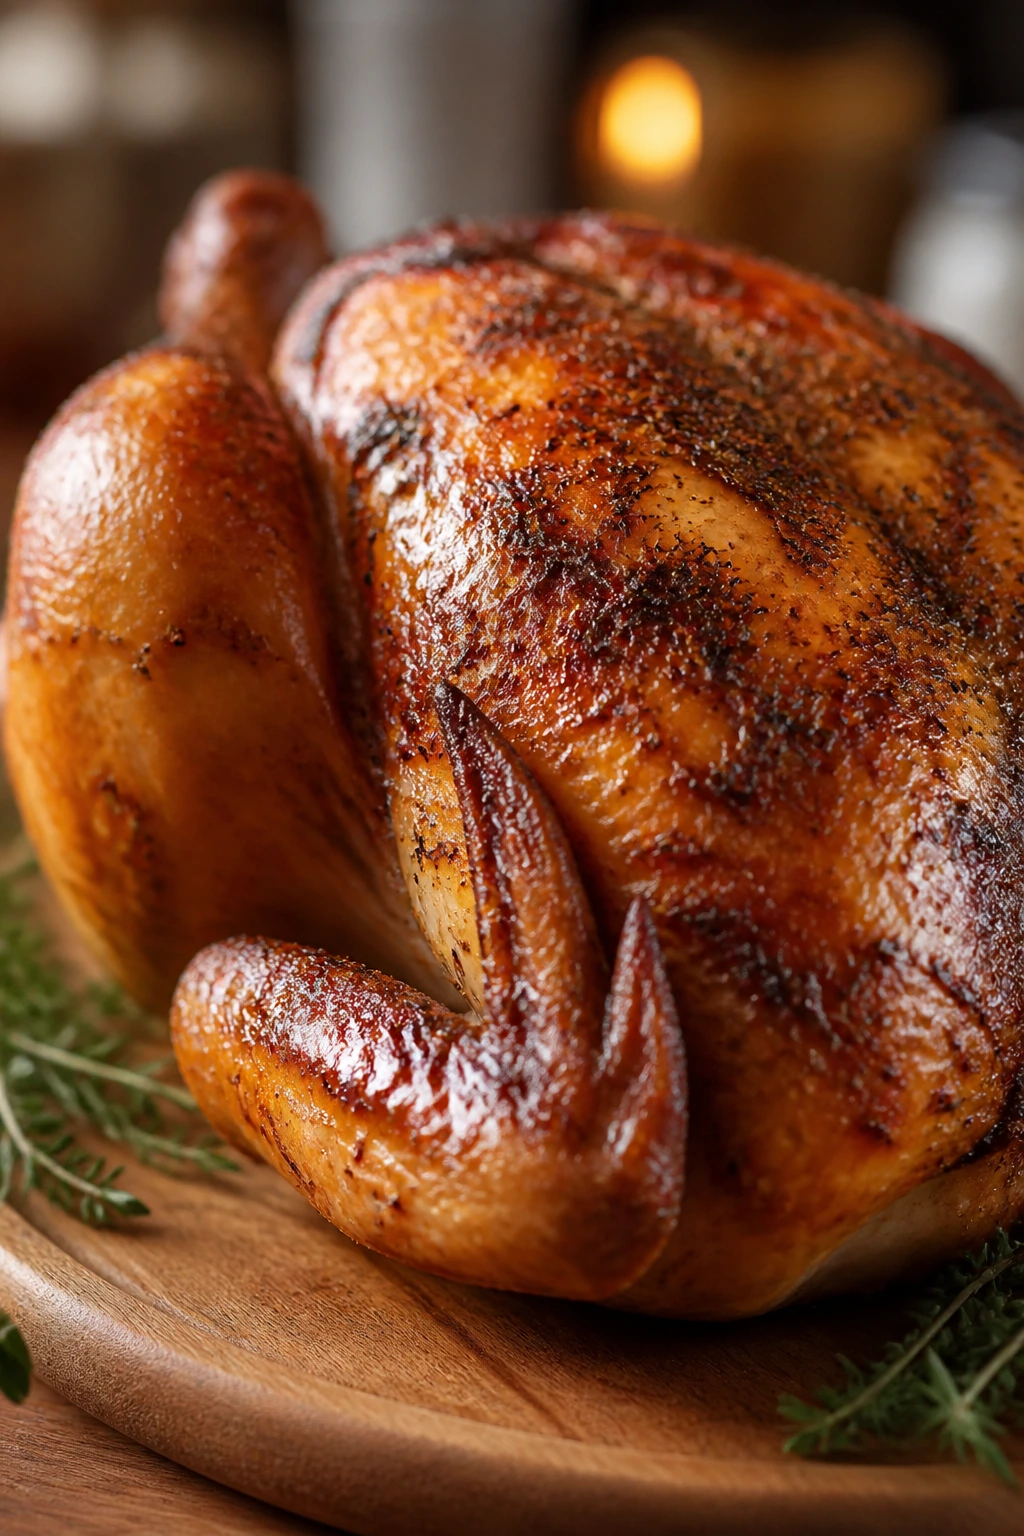
A deli rotisserie chicken tastes like more than salt and heat because the seasoning has usually done three jobs at once: it flavors the skin, it seasons the meat, and it smells warm enough to make the whole kitchen feel finished before the first slice is cut. That is what you want here too.
The spice mix is doing the heavy lifting. Paprika gives color. Garlic and onion powder deepen the savory edge. Thyme and rosemary make the chicken smell like it spent hours in a roasting case, even if it only sat in your oven for a little over an hour. A pinch of brown sugar helps the skin take on that burnished bronze look without turning sweet.
Fat matters more than people think. Butter under the skin keeps the breast from drying out, and olive oil helps the rub spread evenly without clumping. If you’ve ever had a roast chicken where the outside looked seasoned but the meat tasted flat, that’s usually a seasoning distribution problem, not a chicken problem.
And then there is the heat pattern. A hot start at 425°F kicks the skin into browning mode early, then a lower roast finishes the meat without scorching the top. That two-stage method is the difference between a bird that smells roasted and a bird that smells like a toaster got confused.
Timing, Yield, and How Long the Bird Really Needs
A whole chicken is not a set-it-and-forget-it dinner, but it is close enough for a weeknight if you keep the size modest. A 4- to 4 1/2-pound bird usually lands in the oven for about 1 hour and 15 minutes total, though every oven has its own mood. If your bird is closer to 5 pounds, expect another 10 to 15 minutes.
The part that matters most is temperature, not the clock. The breast should come out around 160 to 162°F, then finish climbing to 165°F while it rests. The thigh can go a little higher, and I actually like it that way; dark meat tastes better when it reaches 170 to 175°F and the connective tissue loosens up a bit.
If you have extra time, a dry brine changes the game. Salt the chicken, set it uncovered on a rack in the fridge, and leave it alone for 8 to 24 hours. The skin dries, the salt works deeper into the meat, and the final roast tastes seasoned all the way through instead of only on the outside.
No one gets points for cooking the bird fast if the breast is dry. That’s the wrong bargain.
Getting the Chicken Ready for the Oven
Dry It Until the Skin Feels Ready
Pat the chicken dry inside and out, then keep going for another minute because the first pass is rarely enough. Skin that still looks shiny will steam before it browns, and steamed skin never tastes like rotisserie chicken.
If the chicken came wrapped in a lot of liquid, tip it over the sink and let the cavity drain before you season it. Then blot the cavity, too. A little annoyance here saves you from a soft, rubbery underside later.
Make the Butter Paste Instead of Sprinkling Seasoning
Mix the softened butter, olive oil, salt, paprika, garlic powder, onion powder, thyme, rosemary, black pepper, brown sugar, and cayenne into a thick paste. It should feel spreadable, not runny. If it gets too loose, the rub slides off the skin and lands in the pan, which is where good seasoning goes to die.
Use your fingers to loosen the breast skin gently, starting near the neck opening and working toward the thighs. Slide most of the butter mixture under the skin, then rub the rest over the outside. That little under-skin layer is where the juiciness lives.
Tie the Bird So It Roasts Evenly
Stuff the cavity with the lemon, onion, and garlic, but do not cram them in. Then tie the legs together with kitchen twine and tuck the wing tips under the bird.
Trussing is not a chef-only move. It keeps the chicken compact so the breast and thighs cook at a more even pace, and it stops the wing tips from burning before the rest is done. I skip a lot of kitchen theater. This is not one of those things.
Roast, Rest, and Carve Without Guessing
Optional Dry Brine
- If you have the time, salt the chicken all over with the kosher salt, then set it on a rack over a tray and refrigerate it uncovered for 8 to 24 hours.
- Pull it out while the oven heats so the surface is not ice-cold when it goes in.
Season and Build the Bird 3. Preheat the oven to 425°F (220°C) and position a rack in the center of the oven. 4. Mix the butter, olive oil, paprika, garlic powder, onion powder, thyme, rosemary, black pepper, brown sugar, and cayenne into a smooth paste in a small bowl. 5. Pat the chicken dry again if needed, then loosen the skin over the breast and thighs with your fingers and spread most of the butter paste under the skin. Rub the rest over the outside, getting into the legs and wings. 6. Stuff the cavity with the lemon halves, onion wedges, and smashed garlic, then tie the legs with twine and tuck the wings under the bird.
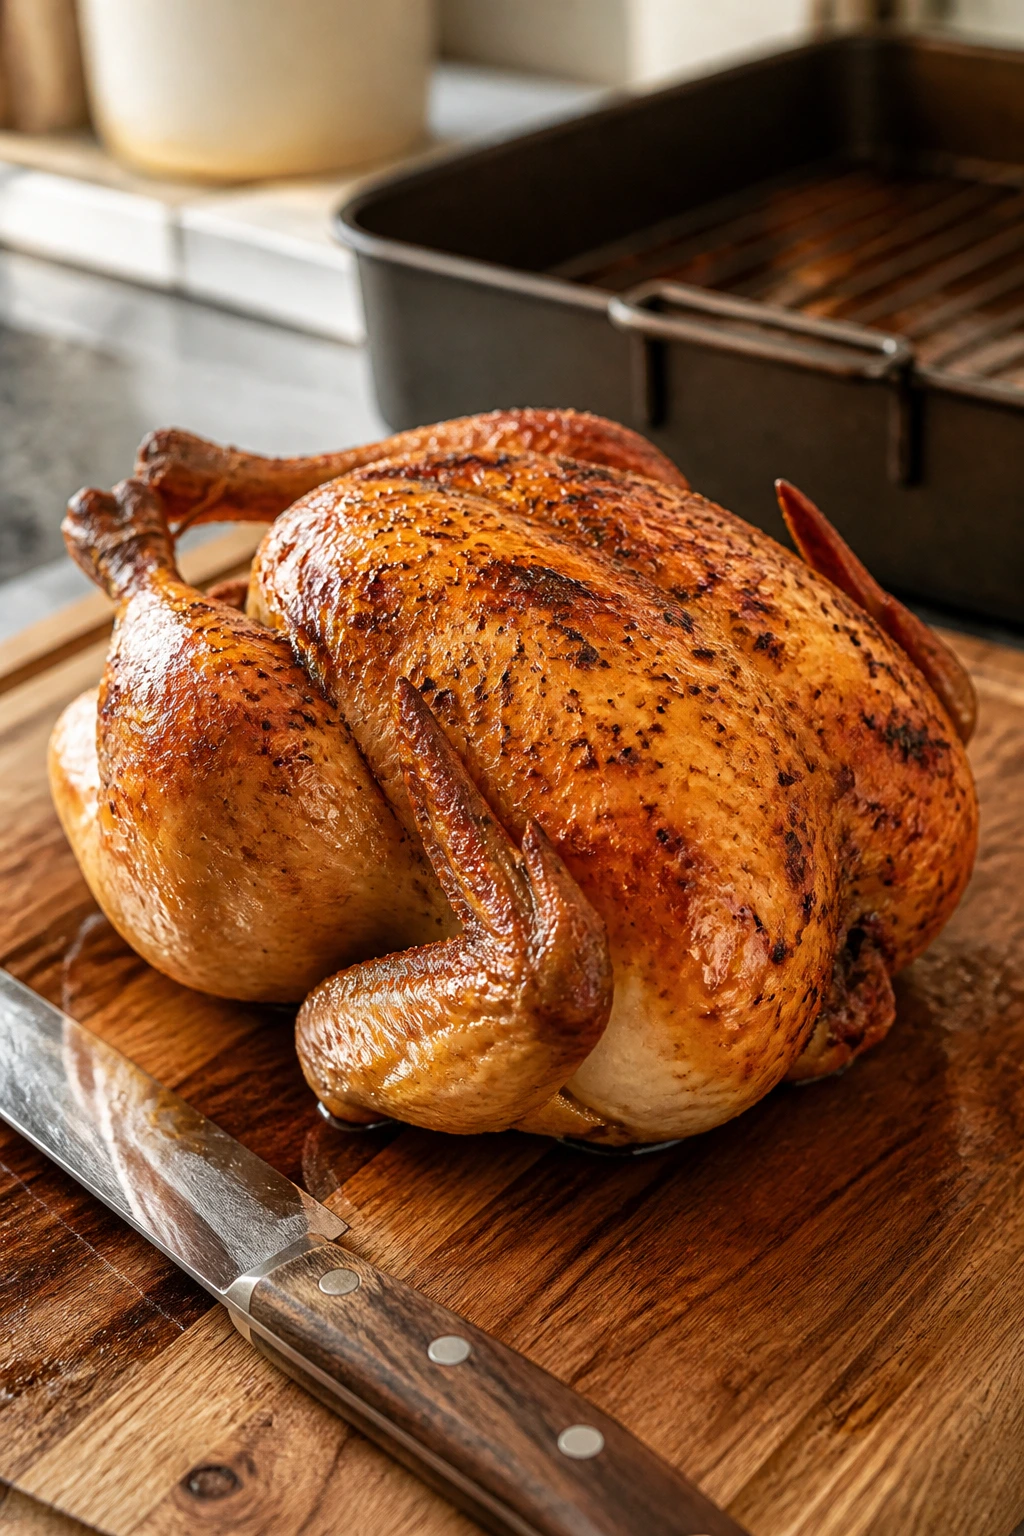
Roast 7. Set the chicken breast-side up on a wire rack inside a rimmed sheet pan or roasting pan. Roast for 20 minutes at 425°F. 8. Reduce the oven temperature to 375°F (190°C) and continue roasting for 35 to 50 minutes more, until an instant-read thermometer inserted into the thickest part of the breast reads 160 to 162°F and the thickest part of the thigh reads 170 to 175°F. 9. If the breast starts turning too dark before the thigh finishes, lay a loose sheet of foil over the top for the final 15 to 20 minutes. Do not seal the foil tight — you want the chicken protected, not steamed. 10. Transfer the chicken to a cutting board and rest for 15 to 20 minutes before carving. Spoon any juices from the board back over the slices or into a small bowl for serving.
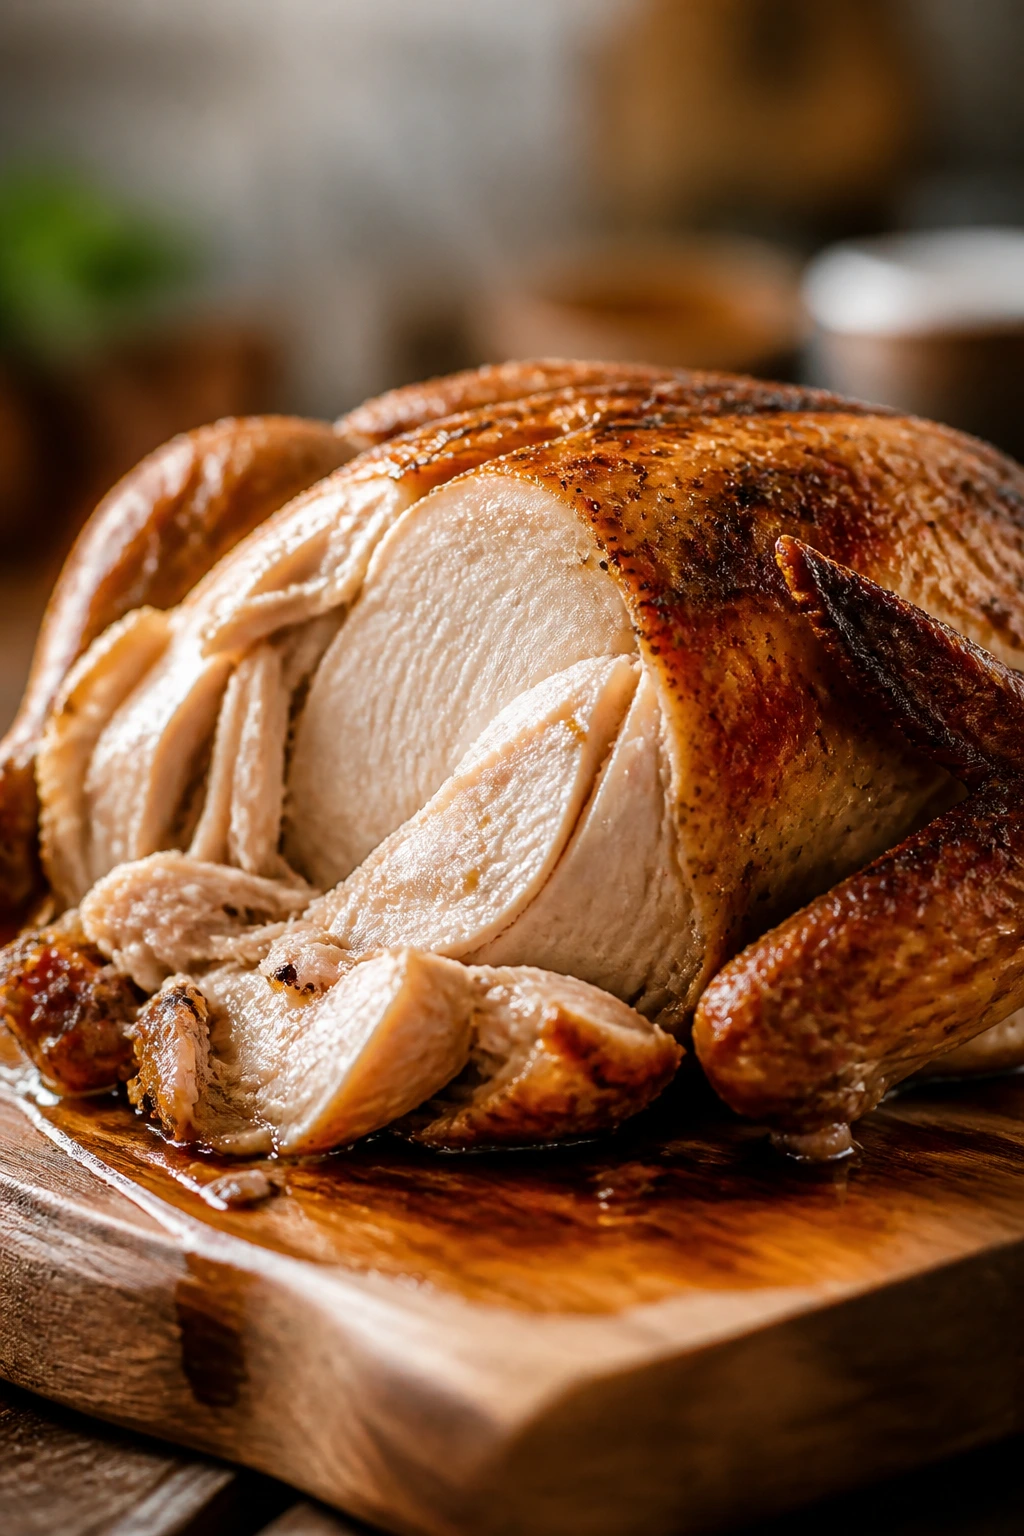
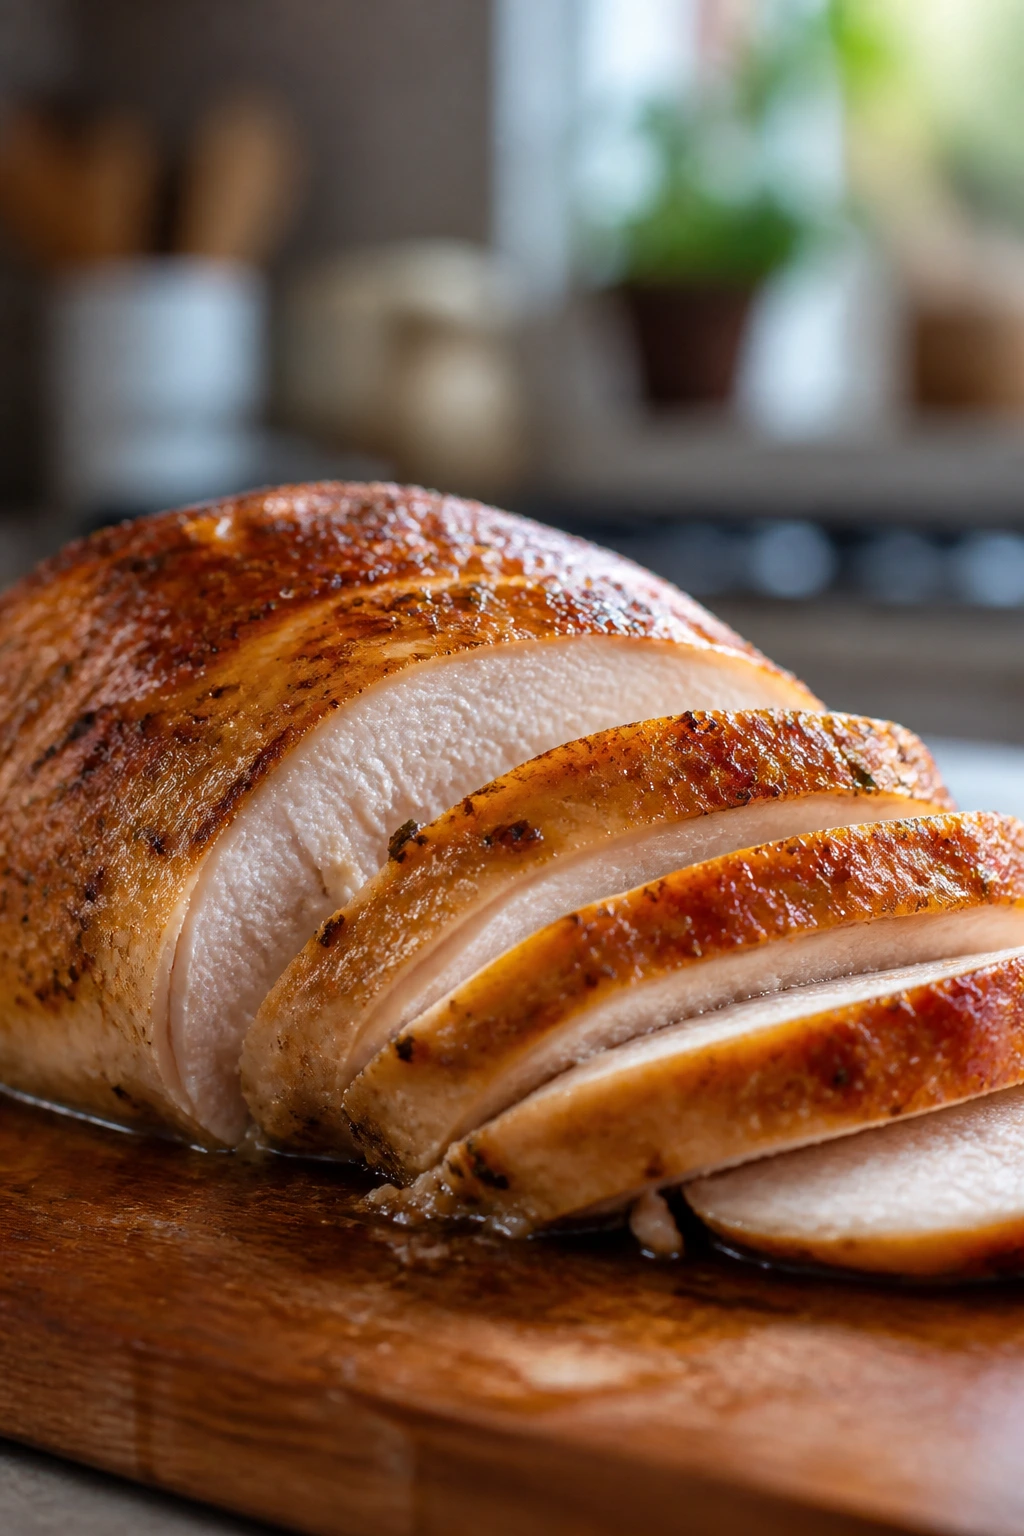
The rest matters. I’m saying it twice because people keep wanting to cut too soon. If you slice a hot chicken straight out of the oven, the juices run onto the board and the breast meat dries out in the first five minutes. Let the bird sit. It pays you back.
How to Plate It for a Weeknight Dinner
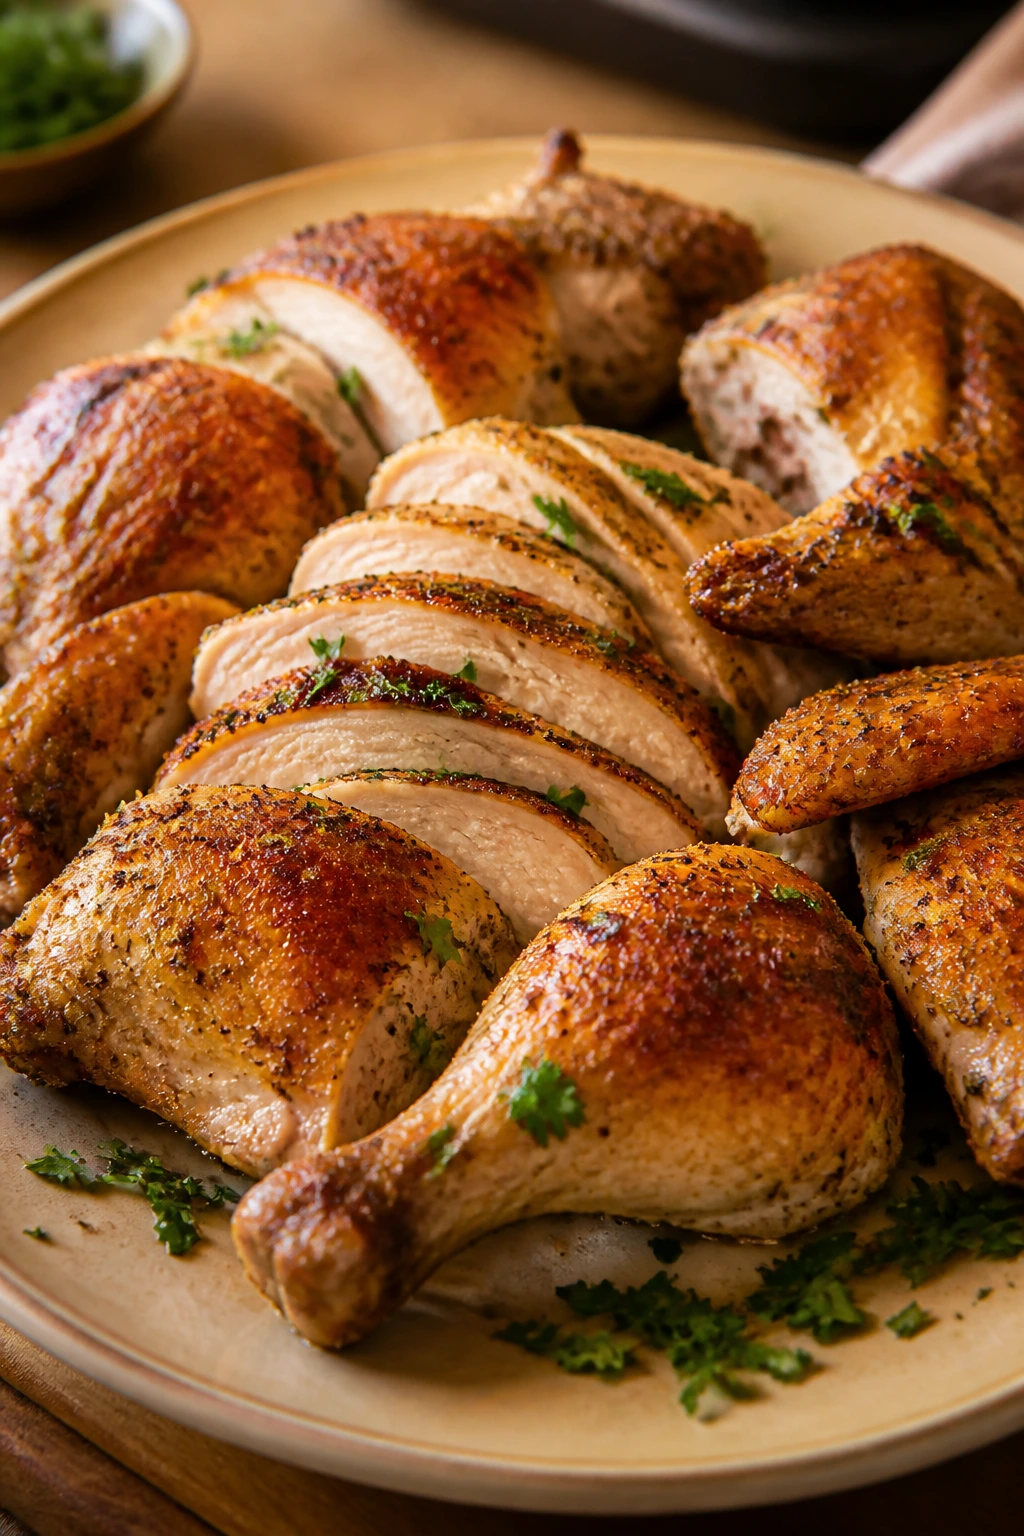
Presentation: Carve the chicken into breast slices, thighs, drumsticks, and wings, then arrange them on a warm platter with a little parsley scattered over the top. If you want it to look especially good, tuck the lemon halves and onion wedges around the edges and spoon a few tablespoons of the resting juices over the slices.
Accompaniments: Keep the sides plain and dependable. Buttered rice, mashed potatoes, roasted green beans, or a simple salad with lemony dressing all work because the chicken already brings the seasoning. I also like it with crusty bread when the oven has been busy and nobody wants to think too hard.
Portions: A 4- to 4 1/2-pound chicken usually feeds 4 hungry people or 6 lighter eaters. For a family dinner, I like to serve one breast half or one thigh per person, plus a scoop of starch and a vegetable. For smaller appetites, slice the breast meat thin and let everybody build a plate with a few pieces rather than a huge pile.
Beverage Pairing: I reach for iced tea, a dry white wine, or a light beer. Nothing flashy. The chicken has enough flavor to carry itself, and the drink should stay in the background where it belongs.
If you are making this on a night when everyone arrives at different times, carve the bird, cover the platter loosely with foil, and keep the meat warm for a short stretch. Better yet, serve it family-style and let people grab what they want while the skin is still crisp at the edges.
Small Adjustments That Keep the Meat Juicy
Salt ahead when you can. Even a few hours in the fridge changes the texture of the meat. The surface dries, the seasoning settles in, and the breast slices come out with more flavor than you’d get from a last-minute rub.
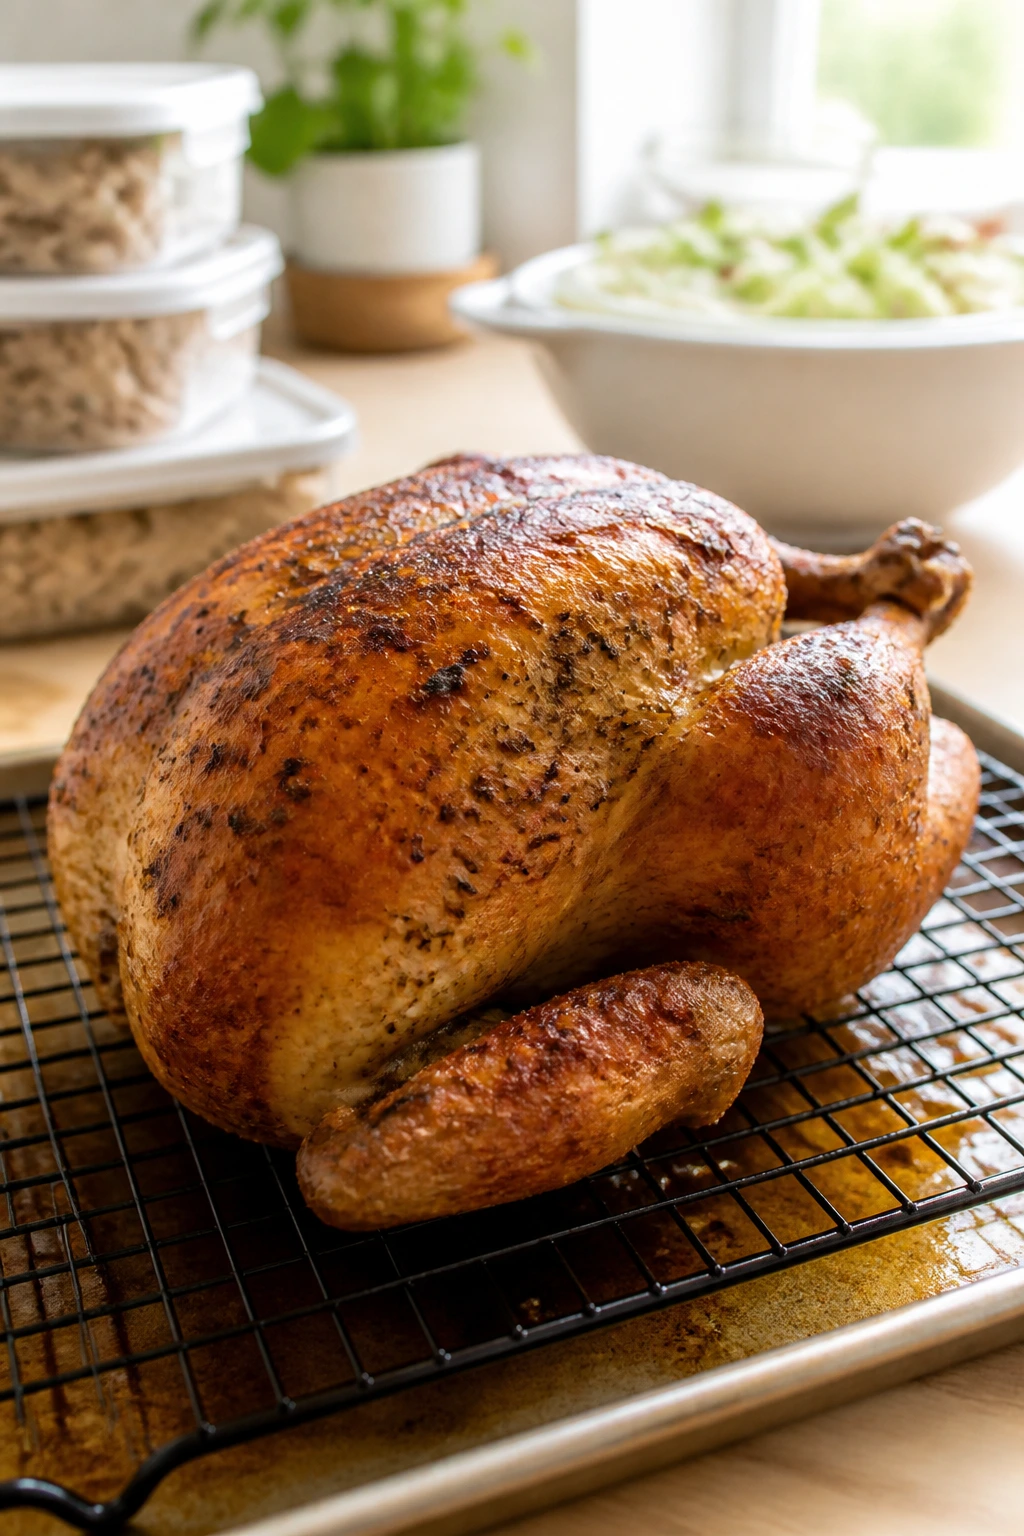
Use the rack. A chicken sitting directly in its own juices will have a soft bottom and a less polished flavor. The rack lets hot air reach the underside and keeps the skin closer to the roasted texture you expect from a rotisserie bird.
Take the breast out first, mentally speaking. Breast meat is the part most likely to overcook while you wait for the thighs to finish. If your thermometer says the breast is at 160°F and the thighs are still a touch shy of 170°F, pull the chicken, tent it loosely, and let carryover heat do the last bit of work.
Save the pan juices. Even without making a sauce, the drippings are worth catching. Spoon them over the carved meat, stir a little into mashed potatoes, or drizzle them onto rice. That is where the roast chicken flavor gets louder.
Let the skin dry before it goes in. If the chicken has been sitting in the fridge uncovered, great. If not, a 20-minute pause on the counter while the oven heats is enough to take the chill off and help the skin roast instead of steam.
The Mistakes That Dry Out Roast Chicken
-
Relying on color instead of temperature: A golden skin can hide a breast that is still a few degrees short or a thigh that’s already gone past the sweet spot. The fix is an instant-read thermometer in two places: breast and thigh.
-
Leaving the chicken wet: Damp skin steams in the oven and turns soft and pale instead of crisp. Blot the bird dry before seasoning, and if it still feels slick, blot it again.
-
Packing the cavity too tightly: A stuffed bird cooks unevenly because the heat can’t move through the center. Keep the lemon, onion, and garlic loose and sparse.
-
Skipping the rest: Cutting immediately sends juices to the board, where they do not help anybody. Rest 15 to 20 minutes, even if the kitchen smells too good to wait.
-
Using a bird that is too large for a weeknight roast: Bigger chickens need more time, and more time means a greater chance of dry breast meat. If you want the process to stay friendly, stay in the 4- to 4 1/2-pound range.
-
Forgetting that ovens have hot spots: If the back corner of your oven browns faster than the front, rotate the pan once during the lower-temperature roast. One quick turn can save the skin from dark patches and the breast from uneven cooking.
Flavor Variations Worth Trying
Lemon-Pepper Deli Style
Double the black pepper to 1 teaspoon and add 1 teaspoon finely grated lemon zest to the butter paste. This version tastes bright, sharp, and a little more snackable, which makes it good for sandwiches the next day.
Smoky Paprika Bird
Swap the paprika for smoked paprika and add a small pinch of cumin. The chicken takes on a deeper, wood-fired smell even though it’s still roasted in a plain oven.
Garlic-Herb Butter Roast
Add 1 tablespoon chopped fresh parsley and 1 teaspoon chopped fresh thyme to the butter mixture, then use a little extra butter under the skin. This one leans softer and more aromatic, the kind of roast I’d serve with potatoes or bread for soaking up the juices.
Spicy Weeknight Roast
Increase the cayenne to 1/2 teaspoon and add 1/2 teaspoon crushed red pepper flakes to the rub. The heat stays in the background rather than burning at the front, so the chicken still tastes like chicken and not like a dare.
All-Olive-Oil Version
Replace the butter with 3 tablespoons olive oil if you want to avoid dairy. The chicken will still brown well, though the skin lands a little leaner and less rich.
Make-Ahead, Storage, and Reheating
If you want to get ahead before the oven ever heats, season the chicken and let it sit uncovered on a rack in the fridge for 8 to 24 hours. That dry-brine window gives you better skin and deeper seasoning without extra work on the cooking night. The spice butter can also be mixed a day ahead and kept covered in the fridge; just let it soften enough to spread before you use it.
Leftover cooked chicken keeps well in the refrigerator for 3 to 4 days in an airtight container. I like to carve the meat off the bones first, then store the breast and dark meat in separate containers if I know I’ll use them differently. The breast is better for sliced sandwiches or quick bowls; the thighs stay juicier in soups and skillet meals.
For freezing, pull the meat from the bones and pack it tightly in freezer bags or containers with as much air pushed out as possible. It keeps for about 2 months with good texture. If you want, add a spoonful of the pan juices before freezing; that tiny bit of moisture helps the meat reheat more kindly.
Reheating needs a gentle hand. For the oven, set the meat in a covered baking dish with 1 to 2 tablespoons chicken stock or water and warm it at 300°F until hot, usually 12 to 15 minutes for sliced meat and a little longer for bone-in pieces. In a skillet, add a splash of stock, cover with a lid, and warm over low heat until the steam loosens the meat. The microwave works in a pinch if you use 50% power and stop the second the center is hot; a damp paper towel over the top helps keep the slices from drying out.
The skin will not stay crisp after storage. That is normal. If you want crisp skin, eat it fresh.
Questions People Ask Before They Roast

Can I make this with a bigger chicken?
Yes, but the timing stretches. A 5- to 5 1/2-pound bird will usually need more time in the oven, and you’ll want to watch the breast temperature closely so the dark meat does not overcook while everything else catches up.
Do I have to truss the legs?
No, but it helps. Trussing keeps the bird compact, helps the thighs cook more evenly, and keeps the cavity aromatics from falling out before the roast is done.
Can I roast this without butter?
You can. Use all olive oil or ghee instead of the butter and oil mix. The chicken will still brown well, though butter gives the finished meat a rounder taste.
What if the skin is browning too fast?
Loosely tent the top with foil and keep roasting until the temperature is right. The foil should sit like a roof, not a blanket, or you’ll lose the browning you worked for.
How do I know the chicken is done if I don’t trust thermometers?
Use one anyway. The juices should run mostly clear, the legs should move easily in the joint, and the breast should feel springy when pressed, but those signs can fool you. The thermometer tells the truth.
Can I use this seasoning on chicken pieces instead of a whole bird?
Absolutely. The same rub works on thighs, drumsticks, or split breasts. You’ll just need to adjust the cooking time because pieces cook faster than a whole chicken.
What if my oven runs hot?
Start checking earlier and keep an eye on the skin during the second half of the roast. If the top is getting dark before the inside is done, foil fixes most of the drama.
Can I serve this cold the next day?
Yes, and the meat is good that way. Thin slices of chilled roast chicken make excellent sandwiches, salad toppers, and lunch boxes, especially when the seasoning has had time to settle overnight.
The Chicken I Keep Coming Back To
There are fancier roast chickens out there. There are birds with wine in the pan, compound butter in the cavities, and enough herbs tucked under the skin to look like a florist got involved. I like those fine. But for weeknight dinners, this plain rotisserie-style roast keeps winning because it does the useful thing first: it feeds people well, with very little drama.
The skin comes out bronzed and fragrant. The breast stays moist if you stop on time. The thighs get the deeper heat they want. And once the carved platter hits the table, nobody asks whether it came from a spit or a sheet pan. They only ask for a second piece.
Make it once, and you’ll see why the whole chicken deserves a regular place in the dinner rotation. After that, the real question is what you want to do with the leftovers.
Juicy Rotisserie Chicken for Weeknight Dinners — Recipe Card
Recipe Name: Juicy Rotisserie Chicken for Weeknight Dinners
Description: A whole chicken roasted with a paprika-garlic herb butter, lemon, onion, and garlic for crisp skin and juicy meat. It tastes like rotisserie chicken from a deli case, only fresher and easier to control at home.
Prep Time: 20 minutes
Cook Time: 1 hour 15 minutes
Total Time: 1 hour 35 minutes
Course: Dinner, Main Course
Cuisine: American
Servings: 4 to 6 servings
Calories: About 420 kcal per serving
Ingredients
For the Chicken
- 1 whole chicken, 4 to 4 1/2 pounds, giblets removed and patted dry
- 1 tablespoon kosher salt, or 2 teaspoons fine sea salt if needed
For the Rotisserie Rub
- 2 teaspoons paprika
- 1 teaspoon garlic powder
- 1 teaspoon onion powder
- 1 teaspoon dried thyme
- 1/2 teaspoon dried rosemary, crushed
- 1/2 teaspoon black pepper
- 1/2 teaspoon brown sugar
- 1/4 teaspoon cayenne pepper, optional
For the Butter Layer
- 2 tablespoons unsalted butter, softened
- 1 tablespoon olive oil
For the Cavity Aromatics
- 1 lemon, halved
- 1 small yellow onion, cut into 4 wedges
- 4 garlic cloves, smashed
For Serving
- 1 tablespoon chopped parsley, optional
Instructions
- Preheat the oven to 425°F (220°C) and position a rack in the center of the oven.
- Pat the chicken dry inside and out. If you have time, salt it and refrigerate it uncovered on a rack for 8 to 24 hours.
- Mix the butter, olive oil, paprika, garlic powder, onion powder, thyme, rosemary, black pepper, brown sugar, and cayenne into a paste.
- Loosen the skin over the breast and thighs, spread most of the butter paste underneath, then rub the rest over the outside.
- Stuff the cavity with the lemon halves, onion wedges, and smashed garlic. Tie the legs together and tuck the wing tips under.
- Set the chicken breast-side up on a wire rack in a rimmed sheet pan or roasting pan and roast for 20 minutes.
- Lower the oven to 375°F (190°C) and continue roasting for 35 to 50 minutes more, until the breast reaches 160 to 162°F and the thigh reaches 170 to 175°F.
- If the skin darkens too quickly, tent loosely with foil for the last 15 to 20 minutes.
- Transfer the chicken to a cutting board and rest for 15 to 20 minutes before carving.
- Carve, spoon over the resting juices, and serve warm.
Notes: Pull the chicken by temperature, not color. If you want crisp skin again after reheating, warm it in the oven, then finish under the broiler for 1 minute with close attention.